DIY Crochet Daisy Girl Pattern: A Cute Mini Amigurumi Doll Tutorial
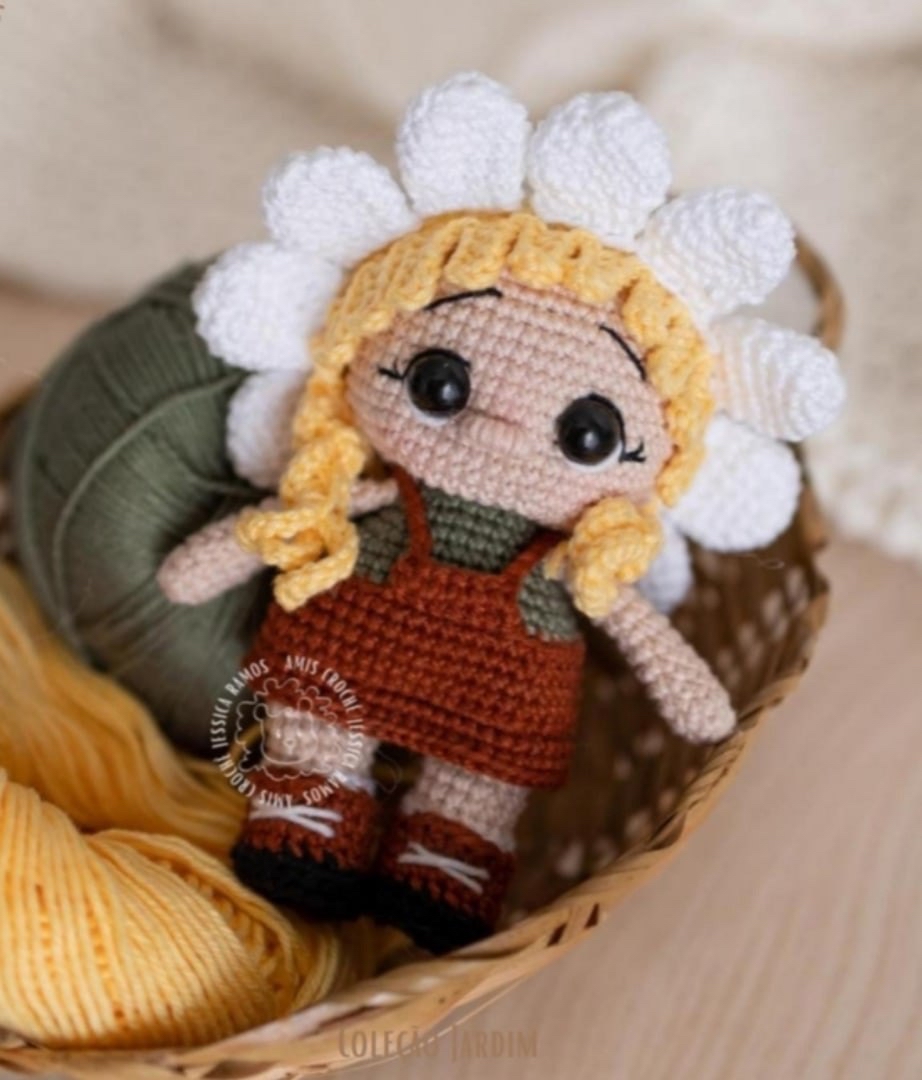
Are you looking for a whimsical, adorable project to add to your crochet collection? This Mini Daisy Girl is the perfect project for crafters who love making small, character-filled amigurumi. With her bright floral headpiece, cute apron, and expressive eyes, she makes a wonderful gift for children, a sweet nursery decoration, or a charming addition to a spring-themed display.
This pattern is designed to be beginner-friendly, focusing on basic stitches while teaching you how to work with color changes and assemble complex shapes. By the end of this tutorial, you will have a finished doll measuring approximately 5.5 inches tall—perfect for tucking into a pocket or displaying on a bookshelf.
Materials & Abbreviations
Before you pick up your hook, ensure you have all the necessary supplies ready. Working with consistent tension is key to making your amigurumi look professional and easy to stuff.
Materials Needed
- Cotton Yarn (Amigurumi weight, approx. 250 yards/125g per skein):
- Beige (for skin/head/arms)
- Yellow (for hair)
- Dark Green (for shirt)
- White (for petals and shoes)
- Rust/Red (for apron and skirt)
- Black (for boots)
- Crochet Hook: 2.0mm (or size needed to achieve tight stitches)
- Safety Eyes: 11mm
- Stuffing: Polyester fiberfill
- Other Essentials: Sewing needle, stitch markers, scissors, and pins
- Optional: Pink blush or makeup for the cheeks
Abbreviations (US Terms)
Please ensure you are using US crochet terminology to follow this pattern correctly:
- MR: Magic Ring
- ch: Chain
- sl st: Slip stitch
- sc: Single crochet
- inc: Increase (2 sc in one stitch)
- dec: Decrease (sc 2 together)
- hdc: Half double crochet
- BLO: Back loop only
- FLO: Front loop only
Step-by-Step Instructions
Arms (Make 2)
Using beige yarn, start with a Magic Ring.
- 6 sc in MR (6)
- (1 sc, inc) x3 (9)
- Rows 3-12: 9 sc (10 rows total)
Fasten off. Fold the tube in half and work 4 sc through both sides to close the arm. Repeat for the second arm.
Legs (Make 2)
We will be changing colors throughout this piece. Start with black yarn.
- 6 sc in MR (6)
- 6 inc (12)
- (1 sc, inc) x6 (18)
- BLO: 18 sl st
Switch to rust/red yarn.
- BLO: 18 sc
- Rows 6-7: 18 sc (2 rows total)
- 8: 7 sc, FLO: 4 hdc, 7 sc
Switch to white yarn.
- FLO: 5 sc, dec, 4 sc, dec, 3 sc, dec (15)
Switch to beige yarn.
- BLO: 15 sc
- Rows 11-13: 15 sc (3 rows total)
Fasten off. Note: For the second leg, do not fasten off. Instead, work 4 sc, then 3 ch to create a joining chain.
Body
We will now join the legs to create the torso. Use the rust/red yarn.
- 14: 15 sc around the first leg, 3 sc in the chain from the second leg, 15 sc around the second leg, 3 sc in the chain (36)
Switch to rust/red yarn.
- 15: FLO: (5 sc, inc) x6 (42)
- 16: (6 sc, inc) x6 (48)
- 17: BLO: 48 sc
- 18-19: 48 sc (2 rows total)
- 20: (14 sc, dec) x3 (45)
- 21: (13 sc, dec) x3 (42)
Switch to dark green yarn.
- 22: BLO: 42 sc
- 23: (5 sc, dec) x6 (36)
- 24: (10 sc, dec) x3 (33)
- 25: (9 sc, dec) x3 (30)
- 26: (8 sc, dec) x3 (27)
- 27: 27 sc (Work the arms into this row by crocheting through both the body and the arm stitches)
- 28: (7 sc, dec) x3 (24)
Head
Continue working from the body using beige yarn.
- 29: (3 sc, inc) x6 (30)
- 30: (4 sc, inc) x6 (36)
- 31: (5 sc, inc) x6 (42)
- 32: (6 sc, inc) x6 (48)
- 33: (7 sc, inc) x6 (54)
- 34-42: 54 sc (9 rows total)
Eye Placement: Insert the 11mm safety eyes between rows 37 and 38. Ensure they are spaced 6 stitches apart. Stuff the head firmly before closing.
- 43: (7 sc, dec) x6 (48)
- 44: (6 sc, dec) x6 (42)
- 45: (5 sc, dec) x6 (36)
- 46: (4 sc, dec) x6 (30)
- 47: (3 sc, dec) x6 (24)
- 48: (2 sc, dec) x6 (18)
- 49: (1 sc, dec) x6 (12)
- 50: 6 dec (6)
Skirt & Apron
Skirt: Join the rust/red yarn to the front loops of row 16 of the body.
- 1-2: 48 sc (2 rows total)
Apron: Join the rust/red yarn to the center of the front loops on row 21 of the body.
- 1-2: 6 sc, ch, turn.
Crochet a chain of your desired length and connect it to the other side of the apron to complete the strap.
Hair Cap & Strands
Using yellow yarn, we will first create a cap to sit on the head.
- 1: 6 sc in MR (6)
- 2: 6 inc (12)
- 3: (1 sc, inc) x6 (18)
- 4: (2 sc, inc) x6 (24)
- 5: (3 sc, inc) x6 (30)
- 6: (4 sc, inc) x6 (36)
- 7: (5 sc, inc) x6 (42)
- 8: (6 sc, inc) x6 (48)
- 9: (7 sc, inc) x6 (54)
- 10: (8 sc, inc) x6 (60)
- 11-14: 60 sc (4 rows total)
- 15: BLO: 60 sc
Hair Strands: Now, we create the decorative strands to attach to the cap.
- Short Strands (Make 9): 6 ch, 3 ch back, 4 hdc, 2 sl st into row 15 of the cap.
- Medium Strand (Make 1): 6 ch, 3 ch back, 4 hdc, 5 sl st into row 15 of the cap.
- Long Strands (Make 6): 21 ch, 2 ch back, 20 sc, 2 sl st into row 15 of the cap.
Daisy Petals
Make 12 petals using white yarn.
- 1: 6 sc in MR (6)
- 2: 6 inc (12)
- 3: (3 sc, inc) x3 (15)
- 4-5: 15 sc (2 rows total)
- 6: (3 sc, dec) x3 (12)
- 7: (2 sc, dec) x3 (9)
Fold each petal in half and work 4 sc through both sides to close the shape.
Finishing
Now for the most rewarding part: bringing your character to life!
Facial Details
Using black embroidery thread or thin yarn, carefully stitch the facial features. To give her that classic “flower girl” look, embroider the nose, eyelashes, and eyebrows. To add depth to the eyes, you can embroider small white highlights or “eye whites” around the safety eyes. Use a beige thread to pull the inner corners of the eyes slightly inward for an expressive, slightly sleepy look.
Assembly
- The Hair: Sew the yellow hair cap onto the head. Arrange the hair strands so they frame the face naturally.
- The Petals: Sew the 12 white petals around the edge of the hair cap to create the daisy effect.
- The Cheeks: For the final touch, use a little bit of pink blush on a brush to lightly apply color to the cheeks. This gives the doll a soft, sweet appearance.
Tips for Success
- Use a Stitch Marker: In amigurumi, it is very easy to lose track of where a round begins. Always use a marker to stay on track.
- Mind Your Tension: If your stuffing is showing through the stitches, your tension might be too loose. Try using a slightly smaller hook if this happens.
- Color Changes: When changing colors, try to pull the new color through the final loop of the previous stitch to ensure a clean transition.
- Eye Placement: If you aren’t sure where the eyes go, pin them in place first and look at the doll from different angles before making them permanent.