Cute Hatching Chick Crochet Pattern: Free Amigurumi Tutorial
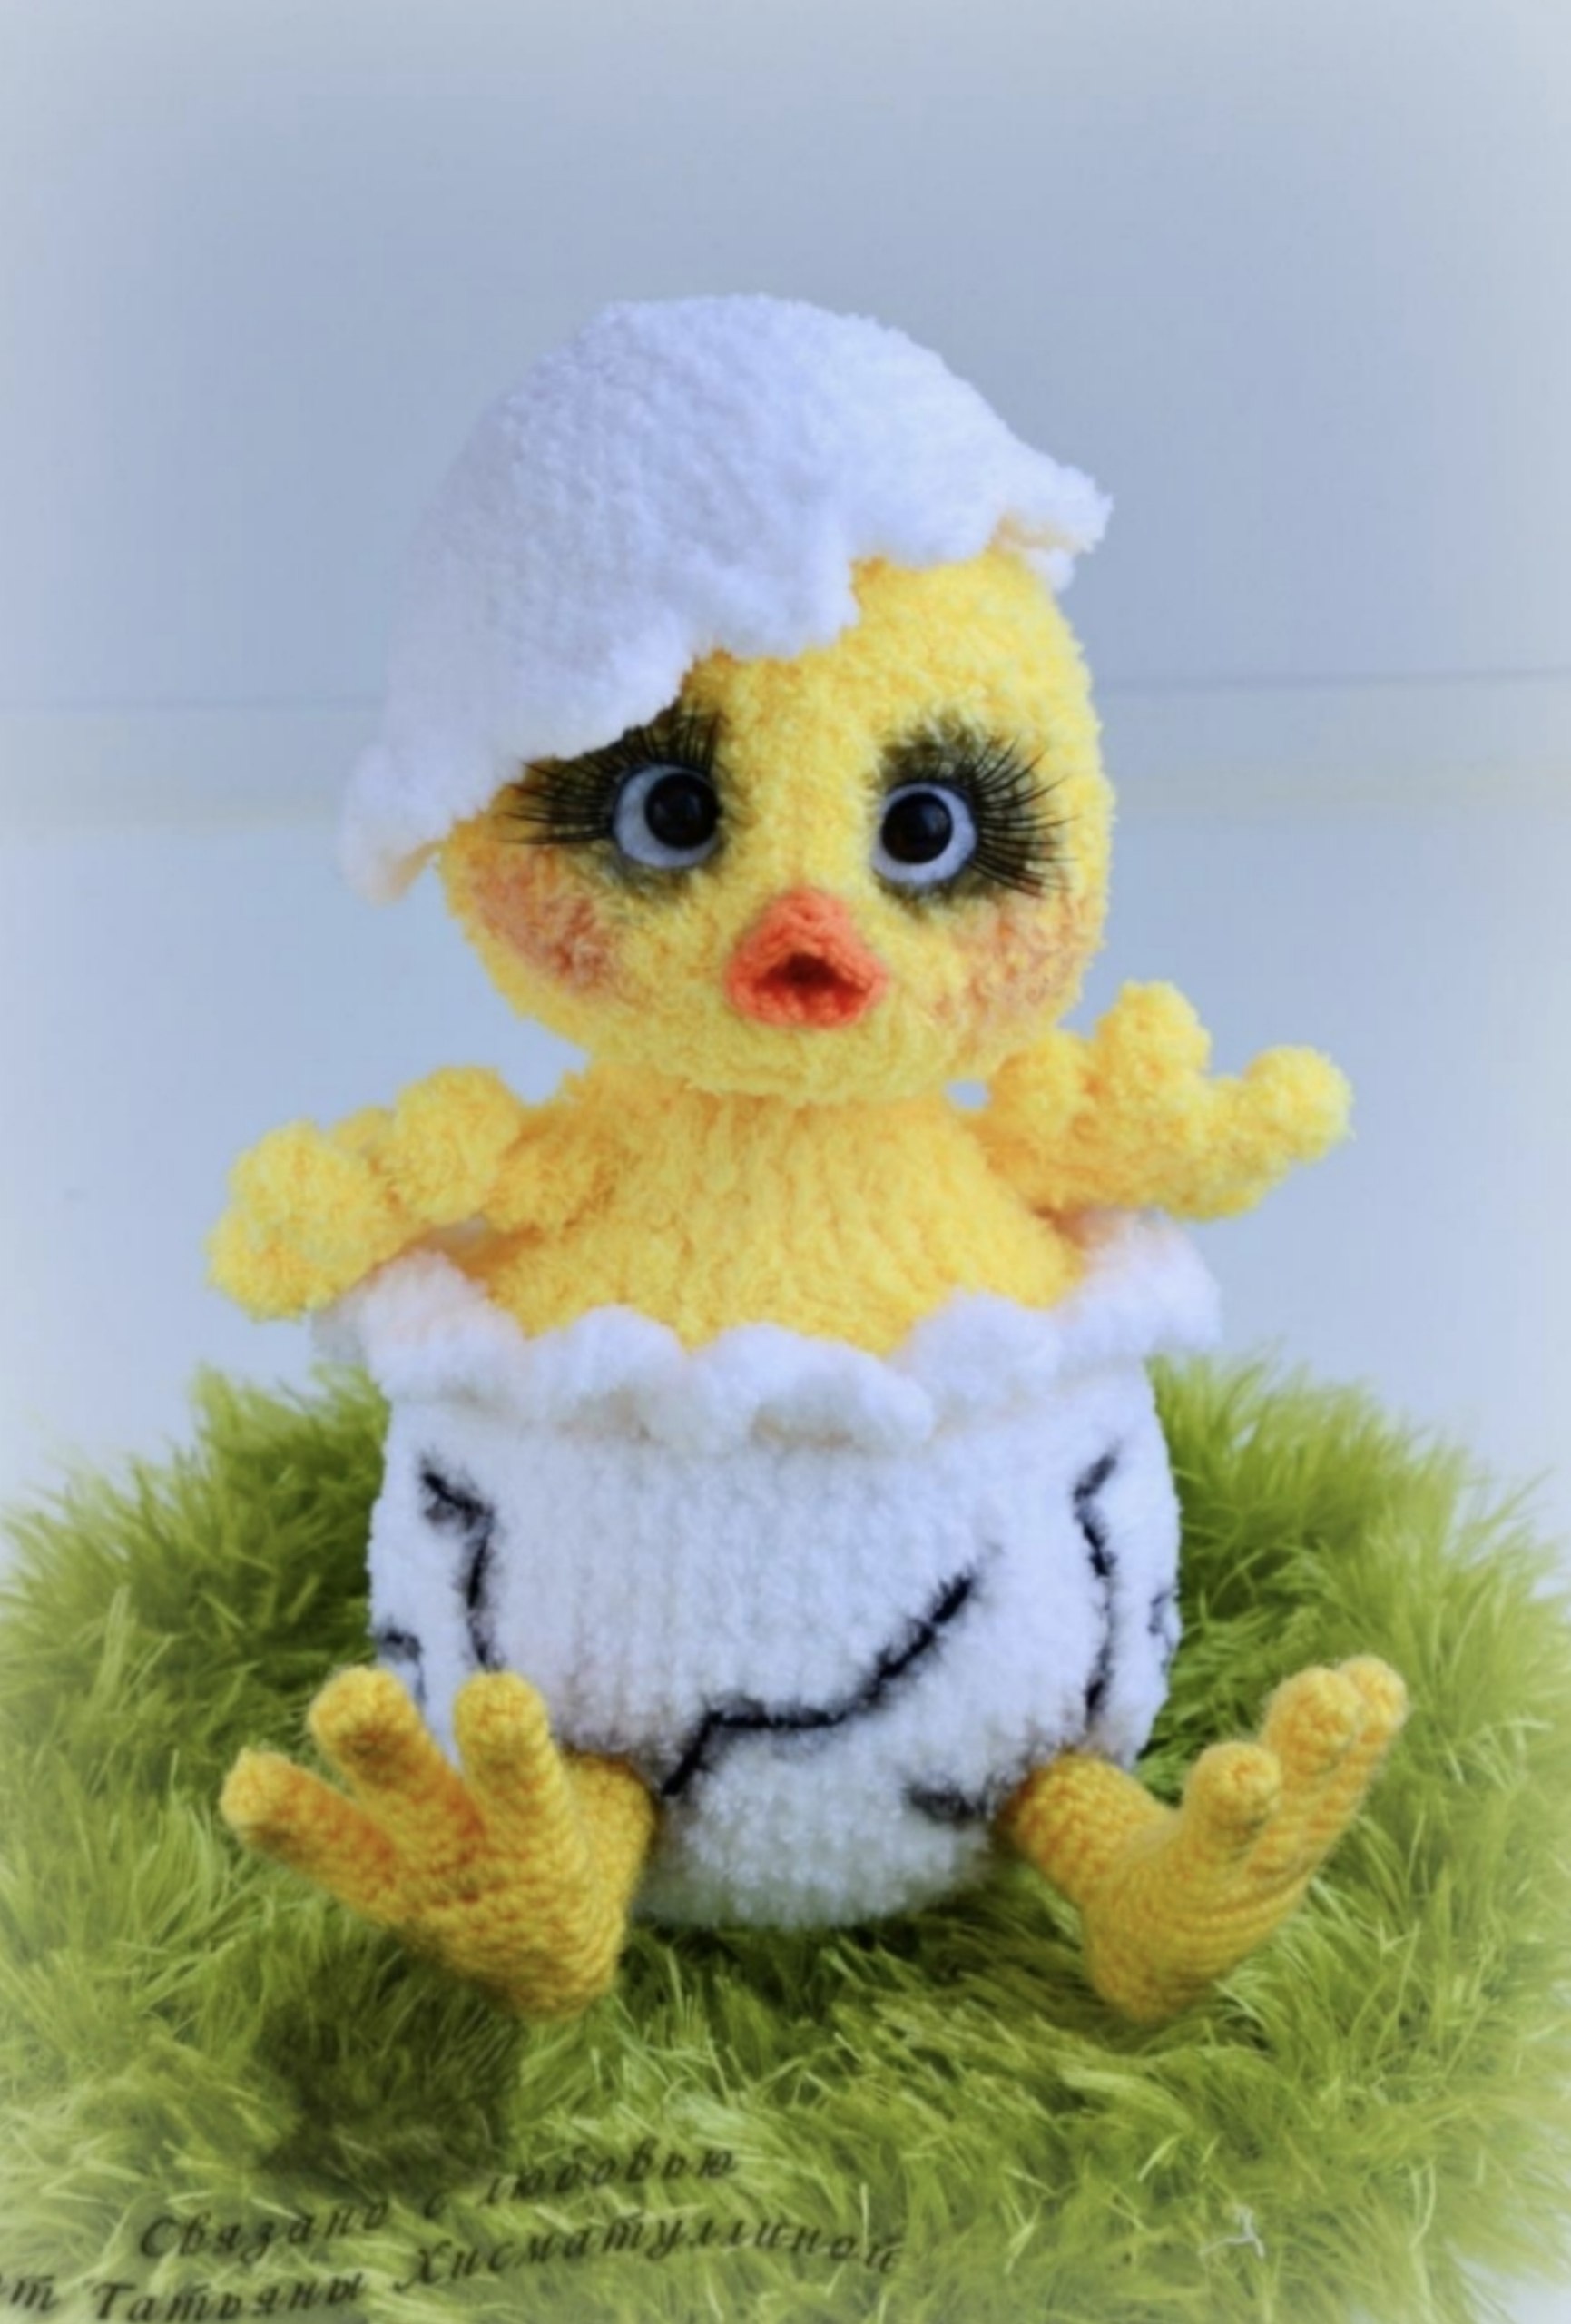
There is nothing quite as sweet as a tiny baby chick emerging from its shell! This adorable amigurumi project is perfect for beginners and experienced crocheters alike. Whether you are looking for a charming spring decoration, a unique gift, or a new addition to your plushie collection, this little chick is sure to bring a smile to everyone’s face.
The finished chick stands approximately 7.5 inches tall and features a poseable head thanks to a simple hardware joint, giving it a professional, toy-store quality feel. In this tutorial, we will walk you through creating the chick, the eggshell, and the final artistic details that bring the character to life.
Materials & Abbreviations
To get started, gather the following materials. We recommend using a textured or “chenille” style yarn to give the chick that fluffy, realistic downy look.
Materials Needed
- Yellow Textured Yarn: For the chick’s body and head.
- White Textured Yarn: For the eggshell pieces.
- Orange Smooth Yarn: For the beak and feet.
- Crochet Hooks: 2.0mm and 2.5mm.
- Hardware Joint: One 1.2-inch bolt, two 1.2-inch washers, and one matching nut.
- Eyes: Small pieces of white felt, two 8mm black half-beads (or safety eyes), and black embroidery thread.
- Toning Tools: Oil pastels, eyeshadow, or blush and a small brush for adding color to the cheeks and eyes.
- Miscellaneous: Polyester fiberfill stuffing, a yarn needle, strong universal glue, and optional faux eyelashes.
Abbreviations (US Terms)
- ch: chain
- sc: single crochet
- inc: increase (2 sc in one stitch)
- dec: decrease (sc 2 together)
- dec2: double decrease (sc 3 together)
- dc: double crochet
- tr: treble crochet
- sl st: slip stitch
- BLO: back loop only
- st(s): stitch(es)
- Rnd: round
Step-by-Step Instructions
All parts of this toy are worked in a continuous spiral. Please use a stitch marker to keep track of the beginning of each round.
The Head
Use the yellow textured yarn and a 2.5mm hook.
- Rnd 1: Create a magic ring and work 6 sc into it. (6)
- Rnd 2: inc in each st around. (12)
- Rnd 3: (1 sc, inc) repeat 6 times. (18)
- Rnd 4: (2 sc, inc) repeat 6 times. (24)
- Rnd 5: (3 sc, inc) repeat 6 times. (30)
- Rnd 6: (4 sc, inc) repeat 6 times. (36)
- Rnd 7: (5 sc, inc) repeat 6 times. (42)
- Rnd 8-13: sc in each st around. (42)
- Rnd 14: (5 sc, dec) repeat 6 times. (36)
- Rnd 15: (4 sc, dec) repeat 6 times. (30)
- Rnd 16: (3 sc, dec) repeat 6 times. (24)
- Rnd 17: (2 sc, dec) repeat 6 times. (18)
Pro Tip: At this stage, insert the bolt with the washer attached to the bottom of the head. Stuff the head firmly with fiberfill around the hardware.
- Rnd 18: (1 sc, inc) repeat 6 times. (12)
- Rnd 19: dec repeat 6 times. (6)
Fasten off and weave in the end. The bolt should now be protruding from the bottom of the head.
The Body and Bottom Shell
Continue with yellow textured yarn.
- Rnd 1: Magic ring, 6 sc. (6)
- Rnd 2: inc in each st around. (12)
- Rnd 3: (1 sc, inc) repeat 6 times. (18)
- Rnd 4: (2 sc, inc) repeat 6 times. (24)
- Rnd 5: (3 sc, inc) repeat 6 times. (30)
- Rnd 6-7: sc in each st around. (30)
- Rnd 8: (4 sc, inc) repeat 6 times. (36)
- Rnd 9: (5 sc, inc) repeat 6 times. (42)
- Rnd 10: (6 sc, inc) repeat 6 times. (48)
- Rnd 11: sc in each st around. (48)
Switch to white textured yarn for the shell:
- Rnd 12: sc in each st around working in BLO. (48)
- Rnd 13: (7 sc, inc) repeat 6 times. (54)
- Rnd 14-16: sc in each st around. (54)
- Rnd 17: (8 sc, inc) repeat 6 times. (60)
- Rnd 18-21: sc in each st around. (60)
- Rnd 22: (8 sc, dec) repeat 6 times. (54)
- Rnd 23: (7 sc, dec) repeat 6 times. (48)
- Rnd 24: (6 sc, dec) repeat 6 times. (42)
- Rnd 25: (5 sc, dec) repeat 6 times. (36)
- Rnd 26: (4 sc, dec) repeat 6 times. (30)
- Rnd 27: (1 sc, dec) repeat 10 times. (20)
- Rnd 28: (2 sc, dec) repeat 5 times. (15)
- Rnd 29: dec2 repeat 5 times. (5)
Stuff the body firmly, fasten off, and sew the hole closed.
The Eggshell Top (Hat)
Use white textured yarn.
- Rnd 1: Magic ring, 6 sc. (6)
- Rnd 2: inc in each st around. (12)
- Rnd 3: (1 sc, inc) repeat 6 times. (18)
- Rnd 4: (2 sc, inc) repeat 6 times. (24)
- Rnd 5: (3 sc, inc) repeat 6 times. (30)
- Rnd 6: (4 sc, inc) repeat 6 times. (36)
- Rnd 7: (5 sc, inc) repeat 6 times. (42)
- Rnd 8: (6 sc, inc) repeat 6 times. (48)
- Rnd 9-12: sc in each st around. (48)
Jagged Edge: To create the broken shell look, work one final round as follows: (sc, ch 1, dc, tr, ch 1, sl st) repeat around the edge to create small peaks. Fasten off.
The Beak
Use orange smooth yarn and a 2.0mm hook.
- Rnd 1: ch 12, join with a sl st to form a ring.
- Rnd 2: 5 sc, 1 dc, 1 tr, 1 dc, 4 sc.
Fasten off, leaving a long tail for sewing.
The Feet
Use orange smooth yarn. You will make 6 toes in total (3 for each foot).
- Toe 1 (Make 2): Rnd 1: Magic ring 6 sc. Rnd 2-5: sc around. (6)
- Toe 2 (Make 2): Rnd 1: Magic ring 6 sc. Rnd 2-6: sc around. (6)
- Toe 3 (Make 2): Rnd 1: Magic ring 6 sc. Rnd 2-5: sc around. (6)
Joining the Toes: Do not fasten off the third toe. Work around the three toes in one round: (2 sc on toe 3, 3 sc on toe 2, 6 sc on toe 1, 3 sc on toe 2, 4 sc on toe 3). (18)
- Rnd 2: sc around. (18)
- Rnd 3: 7 sc, dec, 7 sc, dec. (16)
- Rnd 4: 6 sc, dec, 6 sc, dec. (14)
- Rnd 5: 5 sc, dec, 5 sc, dec. (12)
- Rnd 6: sc around. (12)
- Rnd 7: dec repeat 6 times. (6)
The Leg: Join yarn to the top of the foot and work 4 rounds of 12 sc to create the leg. Repeat for the second foot.
The Wings
Using yellow textured yarn, crochet two small flat ovals. You can simply ch 5, sc around the chain, and increase at the ends to create a small leaf-like wing shape.
Finishing & Assembly
Putting it Together
Slide the head bolt through the top of the body. Secure it with a washer and a nut on the inside of the body. This allows the chick’s head to tilt and turn.
- Beak: Glue or sew the beak to the center of the face.
- Wings & Feet: Sew the wings to the sides of the body and the feet to the bottom of the shell.
- Shell Hat: Place the shell top on the head and sew it in place.
Face Sculpting and Toning
This is where the chick gains its personality! Use a long needle and strong thread to perform “eye indentations.” Insert the needle from the back of the head, through the eye area, and back down to the nose area. Pull tight to create a dip for the eye. Repeat for both sides.
- Eyes: Glue small white felt circles onto the indentations and place a black bead in the center. Add faux eyelashes for an extra cute look.
- Toning: Use a brush and a little bit of pink blush or eyeshadow to add color to the cheeks. Use a dark brown or black oil pastel to lightly shade the corners of the eyes and the inside of the beak to add depth.
- Shell Details: Using black embroidery thread, sew jagged “crack” lines onto the white shell to make it look like it’s actually breaking open.
Tips for Success
- Yarn Tension: Textured yarn can be difficult to see stitches in. Use your fingers to feel for the gaps between stitches rather than relying only on your eyes.
- Stuffing: Stuff the head and body very firmly. This ensures that the bolt joint remains stable and the chick keeps its shape.
- Toning: Always start with a very small amount of makeup. You can always add more, but it’s hard to remove from fuzzy yarn!