Cute Crochet Puppy Pattern: A Step-by-Step Amigurumi Tutorial
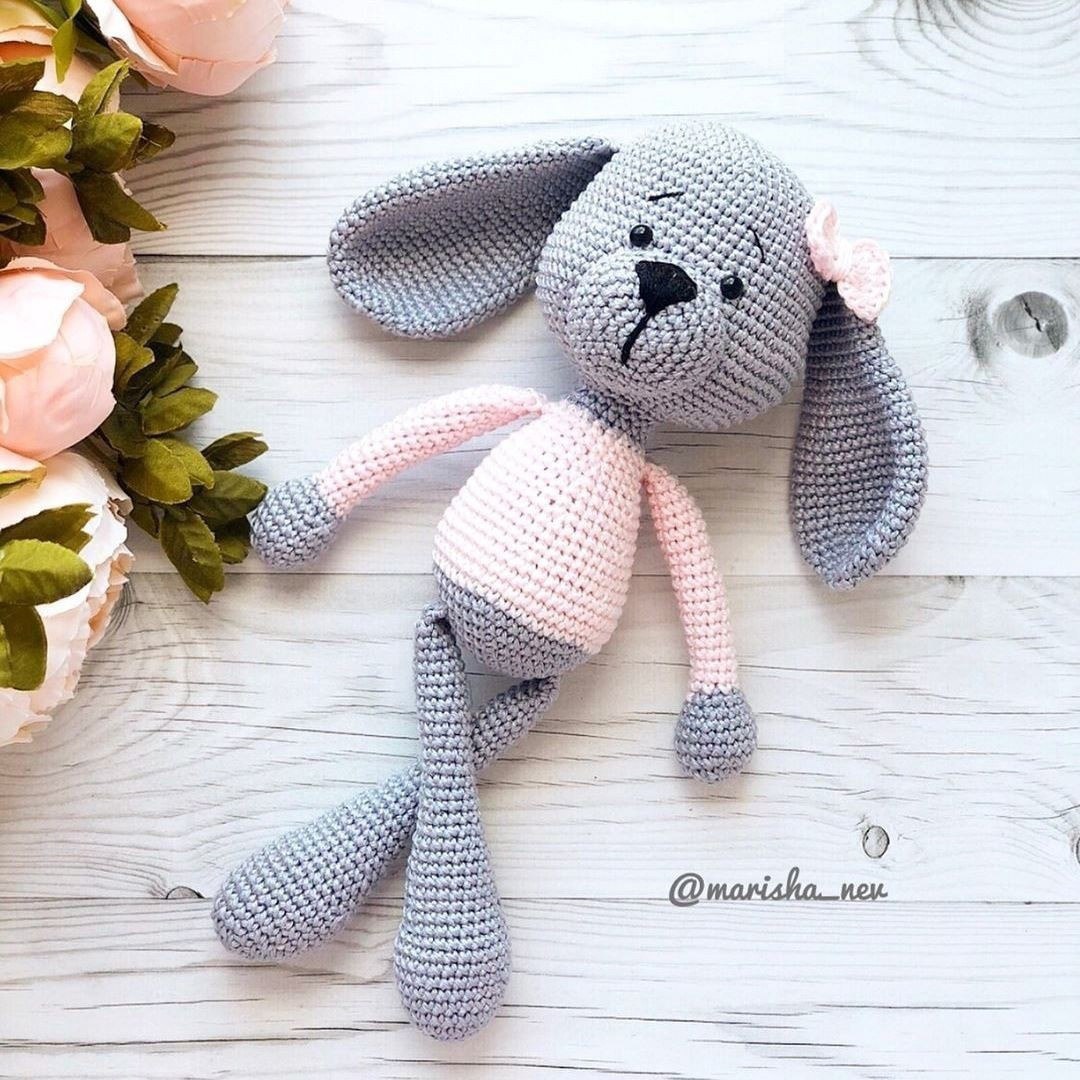
Are you looking for a heartwarming project to brighten up a nursery or a perfect handmade gift for a baby shower? This adorable little crochet puppy is the answer! With its soft grey fur, sweet pink accents, and tiny sweater, this amigurumi dog is as charming as it is simple to make. Whether you are a seasoned maker or a beginner looking to practice your amigurumi skills, this detailed guide will walk you through every stitch.
This pattern creates a sitting puppy with long, floppy ears and expressive features. The project is worked in rounds using the common amigurumi technique, ensuring a tight, professional-looking finish that keeps the stuffing tucked safely inside. Grab your hook and some cozy yarn, and let’s bring this little pup to life!
Materials & Abbreviations
Before we dive into the stitches, let’s make sure you have everything you need on your crafting table. For a project like this, using a slightly smaller hook than recommended on your yarn label is a great trick to keep the stitches tight so the stuffing doesn’t peek through.
What You Will Need:
- Yarn: Medium weight (worsted) yarn in Grey (main body), Pink (accents), a secondary color for the sweater (e.g., mint, yellow, or light blue), and Black (for the nose).
- Crochet Hook: A 3.25mm (D) or 3.5mm (E) hook is ideal for amigurumi.
- Safety Eyes: 8mm to 10mm black safety eyes.
- Stuffing: Polyester fiberfill.
- Tapestry Needle: For sewing the pieces together and weaving in ends.
- Scissors: To trim your yarn.
- Stitch Marker: Essential for keeping track of your rounds.
Abbreviations (US Terms):
- MR: Magic Ring
- sc: Single crochet
- inc: Increase (2 sc in the same stitch)
- dec: Decrease (sc 2 together)
- ch: Chain
- sl st: Slip stitch
- tr: Treble crochet
- st(s): Stitch(es)
Step-by-Step Instructions
Note: All instructions are worked in continuous rounds. Use a stitch marker to mark the beginning of each round.
The Head
Start with your main Grey yarn. The head should form a rounded, slightly elongated sphere.
- R1: 6 sc in MR (6)
- R2: (inc) *6 (12)
- R3: (1 sc, inc) *6 (18)
- R4: (2 sc, inc) *6 (24)
- R5: (3 sc, inc) *6 (30)
- R6: (4 sc, inc) *6 (36)
- R7: (5 sc, inc) *6 (42)
- R8: (6 sc, inc) *6 (48)
- R9: (7 sc, inc) *6 (54)
- R10-16: 7 rounds of sc (54)
- R17: (8 sc, inc) *6 (60)
- R18: (9 sc, inc) *6 (66)
- R19: (10 sc, inc) *6 (72)
- R20-22: 3 rounds of sc (72)
- R23: (10 dec) *6 (66)
- R24: (9 dec) *6 (60)
- R25: (8 dec) *6 (54)
- R26: (7 dec) *6 (48)
- R27: (6 dec) *6 (42)
- R28: (5 dec) *6 (36)
- R29: (4 dec) *6 (30)
- R30: (3 dec) *6 (24)
- R31: (2 dec) *6 (18)
Fasten off, leaving a long tail of approximately 24 inches (60 cm) for sewing the head to the body later.
The Muzzle
Use your Grey yarn for the muzzle. This piece will be stuffed and sewn onto the face.
- R1: 6 sc in MR (6)
- R2: (inc) *6 (12)
- R3: (1 sc, inc) *6 (18)
- R4: (2 sc, inc) *6 (24)
- R5: (3 sc, inc) *6 (30)
- R6-7: 2 rounds of sc (30)
The Body
The body features a color change to create the look of a little sweater. Start with Grey yarn.
- R1: 6 sc in MR (6)
- R2: (inc) *6 (12)
- R3: (1 sc, inc) *6 (18)
- R4: (2 sc, inc) *6 (24)
- R5: (3 sc, inc) *6 (30)
- R6: (4 sc, inc) *6 (36)
- R7: (5 sc, inc) *6 (42)
- R8: (6 sc, inc) *6 (48)
- R9-10: 2 rounds of sc in Grey (48)
- R11: Change to your sweater color (e.g., Pink or Blue) and sc (48)
- R12: 1 round of sc in sweater color (48)
- R13: (6 sc, dec) *6 (42)
- R14-16: 3 rounds of sc in sweater color (42)
- R15: (5 sc, dec) *6 (36)
- R16-17: 2 rounds of sc in sweater color (36)
- R18: (4 sc, dec) *6 (30)
- R19: 1 round of sc (30)
- R20: (3 sc, dec) *6 (24)
- R21-22: 2 rounds of sc. Change back to Grey yarn.
- R23: (2 sc, dec) *6 (18)
- R24: 1 round of sc (18)
Stuff the body firmly before fastening off.
The Ears (Make 2)
Use your Grey yarn to create these long, floppy ears.
- R1: 6 sc in MR (6)
- R2: (inc) *6 (12)
- R3: (1 sc, inc) *6 (18)
- R4: (2 sc, inc) *6 (24)
- R5: (3 sc, inc) *6 (30)
- R6: (4 sc, inc) *6 (36)
- R7-15: 9 rounds of sc (36)
- R16: (4 dec) *6 (30)
- R17-19: 3 rounds of sc (30)
- R20: (3 dec) *6 (24)
- R21-27: 7 rounds of sc (24)
The Tail
Use your Grey yarn.
- R1: 6 sc in MR (6)
- R2: (inc) *6 (12)
- R3-4: 2 rounds of sc (12)
The Upper Arms (Make 2)
Start with Grey yarn. Note that these are only partially stuffed.
- R1: 6 sc in MR (6)
- R2: (inc) *6 (12)
- R3: (1 sc, inc) *6 (18)
- R4-6: 3 rounds of sc (18)
- R7: (4 sc, dec) *3 (15)
- R8: (3 sc, dec) *3 (12)
- R9: (2 sc, dec) *3 (9)
- R10: Change to sweater color and sc (9)
- R10-27: 18 rounds of sc (9)
Fasten off. Stuff only the bottom portion of the arms before sewing them to the top of the body.
The Lower Legs (Make 2)
Use your Grey yarn. These should be fully stuffed.
- R1: 6 sc in MR (6)
- R2: (inc) *6 (12)
- R3: (1 sc, inc) *6 (18)
- R4: (2 sc, inc) *6 (24)
- R5: 1 round of sc (24)
- R6: (11 sc, inc) *2 (26)
- R7-9: 3 rounds of sc (26)
- R10: (11 sc, dec) *2 (24)
- R11: (10 sc, dec) *2 (22)
- R12: (9 sc, dec) *2 (20)
- R13: 1 round of sc (20)
- R14: (8 sc, dec) *2 (18)
- R15: 1 round of sc (18)
- R16: (7 sc, dec) *2 (16)
- R17: 1 round of sc (16)
- R18: (6 sc, dec) *2 (14)
- R19: 1 round of sc (14)
- R20: (5 sc, dec) *2 (12)
- R21: 1 round of sc (12)
- R22: (4 sc, dec) *2 (10)
- R23-33: 11 rounds of sc (10)
Finishing
The assembly phase is where your puppy truly comes to life! Follow these steps carefully for the best results:
Face Assembly
- Stuff the muzzle firmly.
- Sew the muzzle onto the center of the head.
- While the muzzle is attached, mark the spots where the eyes will go.
- To get a professional look, pull a little bit of the stuffing out from the eye area, insert your safety eyes, and then firmly re-stuff the head around them.
- Using black yarn, embroider the nose onto the tip of the muzzle.
Body Assembly
- Sew the head onto the top of the body.
- Attach the ears to the sides of the head.
- Sew the upper arms to the top of the body and the lower legs to the bottom.
- Don’t forget to attach the tail to the rear!
Tips
- Tension is Key: For amigurumi, try to keep your stitches tight. If you see gaps, try using a smaller hook.
- The Magic Ring: If you struggle with the magic ring, you can alternatively chain 2 and work your first 6 sc into the first chain.
- Safety First: If this toy is intended for a very young infant, please consider embroidering the eyes with black yarn instead of using plastic safety eyes to prevent any choking hazards.
- Color Changes: When changing colors for the sweater, pull the new color through the final two loops of the last stitch of the previous round to create a clean transition.