Adorable Crochet Plush Duck Pattern: A Step-by-Step Beginner Tutorial
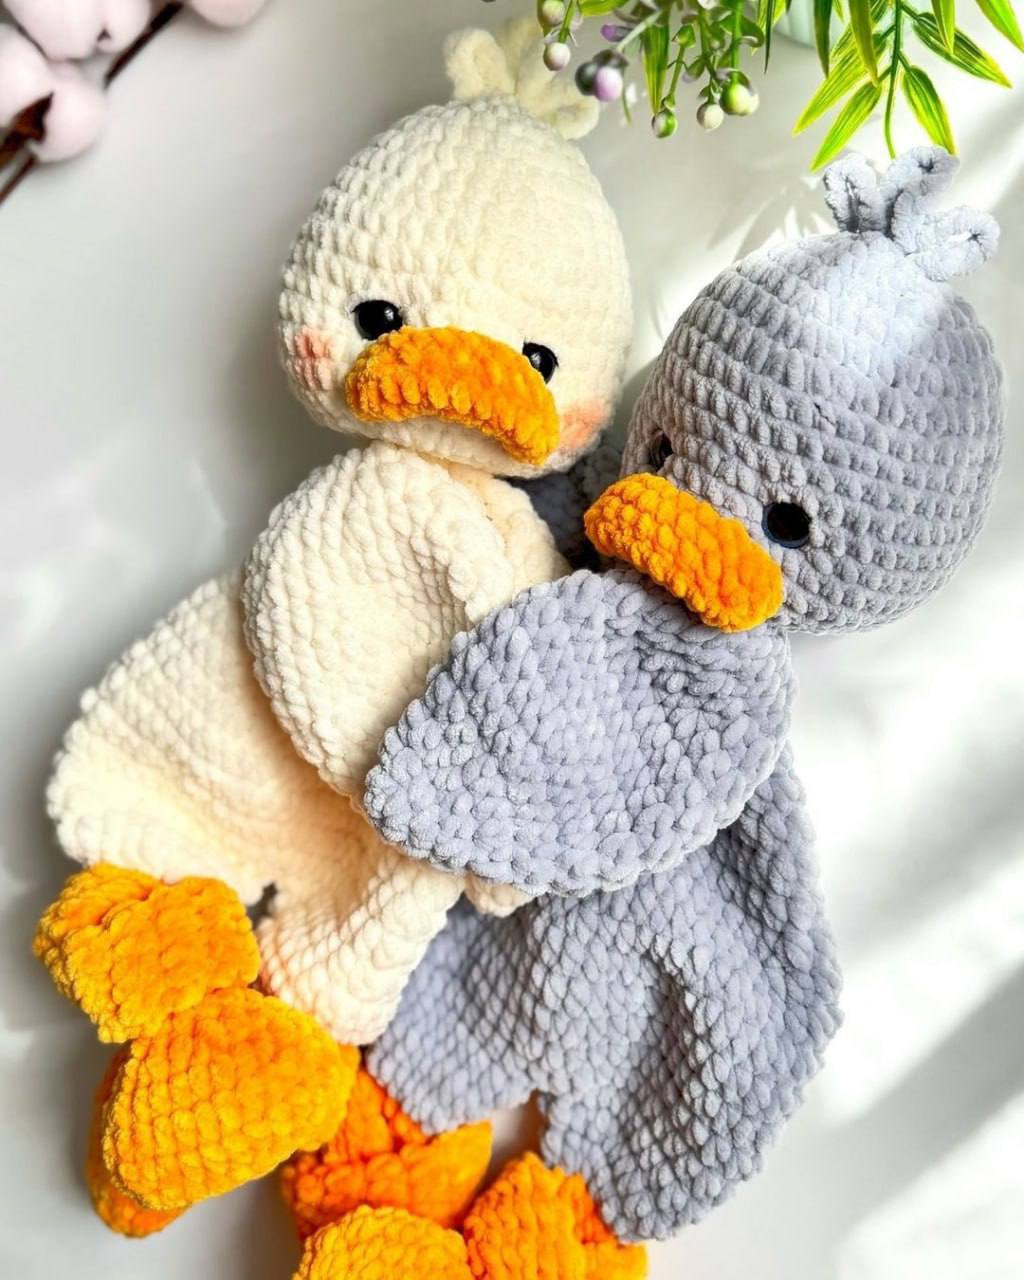
Looking for a cozy project that results in an instant cuddle buddy? This adorable crochet plush duck is the perfect project for anyone looking to dive into the world of amigurumi. Using super soft chenille or velvet yarn, this little duckling turns out incredibly squishy and cute, making it a wonderful gift for children or a charming addition to your own desk decor.
Whether you are a seasoned pro or a beginner who has just learned the basic stitches, this tutorial will guide you through every step. We will be using a “bottom-up” approach for the body, starting with the feet and working our way up to the head. Let’s grab our hooks and get started!
Materials & Abbreviations
To achieve that signature “plush” look, I highly recommend using a chunky chenille-style yarn. If you don’t have the specific brand mentioned, any super-bulky velvet yarn will work perfectly.
Materials Needed:
- Yarn: Super bulky chenille yarn (e.g., Himalaya Dolphin Baby) in your choice of main color (white, yellow, or grey) and a contrasting color for the beak and feet (orange).
- Crochet Hook: 4.5mm hook.
- Safety Eyes: 14mm plastic safety eyes.
- Stuffing: High-quality polyester fiberfill.
- Tools: Tapestry needle, scissors, and stitch markers.
Abbreviations (US Terms):
- MR: Magic Ring
- sc: Single crochet
- inc: Increase (2 sc in the same stitch)
- dec: Decrease (sc 2 together)
- hdc: Half double crochet
- sl st: Slip stitch
- ch: Chain
- st(s): Stitch(es)
Step-by-Step Instructions
The Head
The head is worked in a continuous spiral. Do not join rounds with a slip stitch unless specified.
- Round 1: 6 sc in MR (6)
- Round 2: 6 inc (12)
- Round 3: (1 sc, inc) * 6 (18)
- Round 4: (2 sc, inc) * 6 (24)
- Round 5: (3 sc, inc) * 6 (30)
- Round 6: (4 sc, inc) * 6 (36)
- Round 7: (5 sc, inc) * 6 (42)
- Rounds 8-10: sc in each st around (42) – 3 rounds total
- Round 11: (6 sc, inc) * 6 (48)
- Rounds 12-15: sc in each st around (48) – 4 rounds total
Placement Tip: Insert the 14mm safety eyes between rounds 12 and 13. Space them 8 stitches apart to give your duck a sweet, wide-eyed expression.
- Round 16: (6 sc, dec) * 6 (42)
- Round 17: (5 sc, dec) * 6 (36)
Stuff the head firmly with fiberfill at this stage.
- Round 18: (2 sc, dec) * 9 (27)
- Round 19: (1 sc, dec) * 9 (18)
- Round 20: 9 dec (9)
Fasten off, weave the tail through the remaining stitches to close the hole, and secure the yarn.
The Beak
Change to orange yarn for the beak.
- Ch 9.
- Starting in the second chain from the hook: 7 sc, 4 sc in the last chain (to turn the corner). Now working along the other side of the chain: 6 sc, 4 sc in the final chain (21)
- inc, 7 sc, inc, 1 sc, inc, 8 sc, inc, 1 sc (25)
- sc in each st around (25)
Fasten off, leaving a long tail for sewing. Do not stuff the beak too much; a slight amount of stuffing or sewing it flat works best.
The Crest (Hair Tuft)
Attach your main color yarn to the top of the head, near the magic ring.
- Insert hook into a stitch next to the MR, ch 8.
- sl st back into the MR at the top of the head, ch 10.
- sl st into the next stitch, ch 8.
Fasten off and hide the yarn ends inside the head.
The Wings (Make 2)
The wings use half double crochet for a slightly denser, taller texture.
- Round 1: 6 sc in MR (6)
- Round 2: 6 inc (12)
- Round 3: 12 hdc (12)
- Round 4: (1 hdc, inc) * 6 (18)
- Round 5: (2 hdc, inc) * 6 (24)
- Round 6: (3 hdc, inc) * 6 (30)
- Rounds 7-9: hdc in each st around (30) – 3 rounds total
- Round 10: (3 hdc, dec) * 6 (24)
- Round 11: (2 hdc, dec) * 6 (18)
- Round 12: (1 hdc, dec) * 6 (12)
- Round 13: 12 hdc (12)
Fold the wing in half and crochet through both layers using 3 decreases to close the end. Fasten off, leaving a tail for sewing.
The Tail
- Round 1: 6 sc in MR (6)
- Round 2: 6 inc (12)
- Rounds 3-4: sc in each st around (12) – 2 rounds total
- Round 5: (1 sc, inc) * 6 (18)
Lightly stuff the tail. Fold it in half and sc across the opening to flatten it. Fasten off and leave a tail for sewing.
The Legs & Body
We will start by making two legs and then joining them together to create the body.
Legs:
- Ch 9.
- 7 hdc, 4 hdc in the last stitch, 6 hdc, 4 hdc in the last stitch (21)
- inc, 7 hdc, inc, 1 hdc, inc, 8 hdc, inc, 1 hdc (25)
- hdc in each st around (25)
- dec, 8 hdc, 2 dec, 9 hdc, dec (21)
- (1 hdc, dec) * 7 (14)
- dec, 4 hdc, 2 dec, 2 hdc, dec (10)
Lightly stuff the foot of the leg.
- Rounds 8-28: hdc in each st around (10) – 21 rounds total
- Round 29: 10 inc (20)
- Round 30: (8 hdc, 2 inc) * 2 (24)
- Round 31: 24 hdc (24)
Fasten off the first leg with a slip stitch. Do NOT fasten off the second leg; we will go straight into the body.
The Body:
- Round 32: hdc around the first leg (24), 1 hdc in the space between legs, hdc around the second leg (24), 1 hdc in the space between legs (50)
- Round 33: inc, 11 hdc, inc, 12 hdc, inc, 11 hdc, inc, 12 hdc (54)
- Round 34: (8 hdc, inc) * 6 (60)
- Rounds 35-36: hdc in each st around (60) – 2 rounds total
- Round 37: (8 hdc, dec) * 6 (54)
- Round 38: (7 hdc, dec) * 6 (48)
- Round 39: (6 hdc, dec) * 6 (42)
- Rounds 40-41: hdc in each st around (42) – 2 rounds total
- Round 42: (5 hdc, dec) * 6 (36)
- Round 43: (4 hdc, dec) * 6 (30)
- Round 44: hdc in each st around (30)
- Round 45: (3 hdc, dec) * 6 (24)
- Round 46: (2 hdc, dec) * 6 (18)
Note: If you prefer to crochet the wings directly into the body, join them during Round 47. Otherwise, continue as follows:
- Rounds 47-48: hdc in each st around (18) – 2 rounds total
Fasten off, leaving a tail for sewing. Ensure you end your stitching in the center of the back of the duck for easy head attachment.
Finishing
Now comes the magic—assembling your little friend!
- The Head: Sew the head to the body using a strong yarn in a matching color. Make sure it is centered and secure.
- The Beak: Sew the beak to the center of the face, just below the eyes.
- The Wings: Sew the wings to the sides of the body, ensuring they are symmetrical.
- The Tail: Sew the tail to the back of the body.
- Details: For an extra touch of personality, use a needle and black embroidery thread to add tiny eyelashes. You can also use a bit of pink blush or pink yarn to add soft cheeks just under the eyes.
Tips for Success
Working with chenille yarn can be a bit tricky because the stitches are harder to see. Here are a few tips to make your experience smoother:
- Use Stitch Markers: Since you are working in spirals, a stitch marker is essential. Place it in the first stitch of every round so you don’t lose your place.
- Feel the Stitches: Instead of relying solely on your eyes, use your fingers to feel for the gaps where the hook should go.
- Stuff Firmly: To keep your duck from sagging, ensure the head and body are stuffed firmly, but not so much that the stuffing starts to peek through the stitches.
- Tension: Keep your tension consistent. If the stitches are too loose, the stuffing will show; if they are too tight, the plush will be stiff.