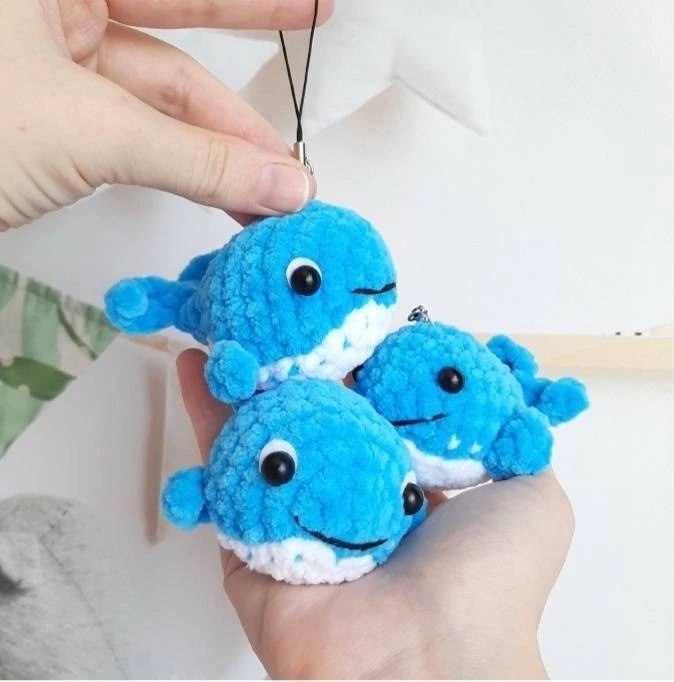
Crochet Whale Pattern: A Cute Amigurumi Blue Whale Tutorial
Are you looking for a quick, adorable, and incredibly soft project to add to your crochet collection? This little blue whale is the perfect project! Whether you want to create a tiny keychain, a nursery decoration, or a sweet gift for a sea lover, this amigurumi whale is sure to bring a smile to everyone’s face. Because we are using chunky chenille-style yarn, this little guy works up quickly and feels irresistibly soft to the touch.
This tutorial is designed to be beginner-friendly. We will walk through every step, from the initial magic ring to the final tiny smile. By the end of this guide, you will have a charming 3-inch whale ready to swim into its new home!
Materials & Abbreviations
To get the best results and achieve that signature “squishy” amigurumi look, I recommend using a velvet or chenille-style yarn. This makes the stitches hide easily and gives the whale its wonderful texture.
Materials Needed
- Yarn: Bulky weight chenille or velvet yarn (such as Himalaya Dolphin Baby) in two colors: Bright Blue and White.
- Embroidery Floss: A small amount of thin black cotton thread or embroidery floss for the mouth.
- Crochet Hook: 4.5 mm (or a size that provides tight stitches so stuffing doesn’t show through).
- Eyes: 8 mm black beads or black safety eyes.
- Stuffing: Polyester fiberfill (poly-fill).
- Tools: Scissors and a stitch marker (highly recommended).
Stitch Abbreviations (US Terms)
Please note that all instructions are written using standard US crochet terminology. Work in a continuous spiral; do not join at the end of each round unless specified.
- ch: chain
- sc: single crochet
- dc: double crochet
- inc: increase (2 sc in the same stitch)
- dec: decrease (sc 2 stitches together)
- sl st: slip stitch
- * : repeat the sequence indicated within the asterisks
- ( ) : indicates the total number of stitches at the end of the round
Step-by-Step Instructions
The Body
We begin the body using the Blue yarn. Remember to use a stitch marker to keep track of the start of each round.
Round 1: Start with 2 ch. In the second chain from the hook, work 6 sc. (6)
Round 2: Using Blue, work 4 inc. Then, switch to White yarn and work 2 inc. (12)
Round 3: Using Blue, work (1 sc, inc) * 4 times. Switch to White yarn and work (1 sc, inc) * 2 times. (18)
Round 4: Using Blue, work (2 sc, inc) * 4 times. Switch to White yarn and work (2 sc, inc) * 2 times. (24)
Rounds 5-6: Continue working in the color pattern established in Round 4. Work 16 sc in Blue and 8 sc in White. (24)
Adding the Fins
In this round, we will create the side fins directly into the stitches. This gives the whale its characteristic shape.
Round 7:
- Work 1 sc in Blue.
- First Fin: Immediately ch 4. In the second chain from the hook, work [1 sc, 1 dc, 1 sc].
- Work 15 sc in Blue.
- Second Fin: Immediately ch 4. In the second chain from the hook, work [1 sc, 1 dc, 1 sc].
- Finish the round by working 8 sc in White. (24)
Shaping and Closing
Now we will begin to taper the body to create the rounded shape. Continue following the color split (Blue for the top, White for the bottom).
Round 8: Using Blue, work (2 sc, dec) * 4 times. Using White, work (2 sc, dec) * 2 times. (18)
Round 9: Using Blue, work 12 sc. Using White, work (1 sc, dec) * 2 times. (16)
Round 10: Using Blue, work (1 sc, dec) * 4 times. Using White, work 2 dec. (10)
Round 11: Work 8 sc in Blue and 2 sc in White. (10)
Note: Secure the White yarn and fasten off.
Stuffing: Before you close the whale completely, stuff the body firmly with polyester fiberfill. You want it to be plump but still soft.
Round 12: Work 4 dec, then 2 sc. (6)
Round 13: Work 4 sc, then 1 dec. (5)
The Tail
We will now crochet the tail onto the remaining stitches of the body. You can remove your stitch marker for this part.
Tail Instructions:
- Work 2 sc into the body.
- Immediately ch 5. In the second chain from the hook, work [1 sc, 2 dc, 1 sc] (this is the first half of the tail).
- Work 1 sc into the next stitch of the body.
- Immediately ch 5. In the second chain from the hook, work [1 sc, 2 dc, 1 sc] (this is the second half of the tail).
- Work 1 sc into the final stitch of the body.
Fasten off, leaving a small tail of yarn for sewing. Use a tapestry needle to weave the yarn through the remaining stitches and pull tight to close the hole.
Finishing
Now comes the fun part—giving your whale its personality!
- Eyes: Using your 8 mm beads or safety eyes, attach them to the front of the blue section. Aim for the area just above where the white belly meets the blue body. If using beads, you can sew them on with a little bit of thread.
- Smile: Using your black embroidery floss, carefully stitch a small, slightly curved line between the eyes to create a cute, happy mouth.
- Keychain (Optional): If you want to make this a keychain, loop a metal ring or a piece of cord through the top of the whale before you finish the final stitches, or simply attach it to the top of the head.
Tips for Success
Amigurumi can be a little tricky at first, so here are a few professional tips to help you succeed:
- Tension is Key: When working with chenille yarn, try to keep your tension consistent. If your stitches are too loose, the stuffing will peek through the gaps. If they are too tight, it can be hard to insert your hook.
- Mind the Color Changes: Because this pattern involves switching colors mid-row, keep a close eye on your stitch count. Always count your stitches at the end of each round to ensure you haven’t accidentally added or lost any.
- Use a Stitch Marker: Working in a spiral can make it easy to lose your place. Always use a marker to identify the first stitch of every round.
- Stuffing Technique: When stuffing, push the fiberfill into the corners and extremities (like the fins) first. This prevents the whale from looking lumpy.