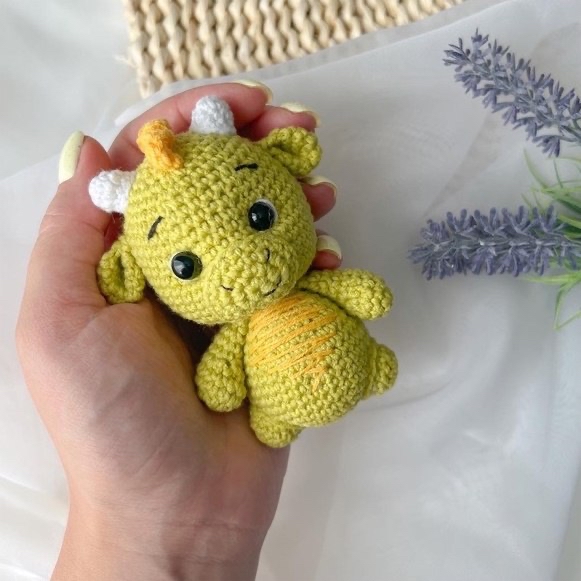
How to Crochet a Tiny Amigurumi Dragon: A Beginner-Friendly Pattern
Are you looking for a quick, adorable, and super satisfying crochet project? Look no further! This Tiny Amigurumi Dragon is the perfect addition to your crochet collection. Whether you want to make a cute keychain, a desk buddy, or a personalized gift for a little one, this little dragon is sure to steal hearts. Because of its small size, it is an excellent project for practicing your tension and learning how to assemble complex amigurumi shapes.
In this tutorial, I will walk you through every single step to create your very own little dragon. We will cover everything from the base body to those adorable little spikes. Grab your hook and some cozy yarn, and let’s get started!
Materials and Abbreviations
Before we dive into the stitches, let’s make sure you have everything you need on your crafting table. Since this is a small project, you won’t need a huge amount of supplies, but using the right weight of yarn will ensure your dragon looks neat and professional.
Materials Needed
- Yarn: Sport weight or DK weight yarn (suggested colors: Green for the main body, White for the horns and eyes, Yellow for the spikes, and Black for facial embroidery).
- Crochet Hook: 2mm or 2.25mm (approximately B-1 or C-2 US).
- Safety Eyes: 6mm.
- Stuffing: Polyfill or any soft fiberfill.
- Tools: A tapestry needle for sewing, scissors, and stitch markers.
Abbreviations (US Terms)
- MR: Magic Ring (or Magic Circle)
- Sc: Single Crochet
- Inc: Increase (2 sc in the same stitch)
- Dec: Decrease (sc two stitches together)
- Ch: Chain
- Sl st: Slip stitch
- Dc: Double crochet
- St(s): Stitch(es)
Note: The number in parentheses ( ) indicates the total number of stitches at the end of that round.
Step-by-Step Instructions
Body and Head (Worked in one piece)
This piece forms the core of your dragon. We start with the body and gradually transition into the head. Remember to stuff the body firmly as you go!
The Body:
- Round 1: 6 sc in MR (6)
- Round 2: 6 inc (12)
- Round 3: (1 sc, inc) * 6 (18)
- Round 4: (2 sc, inc) * 6 (24)
- Round 5: (3 sc, inc) * 6 (30)
- Round 6: (4 sc, inc) * 6 (36)
- Rounds 7-12: 36 sc (6 rounds)
- Round 13: (4 sc, dec) * 6 (30)
- Round 14: 30 sc
- Round 15: (3 sc, dec) * 6 (24)
- Round 16: 24 sc
- Round 17: (2 sc, dec) * 6 (18)
- Round 18: 18 sc
The Head:
Now, we begin expanding to create the head portion of the dragon.
- Round 19: (2 sc, inc) * 6 (24)
- Round 20: (3 sc, inc) * 6 (30)
- Round 21: (4 sc, inc) * 6 (36)
- Round 22: (5 sc, inc) * 6 (42)
- Rounds 23-31: 42 sc (9 rounds)
- Round 32: (5 sc, dec) * 6 (36)
- Round 33: 36 sc
- Round 34: (4 sc, dec) * 6 (30)
- Round 35: 30 sc
- Round 36: (3 sc, dec) * 6 (24)
- Round 37: 24 sc
- Round 38: (2 sc, dec) * 6 (18)
- Round 39: (1 sc, dec) * 6 (12)
- Round 40: 6 dec (6)
- Round 41: Fasten off.
Important Eye Placement: Before you close the head completely, insert your 6mm safety eyes between Rounds 29 and 30. To get the perfect look, ensure there are 5 stitches between the eyes once they are placed. Use your hook or fingers to “indent” the area around the eyes to give the dragon a cute, expressive face.
The Muzzle
The muzzle adds so much character! Note that we do not stuff this piece; we will sew it onto the face later.
- Round 1: 6 sc in MR (6)
- Round 2: 6 inc (12)
- Round 3: (1 sc, inc) * 6 (18)
- Round 4: 18 sc
Fasten off, leaving a long tail for sewing.
Ears (Make 2)
- Round 1: 6 sc in MR (6)
- Round 2: 6 inc (12)
- Rounds 3-4: 12 sc (2 rounds)
Assembly Tip: After finishing the rounds, fold the ear in half. Work 6 sc through both layers at once. Then, fold it in half again and work 3 sc through both layers. This creates a flat, sturdy ear. Leave a long tail for sewing to the head from the inside so the seam doesn’t show.
Horns (Make 2)
- Round 1: 6 sc in MR (6)
- Round 2: (1 sc, inc) * 3 (9)
- Rounds 3-4: 9 sc (2 rounds)
Leave a long tail. You will stuff these lightly as you sew them to the top of the head.
Arms (Make 2)
- Round 1: 6 sc in MR (6)
- Round 2: 6 inc (12)
- Rounds 3-4: 12 sc (2 rounds)
- Round 5: 3 dec, 6 sc (9)
- Rounds 6-9: 9 sc (4 rounds)
Assembly Tip: Stuff only the bottom part of the arm so the top remains flat. Fold the arm in half and work 4 sc through both layers to close it. Leave a long tail and sew to the body from the inside of the arm to hide the connection.
Legs (Make 2)
- Round 1: 6 sc in MR (6)
- Round 2: 6 inc (12)
- Rounds 3-4: 12 sc (2 rounds)
Leave a long tail. These legs are quite simple and should be stuffed lightly as you sew them to the bottom of the body.
Tail
- Round 1: 6 sc in MR (6)
- Round 2: (1 sc, inc) * 3 (9)
- Round 3: 9 sc
- Round 4: (2 sc, inc) * 3 (12)
- Round 5: 12 sc
- Round 6: (3 sc, inc) * 3 (15)
- Round 7: 15 sc
- Round 8: (4 sc, inc) * 3 (18)
- Round 9: 18 sc
Leave a long tail. Stuff the tail as you sew it to the back of the body.
The Spikes
These spikes run down the dragon’s back and give it that iconic look!
Instructions:
Chain 36. Starting from the 3rd chain from your hook: work 3 dc into the next stitch. Then, work 1 sl st in the following two stitches. Next, chain 2, and work 3 dc into the very next stitch. Repeat this pattern (3 dc, 1 sl st, 1 sl st, ch 2) all the way to the end of the chain. Fasten off, leaving a long tail for sewing. Attach the spikes starting from the top of the head and work your way down the back.
Finishing
Now comes the magical part: assembly! Use your tapestry needle and the long tails left from each piece to bring your dragon to life.
- Attach the Muzzle: Center it between and slightly below the eyes.
- Attach Ears and Horns: Place the horns on top and the ears on the sides. Remember to sew from the inside where possible for a cleaner look.
- Attach Limbs and Tail: Position the arms, legs, and tail naturally.
- Spikes: Carefully sew the spike chain along the spine.
- Embroidery: Use black yarn to embroider small eyebrows and a cute little mouth on the muzzle to complete the expression.
Tips for Success
- Tension is Key: When making amigurumi, try to keep your stitches tight. This prevents the white stuffing from peeking through your stitches.
- Use Stitch Markers: Since you are working in continuous rounds, it is very easy to lose your place. Always mark the first stitch of every round.
- Eye Indentation: Don’t skip the step of pulling the fabric in around the safety eyes. This “eye socket” effect is what gives amigurumi characters their cute, lifelike personality.
- Don’t Overstuff: While you want the dragon to be firm, overstuffing can cause the stitches to stretch and become uneven. Aim for a smooth, rounded shape.