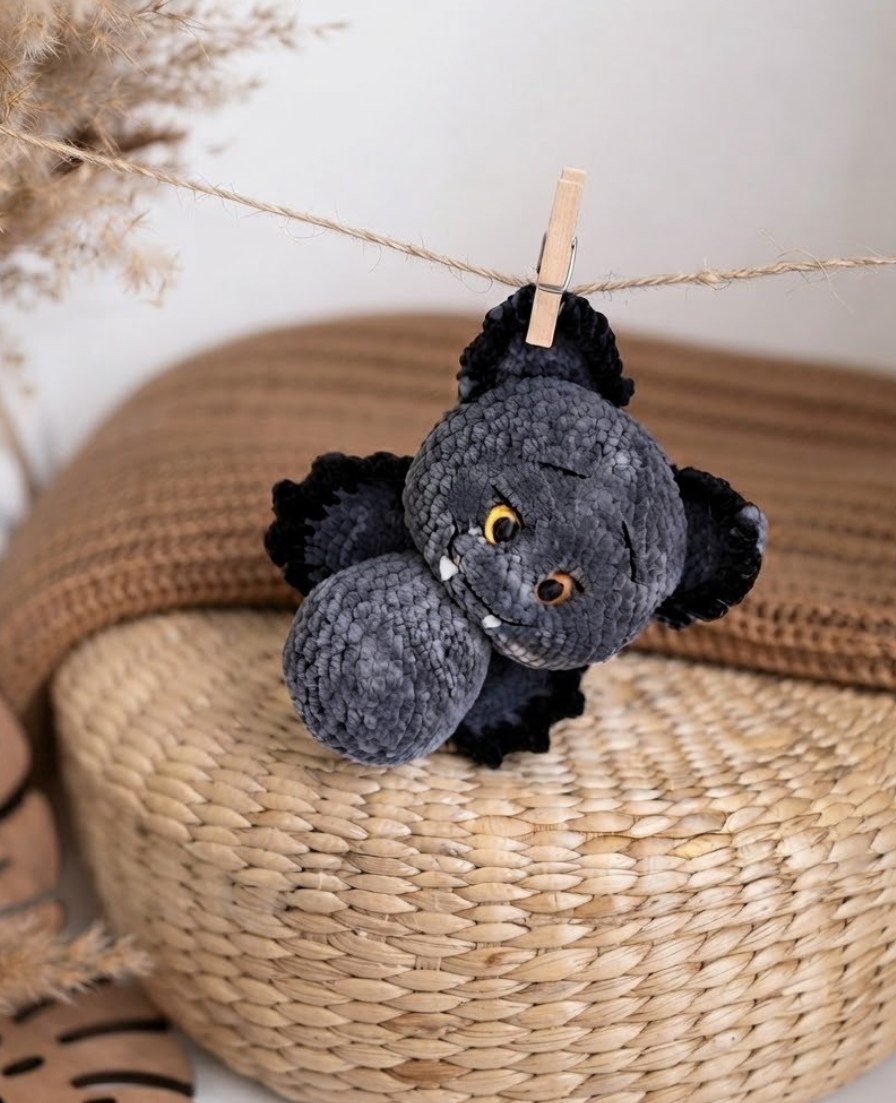
DIY Amigurumi Bat Crochet Pattern: A Cute and Spooky Halloween Plushie Tutorial
Are you looking for the perfect spooky-season project? Whether you are decorating for Halloween or looking for a unique, adorable gift for a friend, this amigurumi bat is a fantastic choice. This little bat is designed to be “spooky-cute”—it has large, expressive eyes and a chunky, huggable body that makes it irresistible.
This pattern is written for beginners and intermediate crocheters alike. It uses a “mixed” crochet method with a moderate tension to ensure your bat keeps its shape while remaining soft to the touch. The finished plushie stands approximately 6 inches tall, making it the perfect size for a desk companion or a shelf sitter.
Materials & Abbreviations
Materials Needed
- Yarn: You will need a plush/chenille style yarn for the main body. I recommend Himalaya Dolphin Baby in colors 367 (grey) and 311 (darker grey), though you can use any soft chenille yarn you prefer. You will need less than one full skein.
- Accent Yarn: A thinner embroidery floss or cotton yarn (like YarnArt Jeans in color 53) for the facial details and stitching.
- Color Change Yarn: A small amount of black yarn for the wing edges and ear borders.
- Safety Eyes: 0.7 x 0.5 inch (18 x 13 mm) oval safety eyes.
- Stuffing: Polyester fiberfill or similar poly-fill.
- Crochet Hook: A 4.5 mm hook (or the size most appropriate for your yarn tension to keep stitches tight).
- Notions: Felt (for details), hot glue (or a needle for sewing), a tapestry needle, scissors, and stitch markers.
Abbreviations (US Terms)
- MR: Magic Ring
- sc: Single Crochet
- inc: Increase (2 sc in one stitch)
- dec: Decrease (sc 2 together)
- ch: Chain
- sl st: Slip Stitch
- ( ) * n: Repeat the instructions inside the parentheses n times
- Stitch count: The number in parentheses represents the total number of stitches at the end of the round.
Note: This pattern is worked in a continuous spiral. Do not join the rounds with a slip stitch or add a chain at the end of each row unless specifically instructed.
Step-by-Step Instructions
Body and Head (Worked as One Piece)
We begin by creating the main body, which flows directly into the head. This creates a seamless, chubby look.
- 6 sc in MR (6)
- 6 inc (12)
- (1 sc, inc) * 6 (18)
- 1 sc, inc, (2 sc, inc) * 5, 1 sc (24)
- (3 sc, inc) * 6 (30)
- 6-8. 30 sc (3 rounds total)
- 9. 9 sc, 6 dec, 9 sc (24)
- 10-12. 24 sc (3 rounds total)
- 13. 1 sc, dec, (2 sc, dec) * 5, 1 sc (18). Stop here to stuff the body firmly.
- 14. (4 sc, dec) * 3 (15)
- 15. 15 sc
- 16. 15 inc (30)
- 17. 2 sc, inc, (4 sc, inc) * 5, 2 sc (36)
- 18. (5 sc, inc) * 6 (42)
- 19. 3 sc, inc, (6 sc, inc) * 5, 3 sc (48)
- 20-26. 48 sc (7 rounds total)
- 27. 3 sc, dec, (6 sc, dec) * 5, 3 sc (42)
- 28. (5 sc, dec) * 6 (36)
Eye Placement: Before continuing, locate the center of the “belly” (the area where you performed the 6 decreases in round 9). Use this as your guide to ensure the face is centered. Insert your oval safety eyes between rounds 23 and 24. Ensure they are spaced 4 sc apart.
- 29. 2 sc, dec, (4 sc, dec) * 5, 2 sc (30). Stuff the head firmly.
- 30. (3 sc, dec) * 6 (24)
- 31. 1 sc, dec, (2 sc, dec) * 5, 1 sc (18)
- 32. (1 sc, dec) * 6 (12). Continue stuffing.
- 33. 6 dec. Fasten off, leaving a long tail for sewing the head closed.
Sculpting the Face (The “Utyazhka” Method)
To give the bat its cute, tapered snout, we will use a needle and thread to pull the stitches inward. This creates the facial structure.
Step 1: The Snout Contour
Find the points between rounds 15 and 16 (marked as points 1 and 4) and place 1 sc between them. Between rounds 20 and 21, find the outer edges of the eyes (points 2 and 5). Between rounds 22 and 23, find the inner edges of the eyes (points 3 and 6). Insert your needle at point 1, thread it through points 2, 3, 1, 4, 5, and 6, then back through 4. Pull tight to cinch the face and secure with a knot.
Step 2: The Eye Socket Detail
On the back of the head, find point 1. For the eyes, locate points 3 and 5 at the bottom edge (between rounds 20-21) and points 2 and 4 at the top edge (between rounds 23-24). Thread your needle through point 1, then through points 2, 3, 1, 4, 5, and back to 1. Pull to tighten and secure. Important: When threading through these points, be careful not to catch the “walls” of the crochet stitches to keep the shape clean.
The Wings
The wings are worked in rows rather than a spiral. You will be working back and forth.
- Ch 11.
- 10 sc, ch.
- dec, 6 sc, dec, ch.
- dec, 4 sc, dec, ch.
- dec, 2 sc, dec, ch.
- 2 dec.
- Ch, 5 sc along the side, ch, 8 sc, ch, dec. Change color to black (or keep grey) on the decrease. 5 sc, then (2 ch, turn, 1 sc in ch, 2 sc in next sc) * 4, 2 ch, turn, 1 sc in ch, 5 sc along the other side, 1 sc, sl st. Fasten off, leaving a long tail for sewing.
Assembly: Sew the wings onto the body between rounds 13 and 15.
The Ears
- Ch 11, turn. (Leave a long tail for sewing before you begin).
- 10 sc, ch.
- dec, 6 sc, dec, ch.
- dec, 4 sc, dec, ch.
- 6 sc, ch.
- dec, 2 sc, dec, ch.
- 2 dec, ch.
- 1 dec, sl st. Fasten off.
Edging: Using black or grey yarn, starting from the corner of round 1, work along the side: sl st, 6 sc, inc in the top, 6 sc, sl st. Sew the ears between rounds 23 and 32 of the head.
Finishing
Once all pieces are crocheted and sculpted, it is time for the final details. Use your embroidery floss or thin yarn to stitch small white fangs just below the eyes to complete the look. You can also use felt and hot glue to create tiny details if desired. Ensure all knots are securely hidden inside the plushie and all tails are woven in deeply so they don’t pop out later.
Tips for Success
- Tension is Key: When working with plush chenille yarn, try not to pull too tight, or it can be difficult to insert your hook. However, ensure your stitches are tight enough that the stuffing doesn’t peek through.
- The Magic Ring: If you are new to amigurumi, practice the Magic Ring (MR) technique. It is essential for creating a hole-free center for your bat’s head.
- Stuffing Strategy: Stuff the body firmly, but be more careful with the head. You want it to be firm enough to hold the sculpted shape, but not so hard that it becomes uncomfortable to handle.
- Symmetry: When placing the eyes and sewing the wings, use stitch markers. Symmetry is what makes amigurumi look professional and “alive”!