Cute Amigurumi Tiger Crochet Pattern: A Step-by-Step Tutorial
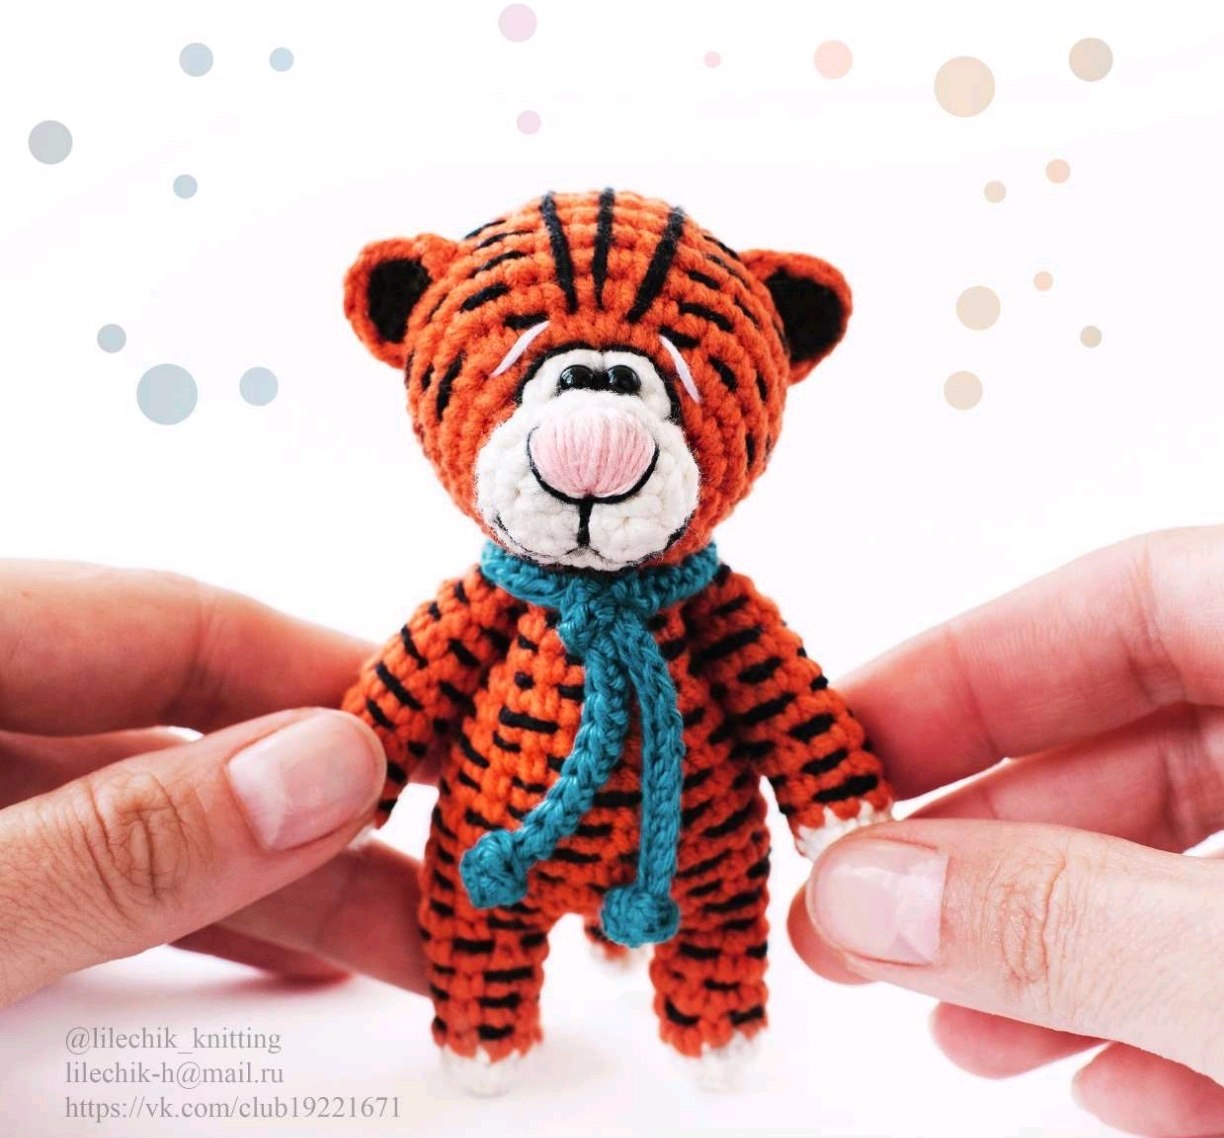
Are you looking for a charming, tiny companion to add to your crochet collection? This adorable amigurumi tiger is the perfect project! Measuring just about 4 inches tall, this little guy is small enough to sit on a desk or shelf but has enough personality to become a favorite toy. Whether you are a beginner looking to practice your stitches or an experienced crocheter wanting a quick, satisfying project, this tiger tutorial will guide you every step of the way.
In this guide, we will walk through everything from creating the tiny muzzle to embroidering those iconic tiger stripes. Grab your hook and some cozy yarn, and let’s get started!
Materials and Tools
To make this little tiger, you will need the following supplies. Using a cotton-blend yarn (like YarnArt Jeans) works best for amigurumi because it provides excellent stitch definition.
- Yarn (Cotton/Acrylic blend):
- Orange (for the main body and head)
- Milk/White (for the muzzle, paws, and eyelids)
- Black (for the stripes and facial details)
- Pink (for the tiny nose)
- Teal or Blue (for the little scarf)
- Crochet Hook: 1.75mm (or a size that creates a very tight tension)
- Stuffing: Polyester fiberfill (holofiber)
- Eyes: Two small black beads (approx. 2mm)
- Tools:
- Large tapestry needles (for sewing and embroidery)
- Small embroidery needles (for the two-needle facial details)
- Scissors
- Pins (to hold pieces in place during assembly)
- Toothpicks or chopsticks (to help pack the stuffing tightly)
- Black liner or pastel (optional, for shading the ears)
Crochet Abbreviations
This pattern uses standard US crochet terms. Please ensure you are familiar with these before beginning:
- ch: chain
- sc: single crochet
- inc: increase (2 sc in one stitch)
- dec: decrease (sc 2 stitches together)
- sl st: slip stitch
- mr: magic ring
- hdc: half double crochet
- dc: double crochet
Step-by-Step Instructions
The Head and Muzzle
The head and muzzle are worked as one continuous piece. We will start with the white muzzle and then transition to orange for the rest of the head.
Part 1: The Muzzle (Milk/White Color)
- Chain 15.
- In the 3rd chain from the hook, work 1 sc. Work 1 sc in the next chain. Work 3 sc into the very last chain to turn the corner. Now, working on the opposite side of the chain, work 1 sc in the next stitch, and work 1 inc in the final stitch.
- Inc, sc, (inc, sc) 3 times, 2 sc, (inc, sc) 2 times (15 stitches).
- Inc, 2 sc, (inc, sc) 3 times, 2 sc, (inc, sc) 2 times (21 stitches).
- Dec, 2 sc, (dec, sc) 4 times, dec, 2 sc, sl st (15 stitches).
Part 2: The Head (Switch to Orange Color)
- 5 sc, (inc, sc) 2 times, (sc, inc) 2 times, 2 sc (19 stitches).
- 6 sc, (sc, inc) 2 times, (inc, sc) 2 times, 5 sc (23 stitches).
- (2 sc, inc) 7 times, 2 sc (30 stitches).
- 3 sc, (3 sc, inc) 5 times, 7 sc (35 stitches).
- Work 5 rows of sc (35 stitches).
- (3 sc, dec) 7 times (28 stitches).
- (2 sc, dec) 7 times (21 stitches).
- Stuff the head firmly with fiberfill.
- (sc, dec) 7 times (14 stitches).
- (dec) 7 times (7 stitches).
- Fasten off, leaving a long tail for sewing.
The Body and Lower Legs
The body and the two lower legs are worked as a single piece. We start with the white feet and then switch to orange for the body.
Part 1: The Legs (Milk/White Color)
- In a magic ring, work 6 sc (6 stitches).
- (inc, sc) 3 times (9 stitches).
- Fasten off the white yarn, leaving a tail.
Part 2: The Body (Switch to Orange Color)
- Attach orange yarn to the same spot as the first leg.
- 9 sc (9 stitches).
- Inc, 8 sc (10 stitches).
- Inc, 9 sc (11 stitches).
- Work 1 row of sc around, ending with a sl st (11 stitches).
- Fasten off the first leg. Now, create the second leg exactly like the first, but do not cut the yarn.
- Chain 4 and join to the first leg with a sl st to create the bridge for the body.
- Working around the legs and the chain: 11 sc on the first leg, 4 sc on the chain, 11 sc on the second leg, and 4 sc on the other side of the chain (30 stitches total).
- Work 3 rows of sc (30 stitches).
- (4 sc, dec) 5 times (25 stitches).
- Work 4 rows of sc (25 stitches).
- (3 sc, dec) 5 times (15 stitches).
- Work 1 row of 15 sc.
- Work 1 row of 15 sc, ending with a sl st (15 stitches).
- Stuff the body firmly. Leave a long tail for assembly.
The Upper Arms
Both arms are worked in the same way. We start with white for the paws and then switch to orange.
- Part 1 (Milk/White): In a magic ring, work 6 sc (6 stitches).
- (inc, sc) 3 times (9 stitches). Fasten off, leaving a tail.
- Part 2 (Orange): Attach orange yarn. Work 7 rows of sc (9 stitches).
- (dec) 4 times (5 stitches).
- Fasten off, leaving a long tail for sewing.
Ears and Tail
Ears (Make 2 pieces – Orange Color):
- In a magic ring, work: ch 3, hdc, 3 dc, hdc, and 2 dc into the ring.
- Pull the ring tight to create a small leaf shape. Fasten off, leaving a long tail.
Tail (Milk/White then Orange):
- Part 1 (Milk/White): In a magic ring, work 6 sc. Work 1 row of 6 sc. Fasten off.
- Part 2 (Orange): Attach orange yarn. 2 inc, 5 sc (8 stitches).
- Work 4 rows of 8 sc, ending with a sl st. Fasten off, leaving a long tail.
Facial Features and Details
This is where your tiger truly comes to life! We will use embroidery to create depth.
The Nose (Pink)
The nose is a small, 3D triangle. Using two needles and pink yarn, mark a triangle on the muzzle. Using a needle-felting style technique, pull the thread through the stuffing to create a raised, triangular shape. The stitches should be very close together to create volume.
The Muzzle and Smile (Black)
Using black yarn and the two-needle technique, outline the edge of the white muzzle. Then, embroider a small “smile” underneath the nose. This creates a sweet, expressive face.
The Eyes and Eyelids
- Eyes: Sew the black beads onto the head, approximately between rows 6 and 7.
- Eyelids (Milk/White): Chain 4. Sew these small chains just above the eyes to give him a sleepy, cute expression.
The Stripes (Black)
Using a backstitch with black yarn, embroider short stripes across the head (starting from row 7 or 8) and across the body, arms, and tail. Keep the stripes roughly 1 to 2 stitches wide.
Finishing and Assembly
Now it is time to put your little tiger together!
Attaching the Head
Pin the head to the body. Use the long tail left from the body to sew around the neck. As you sew, you can add a little more stuffing to the neck area to ensure the head sits firmly and the body stays plump.
Attaching the Arms and Legs
For a secure hold, use the “thread attachment” method. For the arms, mark the spot between rows 16 and 17 of the body. Thread a needle with 30 cm (approx. 12 inches) of orange yarn. Sew through the arm near the top (between rows 9 and 10 of the arm), then push the needle through the body and out through the other side of the arm. Repeat for the second arm. This makes the limbs very sturdy.
The Tail and Ears
- Ears: Pin the ears between rows 12 and 13 of the head. Sew them securely, hiding the yarn tails inside the head.
- Tail: Pin the tail to the back of the body between rows 8 and 9. Angle the tail slightly downward so it can act as a “kickstand” to help the tiger stand upright on its own.
The Scarf (Optional Accessory)
To complete the look, crochet a tiny teal scarf. Chain approximately 12 inches. In each chain, work one hdc and one dc to create a beautiful texture. Tie it around the tiger’s neck with a sliding knot.
Tips for Success
- Tension is key: Since this is a small amigurumi, use a hook slightly smaller than what is recommended for your yarn to ensure there are no gaps where stuffing might peek through.
- Stuffing: Don’t be afraid to use a toothpick to push stuffing into tight corners, like the nose and the tips of the paws. A well-stuffed toy holds its shape much better.
- Symmetry: When sewing the eyes, ears, and arms, always use pins first! It is much easier to move a pin than to unpick a stitch.
- Stripes: If you want a more “painterly” look, you can use a black fabric marker or liner to color the inside of the ears instead of embroidering them.
Congratulations! You have finished your adorable amigurumi tiger! He is ready to go home or be gifted to a loved one.