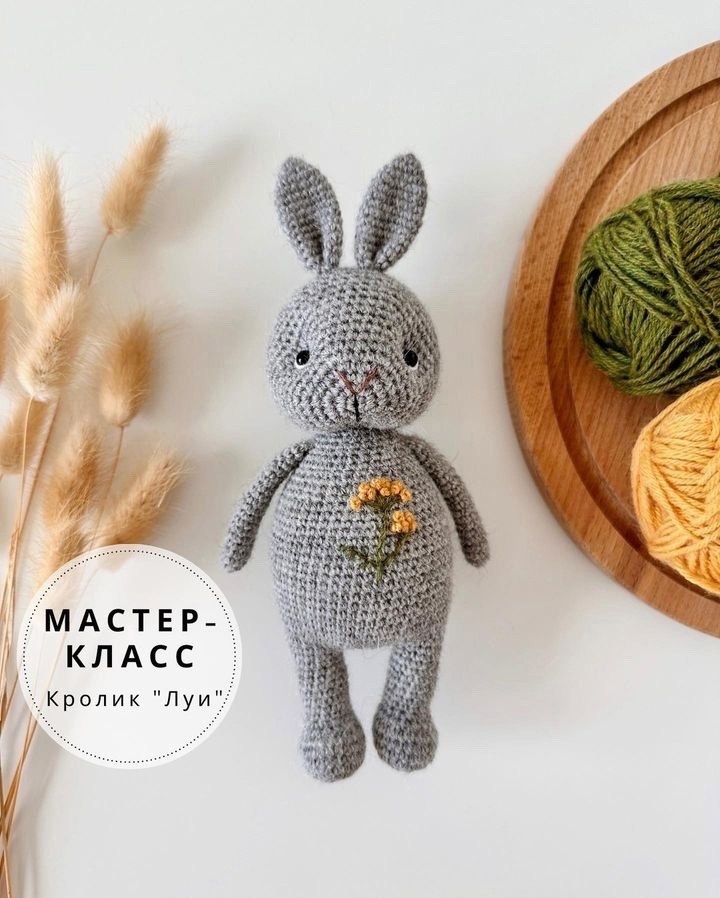
Crochet Bunny Pattern: A Step-by-Step Amigurumi Rabbit Tutorial
Are you looking for a cozy, adorable project to brighten up your home or create a unique handmade gift? This DIY crochet bunny is the perfect project for both beginners and seasoned amigurumi enthusiasts. With its soft grey texture and charming floral details, this little rabbit is sure to become a favorite on any nursery shelf or collector’s display.
In this tutorial, we will walk you through every single stitch, from crafting the tiny paws to the delicate embroidery that gives this bunny its soulful expression. By the time you finish, you’ll have a delightful little companion measuring approximately 8 inches tall.
Introduction
Amigurumi, the Japanese art of knitting or crocheting small, stuffed yarn creatures, is incredibly rewarding. This particular bunny features a “sculpted” face, a technique where we use thread tension to create depth around the eyes, giving the character a realistic and sweet look. While the pattern may seem detailed, we have broken it down into manageable sections. Grab your hook, find a comfy chair, and let’s get stitching!
Materials & Abbreviations
Materials Needed
- Yarn: Medium weight cotton or cotton-blend yarn in grey (approximately 100-150 yards).
- Embroidery Floss: Black, brown, white, yellow, and green for the facial features and floral details.
- Crochet Hook: 1.75 mm (or a size appropriate for your specific yarn to ensure tight stitches).
- Stuffing: Polyester fiberfill or similar soft stuffing.
- Eyes: Two 4 mm black beads or safety eyes.
- Notions: Stitch markers, sewing pins, sharp scissors, and a tapestry needle.
US Crochet Abbreviations
Please ensure you are using US terms to follow this pattern correctly:
- MR: Magic Ring
- ch: Chain
- st: Stitch
- sc: Single crochet
- inc: Increase (2 sc in the same stitch)
- dec: Decrease (sc 2 stitches together)
- sl st: Slip stitch
Step-by-Step Instructions
The Legs (Make 2)
The legs are worked in an oval shape to create a sturdy base for the bunny.
- Start with a ch 5. In the 2nd ch from the hook, work the following:
- Row 1: 3 sc, 3 sc in the next st, 2 sc, 1 inc (10)
- Row 2: 1 inc, 2 sc, 3 inc, 2 sc, 2 inc (16)
- Row 3: 1 sc, 1 inc, 2 sc, (1 sc, 1 inc) repeat 3 times, 2 sc, (1 sc, 1 inc) repeat 2 times (22)
- Rows 4-6: 22 sc in each row (22)
Note: Shift your stitch marker so it sits exactly in the middle of the “heel” area. This helps with shaping.
- Row 7: 5 sc, 6 dec, 5 sc (16)
- Row 8: 5 sc, 3 dec, 5 sc (13)
- Rows 9-16: 13 sc in each row (13)
Fasten off, leaving a long tail for the first leg. For the second leg, do not fasten off; leave it attached so we can join them for the body.
The Body
We will now join the legs to create the torso.
- Starting from the first leg, ch 7 and join to the first leg with a sl st. Place your stitch marker at the joining point.
- Row 17: (13 sc, 7 sc) repeat twice around (40)
- Row 18: 40 sc (40)
- Row 19: (1 inc, 11 sc, 1 inc, 7 sc) repeat twice (44)
- Row 20: 1 sc, 1 inc, 12 sc, 1 inc, 8 sc, 1 inc, 12 sc, 1 inc, 7 sc (48)
- Rows 21-34: 48 sc in each row (48)
- Row 35: (6 sc, 1 dec) repeat 6 times (42)
- Rows 36-37: 42 sc in each row (42)
- Row 38: (5 sc, 1 dec) repeat 6 times (36)
- Rows 39-40: 36 sc in each row (36)
- Row 41: (4 sc, 1 dec) repeat 6 times (30)
- Rows 42-43: 30 sc in each row (30)
- Row 44: (3 sc, 1 dec) repeat 6 times (24)
- Rows 45-46: 24 sc in each row (24)
- Row 47: (2 sc, 1 dec) repeat 6 times (18)
Fasten off, leaving a long tail for sewing the head later.
The Head
The head is worked in a continuous spiral.
- Row 1: 6 sc in a MR (6)
- Row 2: 6 inc (12)
- Row 3: (1 sc, 1 inc) repeat 6 times (18)
- Row 4: (2 sc, 1 inc) repeat 6 times (24)
- Row 5: (3 sc, 1 inc) repeat 6 times (30)
- Row 6: (4 sc, 1 inc) repeat 6 times (36)
- Row 7: 36 sc (36)
- Row 8: (5 sc, 1 inc) repeat 6 times (42)
- Row 9: 42 sc (42)
- Row 10: (6 sc, 1 inc) repeat 6 times (48)
- Row 11: 48 sc (48)
- Row 12: (7 sc, 1 inc) repeat 6 times (54)
- Rows 13-17: 54 sc in each row (54). Start stuffing the head firmly as you go.
- Row 18: (7 sc, 1 dec) repeat 6 times (48)
- Row 19: 48 sc (48)
- Row 20: (6 sc, 1 dec) repeat 6 times (42)
- Row 21: (5 sc, 1 dec) repeat 6 times (36)
- Row 22: (4 sc, 1 dec) repeat 6 times (30)
- Row 23: (3 sc, 1 dec) repeat 6 times (24)
- Row 24: (2 sc, 1 dec) repeat 6 times (18)
- Row 25: (1 sc, 1 dec) repeat 6 times (12)
Fasten off and pull the loop tight to close the head.
The Arms (Make 2)
- Start with a MR and work 6 sc into it (6).
- Row 2: (1 sc, 1 inc) repeat 3 times (9)
- Rows 3-20: 9 sc in each row (9)
- Row 21: Fold the piece in half and work 4 sc through both layers together (4).
- Fasten off, leaving a long tail for sewing.
The Ears (Make 2)
- Start with a MR and work 6 sc into it (6).
- Row 2: (1 sc, 1 inc) repeat 3 times (9)
- Row 3: (2 sc, 1 inc) repeat 3 times (12)
- Row 4: (3 sc, 1 inc) repeat 3 times (15)
- Rows 5-11: 15 sc in each row (15)
- Row 12: (3 sc, 1 dec) repeat 3 times (12)
- Fasten off, leaving a long tail for sewing.
The Tail
- Start with a MR and work 6 sc into it (6).
- Row 2: 6 inc (12)
- Row 3: 12 sc (12)
- Row 4: 6 dec (6)
- Fasten off, leaving a long tail.
Finishing
Assembly
Assembly is where your bunny truly comes to life! Use pins to hold everything in place before sewing.
Attaching Limbs
- Arms: Pin the arms to the body between rows 44 and 45.
- Tail: Pin the tail to the back of the body.
- Head: Pin the head onto the body, ensuring it sits straight.
Creating the Eyes (Sculpting Technique)
This technique gives the bunny a deep, expressive look. It is very important to do this carefully.
- Mark the eye placement between rows 9 and 10, about 14 stitches apart. Secure with pins.
- Thread your needle with black embroidery floss. Insert the needle from the bottom of the head and pull it up through the pin location.
- Go back down into the head, moving just 1 stitch away from the pin. Pull the thread through to the bottom of the head and tug gently to create a slight indentation.
- Repeat for the second eye, but for the bottom exit point, aim for the center between rows 5 and 6.
- Repeat this process a few times to deepen the “socket.” Finally, tie off the thread securely inside the head.
- Sew your 4 mm beads (or safety eyes) directly into these eye indentations.
- Eye Highlights: Using white cotton thread, sew a single straight stitch along the side of each eye to create a little white reflection.
Face Embroidery
- Nose: Mark the nose position with pins. Using brown thread, sew two stitches in a “V” shape that spans about 3 rows in height. Tie off and hide the tail inside.
- Mouth/Nose Line: Using black thread, sew one long stitch starting from the base of the nose down toward the eye tension area to add character.
Ears and Final Assembly
- Fold the base of the ears in half and sew them firmly to the top of the head.
- Sew the head onto the body using the long tail you left earlier.
Floral Details
To finish your bunny, embroider a small bunch of flowers on its belly.
- Flowers: Use yellow embroidery floss to create small flowers using the French Knot technique.
- Stem and Leaves: Use green thread and the Stem Stitch to create a delicate stem and small leaves connecting the flowers.
Tips
Watch Your Tension: For amigurumi, you want your stitches to be very tight so that the stuffing doesn’t peek through. If you notice gaps, try using a smaller hook.
Use Pins Generously: When assembling, it is very easy for limbs to shift. Always pin the arms, legs, and head before you start sewing to ensure everything is symmetrical.
Stuffing Tips: Stuff your pieces firmly, but avoid overstuffing the head to the point where it distorts the shape. When stuffing the body, make sure to push the fiberfill into the corners (like the bottom of the legs) to avoid lumps.
Master the French Knot: If you are new to embroidery, practice your French knots on a scrap piece of fabric first. It’s the secret to making those beautiful little yellow flowers!
Congratulations! You have just completed a beautiful, handmade crochet bunny. Whether it’s a gift for a loved one or a new addition to your collection, enjoy your new amigurumi friend!