Stitch Your Own Woodland Friend: The Ultimate Realistic Woodpecker Crochet Pattern
How to Crochet a Realistic Woodpecker: Step-by-Step Pattern
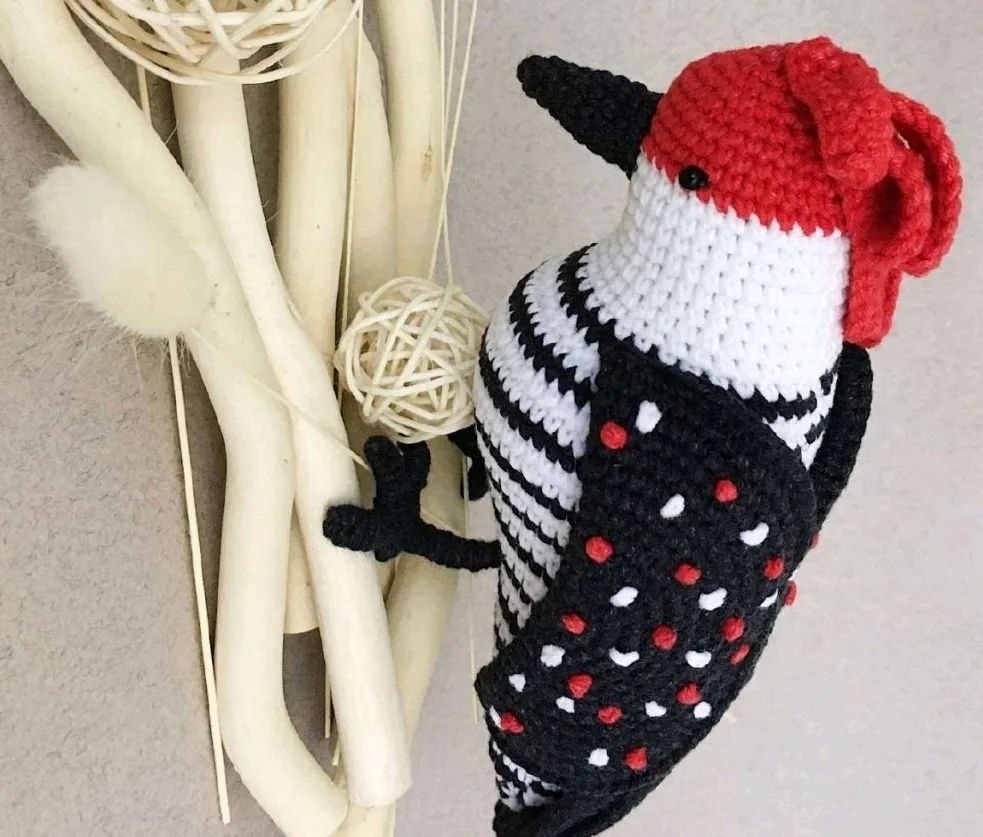
Create your own charming woodland companion with this detailed woodpecker crochet pattern. This project is perfect for beginners and results in a beautiful, stylized bird approximately 8.3 inches (21 cm) tall. The bird features a striking black, white, and red color scheme with intricate details like wire-wrapped feet and embroidered wings.
Materials Needed
Yarn
- Black: Cotton/Acrylic blend (e.g., Yarn Art Jeans)
- White: Cotton/Acrylic blend (e.g., Yarn Art Jeans)
- Red: Cotton/Acrylic blend (e.g., Yarn Art Jeans)
Tools and Supplies
- 2mm crochet hook (or a size appropriate for your chosen yarn)
- Tapestry needles for sewing
- Scissors and sewing pins
- Two 4mm beads for eyes
- Fiberfill stuffing (holofiber)
- Stitch markers
- Aluminum wire (approx. 1mm diameter) for the legs
- Small pliers for shaping wire
- Black sewing thread
Crochet Abbreviations (US Terms)
- ch: chain
- mr: magic ring
- sc: single crochet
- inc: increase (two sc in one stitch)
- dec: decrease (sc two stitches together)
- (…) : total number of stitches at the end of the round
- (…)* : repeat the sequence the specified number of times
General Recommendations
- The project is worked in a continuous spiral. Do not join rounds.
- The most challenging part of this pattern is the frequent color changes.
- The head and body are worked as one single piece.
- Stuff the body in small increments as you go.
- The wings should not be stuffed.
Step 1: Head and Body
Color Sequence: Start with white. Alternate 2 rows of white followed by 1 row of black.
Stuff as you work.
- R1: 6 sc in MR (6)
- R2: 6 sc (6)
- R3: 6 inc (12)
- R4: 12 sc (12)
- R5: (sc, inc)*6 (18)
- R6: 18 sc (18)
- R7: 18 sc (18)
- R8: (2 sc, inc)*6 (24)
- R9: 24 sc (24)
- R10: 24 sc (24)
- R11: 6 sc, (inc, 3 sc)*3, 6 sc (27)
- R12: 27 sc (27)
- R13: 6 sc, (inc, 4 sc)*3, 6 sc (30)
- R14: 30 sc (30)
- R15: 6 sc, (inc, 5 sc)*3, 6 sc (33)
- R16: 33 sc (33)
- R17: 6 sc, (inc, 6 sc)*3, 6 sc (36)
- R18: 36 sc (36)
- R19: 36 sc (36)
- R20: 8 sc, (inc, 4 sc)*4, 8 sc (40)
- R21: 40 sc (40)
- R22: 8 sc, (inc, 5 sc)*4, 8 sc (44)
- R23: 44 sc (44)
- R24: 44 sc (44)
- R25: 8 sc, (inc, 6 sc)*4, 8 sc (48)
- R26: 48 sc (48)
- R27: 48 sc (48)
- R28: 8 sc, (inc, 3 sc)*8, 8 sc (56)
- R29: 56 sc (56)
- R30: 56 sc (56)
- R31: 8 sc, (inc, 4 sc)*8, 8 sc (64)
- R32: 64 sc (64)
- R33: 64 sc (64)
- R34: 64 sc (64)
- R35: 8 sc, (dec, 3 sc)*10, 6 sc (54)
- R36: 54 sc (54)
- R37: 54 sc (54)
- R38: 6 sc, (dec, 2 sc)*10, 8 sc (44)
- R39: 44 sc (44)
- R40: 4 sc, (dec, sc)*10, 10 sc (34)
- R41-48 (8 rounds): 34 sc (34)
Change color to Red:
- R49-52 (4 rounds): 34 sc (34)
- R53: (dec, 3 sc), (dec, 4 sc)*2, (dec, 3 sc), (dec, 4 sc)*2 (28)
- R54: (dec, 5 sc)*4 (24)
- R55: (2 sc, dec)*6 (18)
- R56: (sc, dec)*6 (12)
- R57: 6 dec (6)
Fasten off, weave in the ends, and close the hole tightly.
Step 2: The Beak
Use black yarn. Stuff the beak as you sew it to the head.
- R1: 4 sc in MR (4)
- R2: 4 sc (4)
- R3: (sc, inc)*2 (6)
- R4: 6 sc (6)
- R5: (2 sc, inc)*2 (8)
- R6: 8 sc (8)
- R7: (3 sc, inc)*2 (10)
- R8: 10 sc (10)
- R9: (4 sc, inc)*2 (12)
- R10: 12 sc (12)
Fasten off and flatten the top. Sew the beak to the center of the transition between the white and red sections of the head. Attach the bead eyes on the color transition line, counting 5 stitches away from the beak on each side.
Step 3: The Wings (Make 2)
Use black yarn. Do not stuff.
- R1: 8 sc in MR (8)
- R2: 8 inc (16)
- R3: (sc, inc)*8 (24)
- R4: (2 sc, inc)*8 (32)
- R5: (3 sc, inc)*8 (40)
- R6: (2 sc, inc, 2 sc)*8 (48)
- R7: (5 sc, inc)*8 (56)
- R8: (3 sc, inc, 3 sc)*8 (64)
- R9: (7 sc, inc)*8 (72)
- R10: (4 sc, inc, 4 sc)*8 (80)
- R11: (9 sc, inc)*8 (88)
- R12: (5 sc, inc, 5 sc)*8 (96)
- R13: (11 sc, inc)*8 (104)
Do not cut the yarn. Fold the circle in half. On one half of the wing, embroider red French knots and white chain-stitch spots for detail. Crochet through both layers of the folded wing for 52 sc (52). Fasten off, leaving a long tail for sewing. Sew wings to the body.
Step 4: The Crest (Make 3)
Use red yarn. These are worked as oval leaves.
Detail 1: Chain 9. Starting from the 2nd ch from hook, work around the chain: 7 sc, 3 sc in one stitch, 6 sc, inc (18). Fasten off.
Detail 2: Chain 11. Starting from the 2nd ch from hook, work around the chain: 9 sc, 3 sc in one stitch, 8 sc, inc (22). Fasten off.
Detail 3: Chain 13. Starting from the 2nd ch from hook, work around the chain: 11 sc, 3 sc in one stitch, 10 sc, inc (26). Fasten off.
Sew the crest pieces to the top of the head.
Step 5: The Tail
Use black yarn.
Tail Detail 1: Chain 20. Starting from 2nd ch from hook, work around the chain: 18 sc, 3 sc in one stitch, 17 sc, inc (40). R3: inc, 17 sc, 3 inc, 17 sc, 2 inc (46). Fasten off.
Tail Detail 2 (Make 2): Chain 15. Starting from 2nd ch from hook, work around the chain: 13 sc, 3 sc in one stitch, 12 sc, inc (30). R3: inc, 12 sc, 3 inc, 12 sc, 2 inc (36). Fasten off.
Assembly: Sew the two “Detail 2” pieces together along one side using only the back loops. Sew “Detail 1” to the center of these two pieces. Attach the completed tail to the body at the 4th black stripe from the tail tip.
Step 6: The Legs
Use aluminum wire and black yarn.
- Locate the 6th black stripe from the tail tip.
- Cut a piece of wire 44 cm (approx 17 inches) long.
- Thread the wire through the body at the marked points.
- Shape the wire into feet and toes, leaving small loops at the ends of the toes to make wrapping easier.
- Secure the wire at the heel and hide the end inside the body.
- Secure black yarn at the base of the leg and wrap the yarn tightly around the wire, moving from toe to toe.
- Secure the yarn at each toe to prevent unraveling.
- Finish by securing the yarn at the base and hiding the end inside the body.
Your handcrafted woodpecker is now complete