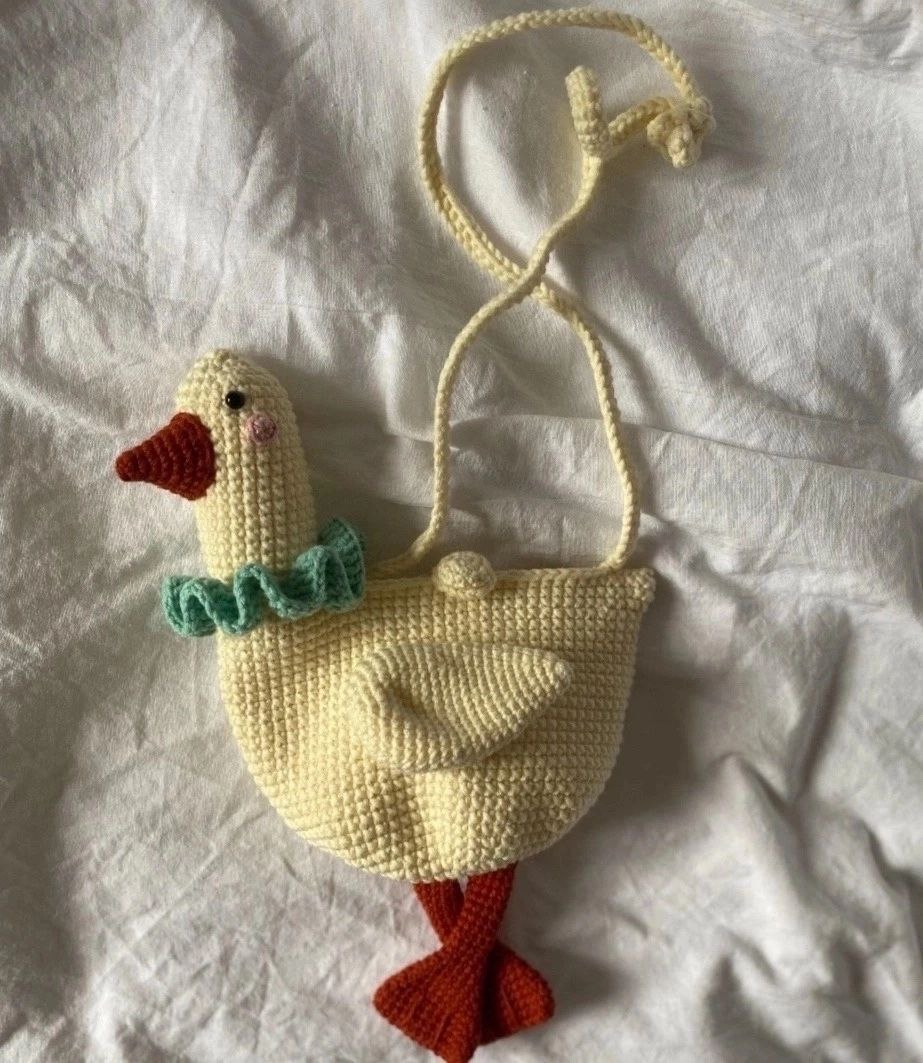
Crochet Goose Toy Bag Pattern: A Cute Amigurumi Purse Tutorial
Are you looking for the perfect, whimsical project that combines functionality with adorable amigurumi charm? This Crochet Goose Toy Bag is a standout project! Whether you are making a unique accessory for a child or a quirky, handmade gift for a friend, this goose-shaped purse is sure to bring a smile to everyone’s face. This pattern is designed to be beginner-friendly, guiding you through creating a sturdy little bag that looks just like a charming little bird.
In this tutorial, we will walk through every step of the process, from the rounded body and long neck to the tiny details like the beak, cheeks, and even a ruffled collar. By the end, you will have a fully functional crossbody bag that is as much a toy as it is a purse. Grab your favorite cotton yarn and let’s get stitching!
Materials and Abbreviations
To ensure your goose turns out looking professional and holds its shape, I recommend using a firm cotton yarn. Cotton provides the necessary structure for amigurumi, preventing the stuffing from showing through the stitches.
What You Will Need
- Crochet Hooks: A 3.5mm (E) hook for the strap and body, and a 2.0mm (B) hook for the smaller detail work.
- Yarn: Medium weight (Worsted/Aran) cotton yarn in the following colors:
- Cream or Off-white (Main body and neck)
- Orange or Terracotta (Beak and feet)
- Teal or Turquoise (Collar)
- Light Pink (Cheeks)
- Safety Eyes: 6-7mm (approximately 1/4 inch) safety eyes.
- Stuffing: Polyester fiberfill (Poly-fill).
- Buttons: One medium-sized button and one small-sized button.
- Tools: A large-eye tapestry needle for sewing, scissors, and a wooden stick (highly recommended for stuffing tight spaces like the neck).
Abbreviations (US Terms)
Please ensure you are using US crochet terminology to follow this pattern accurately:
- MR: Magic Ring
- ch: Chain
- sc: Single Crochet
- inc: Increase (2 sc in one stitch)
- dec: Decrease (sc 2 stitches together)
- sl st: Slip Stitch
- hdc: Half Double Crochet
- dc: Double Crochet
- st(s): Stitch(es)
Step-by-Step Instructions
The Goose Body and Neck
The body of the goose is worked in continuous rounds. We will start with the base and work our way up to the neck. Use the 3.5mm hook for this section.
The Body:
- Round 1: 7 sc in a MR (7)
- Round 2: 7 inc (14)
- Round 3: (1 sc, inc) repeat 7 times (21)
- Round 4: (2 sc, inc) repeat 7 times (28)
- Round 5: (3 sc, inc) repeat 7 times (35)
- Round 6: (4 sc, inc) repeat 7 times (42)
- Round 7: (5 sc, inc) repeat 7 times (49)
- Round 8: (6 sc, inc) repeat 7 times (56)
- Round 9: (7 sc, inc) repeat 7 times (63)
- Round 10: (8 sc, inc) repeat 7 times (70)
- Round 11: (9 sc, inc) repeat 7 times (77)
- Rounds 12-29: sc in each st around (77)
- Round 30: 2 inc, 74 sc, inc (80)
- Rounds 31-32: sc in each st around (80)
Transitioning to the Neck:
This part is unique! We are going to create the neck by extending the stitches from the body. At Round 28, count 28 sc, place a stitch marker. Continue for 24 more sc, then place another marker. You will now begin working into the loop at the marker to create the neck.
The Neck:
- Work 18 rounds of 24 sc around the neck section.
- Tip: Insert your safety eyes into the body section between the neck and the body, spaced about 9-10 stitches apart.
- Round 33: (2 sc, dec) repeat 6 times (18)
- Round 34: (1 sc, dec) repeat 6 times (12)
- Round 35: 6 dec (6)
- Fasten off, pull the tail tight to close, and weave in the end.
The Wings (Make 2)
Use the 2.0mm hook for the wings to keep them tight. These should be worked flat and then folded.
- Round 1: 6 sc in a MR (6)
- Round 2: 6 inc (12)
- Round 3: (1 sc, inc) repeat 6 times (18)
- Round 4: (2 sc, inc) repeat 6 times (24)
- Round 5: (3 sc, inc) repeat 6 times (30)
- Round 6: (4 sc, inc) repeat 6 times (36)
- Rounds 7-11: sc in each st around (36)
- Round 12: (4 sc, dec) repeat 6 times (30)
- Rounds 13-14: sc in each st around (30)
- Round 15: (3 sc, dec) repeat 6 times (24)
- Rounds 16-17: sc in each st around (24)
- Round 18: (2 sc, dec) repeat 6 times (18)
- Rounds 19-20: sc in each st around (18)
- Round 21: (1 sc, dec) repeat 6 times (12)
- Rounds 22-23: sc in each st around (12)
- Round 24: 6 dec (6)
- Fasten off, leaving a long tail for sewing.
The Feet (Make 2)
The feet are worked in a way that creates a tapered, webbed look. Use the 2.0mm hook.
- Ch 13. Start in the 2nd chain from the hook.
- Round 1: inc, 10 sc, inc, [work on the other side of the chain] 10 sc (24)
- Rounds 2-3: sc in each st around (24)
- Round 4: (dec, 10 sc) repeat 2 times (22)
- Round 5: sc in each st around (22)
- Round 6: (dec, 9 sc) repeat 2 times (20)
- Round 7: sc in each st around (20)
- Round 8: (dec, 8 sc) repeat 2 times (18)
- Round 9: sc in each st around (18)
- Round 10: (dec, 7 sc) repeat 2 times (16)
- Round 11: sc in each st around (16)
- Round 12: (dec, 6 sc) repeat 2 times (14)
- Round 13: sc in each st around (14)
- Round 14: (dec, 5 sc) repeat 2 times (12)
- Round 15: sc in each st around (12)
- Round 16: (dec, 4 sc) repeat 2 times (10)
- Rounds 17-24: sc in each st around (10)
- Fold the piece in half and sc through both sides to close. Leave a long tail for sewing.
The Beak and Cheeks
The Beak:
- Round 1: 6 sc in a MR (6)
- Round 2: (1 sc, inc) repeat 3 times (9)
- Round 3: sc in each st around (9)
- Round 4: (2 sc, inc) repeat 3 times (12)
- Round 5: sc in each st around (12)
- Round 6: (3 sc, inc) repeat 3 times (15)
- Round 7: sc in each st around (15)
- Round 8: (4 sc, inc) repeat 3 times (18)
- Round 9: (5 sc, inc) repeat 3 times (21)
- Round 10: 5 sc, 2 hdc, 5 dc, 2 hdc, 7 sc (21)
- Fasten off, leaving a tail for sewing.
The Cheeks (Make 2):
- Round 1: 6 sc in a MR (6)
- Round 2: 6 inc, sl st to join (12)
- Fasten off, leaving a tail.
The Collar (Ruffle)
The collar adds a lovely pop of color and texture. Use the teal yarn.
- Ch 42.
- Round 1: In the 8th chain from your hook, sc in each chain to the end. Ch, turn.
- Round 2: In every stitch, work (2 sc, 2 ch). Turn.
- Round 3: In every stitch, work 2 dc.
- Fasten off and weave in ends.
The Button Cover and Strap
Button Cover: Use the cream yarn to crochet around your chosen button. If your button is larger or smaller, simply add or subtract rounds of sc to fit.
- Round 1: 6 sc in a MR (6)
- Round 2: 6 inc (12)
- Round 3: (1 sc, inc) repeat 6 times (18)
- Round 4: sc in each st around (18)
- Insert your button here.
- Round 5: (1 sc, dec) repeat 6 times (12)
- Round 6: 6 dec (6)
- Fasten off, leaving a tail.
The Strap:
- Using the 3.5mm hook and cream yarn, attach the yarn near the goose’s neck.
- Ch 145.
- Attach the yarn near the tail/back section.
- Work 1 sc in each ch across.
- Sl st to finish, fasten off, and weave in ends.
Finishing
Now comes the fun part—bringing your goose to life! Follow these steps carefully to assemble your bag.
- Stuffing: Turn your body right-side out. Use a wooden stick to carefully stuff the neck with fiberfill, making sure it is firm but doesn’t look lumpy. Stuff the main body, but leave the top opening clear so it can act as a bag.
- Button Loop: Attach your yarn to one side of the bag’s opening. Chain 14 stitches, then slip stitch back into the same spot to create a loop. This will hold your button.
- Assembly:
- Sew the wings to the sides of the body.
- Sew the beak to the front of the head.
- Sew the pink cheeks just below the eyes.
- Sew the feet to the bottom of the bag.
- Attach the ruffled collar around the base of the neck.
- Finally, sew the button cover onto the front of the bag and attach your button.
Tips for Success
- Tension is Key: For amigurumi, try to keep your stitches tight. This ensures that your stuffing stays hidden inside the toy.
- Use Stitch Markers: Since amigurumi is worked in continuous rounds, it is very easy to lose your place. Always use a marker at the beginning of a round.
- Stuffing Technique: Don’t just shove the stuffing in! Use a tool like a chopstick or a dedicated stuffing tool to push the fiberfill into the narrow parts of the neck.
- Yarn Choice: While this pattern uses cotton, if you want a softer “plush” look, you can use a velvet or chenille yarn, though your hook size will need to increase.
Bonus: Crochet Crown Pattern
Want to give your goose a royal makeover? You can crochet a small crown to sit between the eyes!
The entire crown is worked using slip stitches (sl st) into the back loops only. Follow the grid pattern provided in your reference to create points for the crown. Adjust the number of rows depending on the size of your goose to ensure a perfect fit!