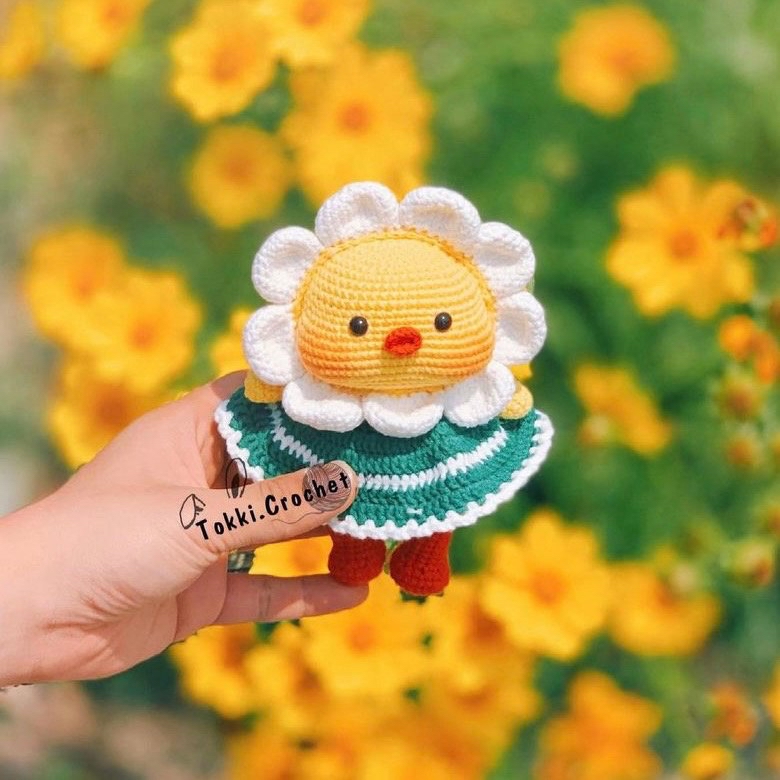
How to Crochet a Cute Daisy Duckling: A Step-by-Step Amigurumi Tutorial
Are you looking for a whimsical and adorable new project for your crochet collection? Look no further! This Daisy Duckling amigurumi is the perfect blend of “kawaii” aesthetics and spring vibes. Whether you want to create a unique gift for a friend or add a charming little character to your desk decor, this duckling is sure to bring a smile to everyone’s face.
This project is designed to be accessible for intermediate beginners. While it uses standard amigurumi techniques like working in the round and increasing/decreasing, the result is a professional-looking, high-quality stuffed animal that looks like it came straight from a boutique. In this tutorial, we will walk you through every single stitch to ensure your duckling turns out just as sweet as the pictures!
Materials & Abbreviations
Before we pick up our hooks, let’s make sure you have everything you need. Since amigurumi relies on tight stitches to keep the stuffing inside, I recommend using a slightly smaller hook than what the yarn label suggests.
What You’ll Need
- Yarn: Medium weight (worsted) yarn in Yellow, White, Green, and Orange.
- Crochet Hook: 2.2 mm (or a size that produces very tight stitches).
- Safety Eyes: 7 mm black safety eyes.
- Stuffing: High-quality polyester fiberfill.
- Tools: A tapestry needle for sewing and scissors.
Abbreviations (US Terms)
Please ensure you are using US terminology to follow this pattern accurately:
- MR: Magic Ring
- ch: Chain
- sc: Single crochet
- inc: Increase (2 sc in one stitch)
- dec: Decrease (sc 2 stitches together)
- hdc: Half double crochet
- hdc inc: Half double crochet increase (2 hdc in one stitch)
- dc: Double crochet
- sl st: Slip stitch
- BLO: Back loops only
- FLO: Front loops only
- ( ) * n: Repeat the sequence inside the parentheses n times
Step-by-Step Instructions
The Head
We begin with the head in yellow yarn. This part forms the base of our duckling’s face.
- MR, 8 sc (8)
- 8 inc (16)
- (1 sc, 1 inc) * 8 (24)
- (3 sc, 1 inc) * 6 (30)
- 2 sc, 1 inc, (4 sc, 1 inc) * 5, 2 sc (36)
- (5 sc, 1 inc) * 6 (42)
- 3 sc, 1 inc, (6 sc, 1 inc) * 5, 3 sc (48)
- (7 sc, 1 inc) * 6 (54)
- 4 sc, 1 inc, (8 sc, 1 inc) * 5, 4 sc (60)
- Rounds 10-14: 60 sc (60)
- 20 sc, 4 inc, 12 sc, 4 inc, 20 sc (68)
Note: Place your 7 mm safety eyes between rounds 14 and 15, approximately 8 stitches apart.
- 20 sc, (1 sc, 1 inc) * 4, 2 inc, 8 sc, 2 inc, (1 inc, 1 sc) * 4, 20 sc (80)
- Rounds 17-21: 80 sc (80)
Sew the beak (pattern below) between rounds 15 and 18.
- 20 sc, (1 sc, 1 dec) * 4, 2 dec, 8 sc, 2 dec, (1 dec, 1 sc) * 4, 20 sc (68)
- 20 sc, 4 dec, 12 sc, 4 dec, 20 sc (60)
- 4 sc, 1 dec, (8 sc, 1 dec) * 5, 4 sc (54)
- (7 sc, 1 dec) * 6 (48)
- 3 sc, 1 dec, (6 sc, 1 dec) * 5, 3 sc (42)
- (5 sc, 1 dec) * 6 (36)
- (4 sc, 1 dec) * 6 (30)
Fasten off, leaving a long tail for sewing. Stuff the head firmly.
The Beak
Using orange yarn:
- MR, 8 sc (8)
- 4 inc (8)
Do not continue after this. Fasten off, leaving a tail for sewing.
The Daisy Petals & Flower Center
We will make 9 white petals first. Use white yarn:
- MR, 8 sc (8)
- 8 inc (16)
- (1 sc, 1 inc) * 8 (24)
- Rounds 4-6: 24 sc (24)
- (2 sc, 1 dec) * 6 (18)
- (1 sc, 1 dec) * 6 (12)
Fasten off each petal. To assemble the flower, use yellow yarn. Fold a petal in half and work 5 sc through the folded edge to create a loop. Between each petal, make 2 ch. Join all 9 petals together in a circle using a slip stitch to complete the flower.
The Arms
Make 2 arms using a combination of green, white, and yellow. Start with green:
- MR, 6 sc (6)
- 6 inc (12)
- Rounds 3-10: 12 sc (12)
Switch to white yarn:
- Rounds 11-12: 12 sc (12)
Switch to green yarn:
- 12 sc (12)
Do not fasten off. Fold the arm in half and sc 6 through both layers to close. Leave a long tail for sewing.
The Legs
Make 2 legs using orange yarn. Right Leg:
- MR, 6 sc (6)
- 6 inc (12)
- (1 sc, 1 inc) * 6 (18)
- (2 sc, 1 inc) * 6 (24)
- 24 sc (24)
- (1 sc, 1 dec) * 6, 6 sc (18)
- (1 sc, 1 dec) * 6 (12)
- Rounds 8-13: 12 sc (12)
Fasten off and leave a tail. Left Leg: Work rounds 1-13 exactly like the right leg, but do not fasten off. You will use the remaining yarn to join the legs for the body.
The Body
Starting from the left leg, we will join the legs using yellow yarn.
- Make 6 ch to join the legs.
- Round 14: 12 sc around the first leg, 6 sc over the chain, 12 sc around the second leg, and 6 sc on the other side of the chain (36)
- (5 sc, 1 inc) * 6 (42)
- 4 sc, (1 sc, 1 inc) * 3, 16 sc, (1 sc, 1 inc) * 3, 10 sc (48)
- (7 sc, 1 inc) * 6 (54)
- (8 sc, 1 inc) * 6 (60)
- Rounds 19-26: 60 sc (60)
- (8 sc, 1 dec) * 6 (54)
- 54 sc (54)
- (7 sc, 1 dec) * 6 (48)
- 48 sc (48)
Switch to green yarn:
- (6 sc, 1 dec) * 6 (42)
- 42 sc in BLO (Back Loops Only) (42)
Switch to white yarn:
- (5 sc, 1 dec) * 6 (36)
- 36 sc (36)
- (4 sc, 1 dec) * 6 (30)
- 30 sc (30)
Fasten off, leave a long tail, and stuff the body firmly.
The Dress
Attach green yarn to the body at round 32.
- (FLO): 3 ch, 42 dc, sl st (42)
- 3 ch, 42 hdc inc, sl st (84)
- 3 ch, 84 dc, sl st (84)
Switch to white yarn:
- 2 ch, 84 hdc, sl st (84)
Switch to green yarn:
- Rounds 5-6: 3 ch, 84 dc, sl st (84)
Switch to white yarn:
- (3 ch, skip 1 stitch, 1 sc) * 42, sl st (84)
Fasten off and weave in your ends.
Finishing
Now comes the fun part—assembly! Using your tapestry needle and the tails left from each piece, carefully sew the components together:
- The Daisy: Sew the flower head onto the top of the duckling’s head.
- The Arms: Sew the arms to the sides of the body, just below the neck area.
- The Legs: Sew the legs to the bottom of the body.
- The Beak: Ensure the beak is centered between rounds 15 and 18 as instructed.
Tips for Success
To make your Daisy Duckling look its absolute best, keep these tips in mind:
- Tension is Key: Amigurumi should be worked with tight tension. If your stitches are too loose, the white stuffing will peek through your work, especially in the yellow and white sections.
- Use Stitch Markers: Since you are working in continuous rounds, it is very easy to lose your place. Always use a stitch marker at the beginning of each round.
- Color Changes: When changing colors, perform the last stitch of the old color and the first stitch of the new color as a single stitch to ensure a seamless transition.
- Stuffing: Don’t be afraid to stuff the head and body firmly. A well-stuffed amigurumi holds its shape much better over time.