Crochet Bunny in Overalls Pattern: A Step-by-Step Amigurumi Tutorial
Introduction
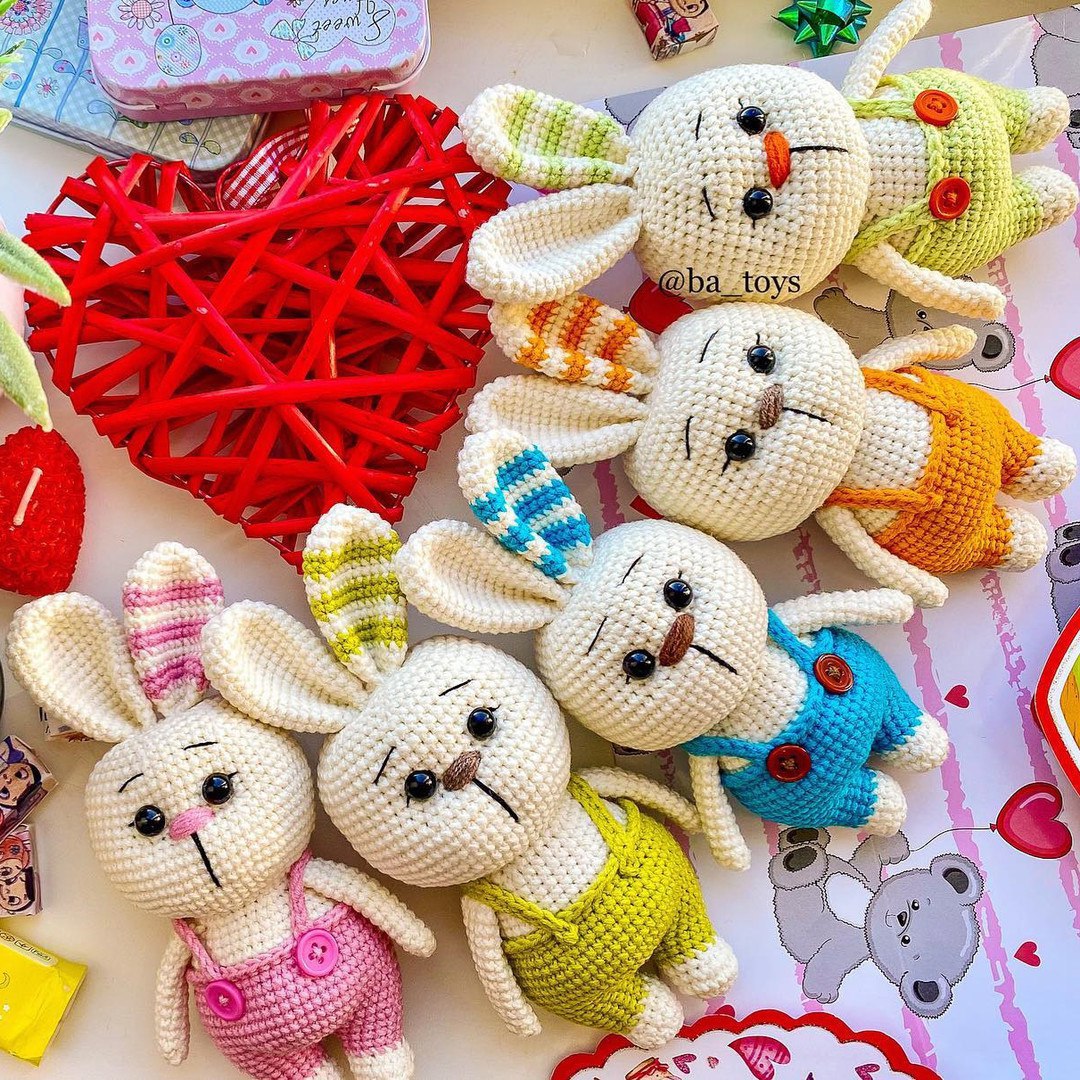
If you are looking for the perfect project to brighten up a nursery or create a whimsical gift for a loved one, look no further! This adorable crochet bunny in overalls is a delightful amigurumi project that combines classic charm with a touch of cottagecore aesthetic. With its tiny hat, little carrot, and cozy lavender overalls, this bunny is sure to become a favorite companion for children and collectors alike.
This pattern is designed with beginners in mind. While you will need to know the basic stitches of crochet, the instructions are broken down step-by-step to guide you through every loop. By the end of this tutorial, you will have a textured, high-quality little bunny that looks professional and feels incredibly soft. Whether you are crocheting for Easter, a baby shower, or just for your own relaxation, this little bunny is a joy to make!
Materials & Abbreviations
Materials Needed
To achieve the best results and ensure your bunny looks just like the pictures, I recommend using a smooth, non-splitting cotton yarn. Here is a list of everything you will need:
- Yarn: Cotton weight yarn (Weight 2 or 3). You will need two main colors:
- Main Color (Cream/Off-White): For the body, head, arms, and one ear.
- Secondary Color (Lavender/Purple): For the overalls and the stripes on the second ear.
- Optional Accent Color (Pink/Rose): For extra stripes on the ear.
- Optional Accent Color (Orange & Green): For the little carrot accessory.
- Crochet Hook: 2.0 mm (B/1) crochet hook.
- Stuffing: High-quality polyester fiberfill (polyfill).
- Safety Eyes: Small black safety eyes (approx. 6mm-8mm).
- Embroidery Thread: A small amount of brown or black thread for the nose and eyebrows.
- Notions: Scissors, a tapestry needle for sewing, and stitch markers or pins.
US Crochet Abbreviations
Please ensure you are using US terms for this pattern:
- MR: Magic Ring
- ch: Chain
- sc: Single crochet
- hdc: Half double crochet
- inc: Increase (2 sc in the same stitch)
- dec: Decrease (sc two stitches together)
- sl st: Slip stitch
- BLO: Back loop only
- FLO: Front loop only
- (…) * n: Repeat the instructions inside the parentheses n times
Step-by-Step Instructions
Arms (Make 2)
Work in the Main Color (Cream).
R1: 6 sc in a MR (6)
R2: (2 sc, inc) * 2 (8)
R3-13: 8 sc (11 rows total)
Finishing: Flatten the arm and sc through both sides of the opening to close it (4 sc). Fasten off, leaving a tail for sewing. Repeat for the second arm.
Ears (Make 2)
For the first ear, we will use a striped effect. For the second ear, use only the Main Color.
Ear 1 (Striped):
Start in Main Color:
R1: 6 sc in a MR (6)
R2: 6 inc (12)
R3: (1 sc, inc) * 6 (18)
R4: (2 sc, inc) * 6 (24)
R5-6: 24 sc in Pink/Rose color (2 rows)
R7-8: 24 sc in Main Color (2 rows)
R9-10: 24 sc in Purple color (2 rows)
R11-12: 24 sc in Main Color (2 rows)
R13-14: 24 sc in Purple color (2 rows)
R15: 24 sc in Main Color (1 row)
R16: (2 sc, dec) * 6 (18)
R17: (1 sc, dec) * 6 (12)
Finishing: Fold the ear in half and sc through both sides (6 sc). Do not stuff the ears; keep them flat. Repeat for the second ear using only the Main Color.
Legs (Make 2)
Left Leg
Start in Main Color (Cream).
R1: 6 sc in a MR (6)
R2: 6 inc (12)
R3: (1 sc, inc) * 6 (18)
R4: 5 sc, 3 dec, 7 sc (15)
R5: 6 sc, 1 dec, 7 sc (14)
R6-7: 14 sc in Purple color (2 rows)
R8: 3 sc, inc, 6 sc, inc, 3 sc (16)
Finishing: Sl st, fasten off and hide the thread.
Right Leg
Start in Main Color (Cream).
R1: 6 sc in a MR (6)
R2: 6 inc (12)
R3: (1 sc, inc) * 6 (18)
R4: 7 sc, 3 dec, 5 sc (15)
R5: 7 sc, 1 dec, 6 sc (14)
R6-7: 14 sc in Purple color (2 rows)
R8: 3 sc, inc, 6 sc, inc, 3 sc (16)
Note: Do not fasten off after R8. We will use the remaining thread to connect to the left leg.
Body & Overalls
Connecting the legs:
With the thread from the right leg, ch 2. Join to the 13th stitch of the left leg. Work your first round as follows:
R1: (16 sc, 2 sc in the chain) * 2 (36)
R2: (5 sc, inc) * 6 (42)
R3: 8 sc, inc, 8 sc, 5 inc, 8 sc, inc, 11 sc (49)
R4: 18 sc, (1 sc, inc) * 2, 2 inc, (inc, 1 sc) * 2, 21 sc (55)
R5-9: 55 sc (5 rows)
R10: (9 sc, dec) * 5 (50)
R11: 9 sc, dec, 26 sc, dec, 11 sc (48)
R12: (6 sc, dec) * 6 (42)
R13 (BLO): 42 sc in the Back Loops Only (this creates the bottom edge of the pants).
Change to Main Color (Body Color) for the next steps.
Creating the Overalls & Straps:
We will use the thread left from the overalls/legs. We will work on the Front Loops (FLO) of Row 13 to create the straps.
R13 (FLO): 3 sc on the first leg; ch 18; from the 2nd ch from the hook, work 17 sc back along the chain (this completes the first strap); 35 sc across the front of the body/pants; ch 18; from the 2nd ch from the hook, work 17 sc back along the chain (completes the second strap); 4 sc on the second leg.
Finishing: Sl st, fasten off and hide the thread.
Continuing the Body:
R14: 42 sc
R15: (5 sc, dec) * 6 (36)
Stuffing: Firmly stuff the legs at this point.
R16-17: 36 sc (2 rows)
R18 (Attaching Arms): 8 sc, 4 sc (work these 4 sc together with the arm), 14 sc, 4 sc (work these 4 sc together with the arm), 6 sc (36).
R19: (4 sc, dec) * 6 (30)
R20: (3 sc, dec) * 6 (24)
Stuffing: Stuff the body very well, especially the hips and tummy, to give the bunny a nice, rounded shape.
Head
Continue in Main Color (Cream).
R1 (BLO): 24 inc (48)
R2: (7 sc, inc) * 6 (54)
R3: (8 sc, inc) * 6 (60)
R4: (9 sc, inc) * 6 (66)
R5-8: 66 sc (4 rows)
R9: (9 sc, dec) * 6 (60)
R10: 60 sc
R11: (8 sc, dec) * 6 (54)
R12 (Eye Holes): 27 sc, ch 1, skip 1 sc, 7 sc, ch 1, skip 1 sc, 18 sc (54).
Note: Depending on your tension, you may need to shift the placement of these stitches slightly to ensure your eyes sit centered.
Insert Safety Eyes into the holes made in R12.
R13-14: 54 sc (3 rows)
R15: (7 sc, dec) * 6 (48)
R16: 48 sc
R17: (6 sc, dec) * 6 (42)
R18: (5 sc, dec) * 6 (36)
R19: (4 sc, dec) * 6 (30)
R20: (3 sc, dec) * 6 (24)
R21: (2 sc, dec) * 6 (18)
R22: (1 sc, dec) * 6 (12)
R23: 6 dec (6)
Finishing: When stuffing the head, focus on the sides to create a slightly flattened, realistic shape rather than a perfect sphere. Fasten off and weave in the ends.
Finishing
Now comes the fun part—bringing your bunny to life!
- Sew the Ears: Attach the ears to the top of the head. For a balanced look, sew the striped ear on the left side and the solid cream ear on the right side.
- Facial Features: Use your embroidery thread to stitch a small nose and cute eyebrows. If you want a more “soulful” look, you can use a needle to slightly pull the fabric between the eyes to create eye sockets (eye pulling technique).
- Accessories: If you chose to make the carrot, sew it to one of the bunny’s hands to complete the look!
Tips
To ensure your amigurumi turns out perfectly, keep these tips in mind:
- Tension is Key: Amigurumi should be worked with relatively tight tension so that the stuffing does not show through the stitches. If you find your stitches are too loose, try using a smaller hook.
- Use Stitch Markers: Especially in rounds where you are increasing or decreasing, a stitch marker is a lifesaver to ensure you don’t lose count.
- Stuffing Technique: Don’t be afraid to stuff firmly! For the body, focus on the belly and hips to create that “chubby” look seen in the photos. For the head, as mentioned, stuff the sides more to avoid a “tennis ball” look.
- Eye Placement: Always double-check your eye placement before you start stuffing the head. It is much easier to adjust the eye holes in Row 12 than it is to move safety eyes once the head is stuffed!