DIY Crochet Angel Amigurumi Pattern: A Sweet and Simple Tutorial
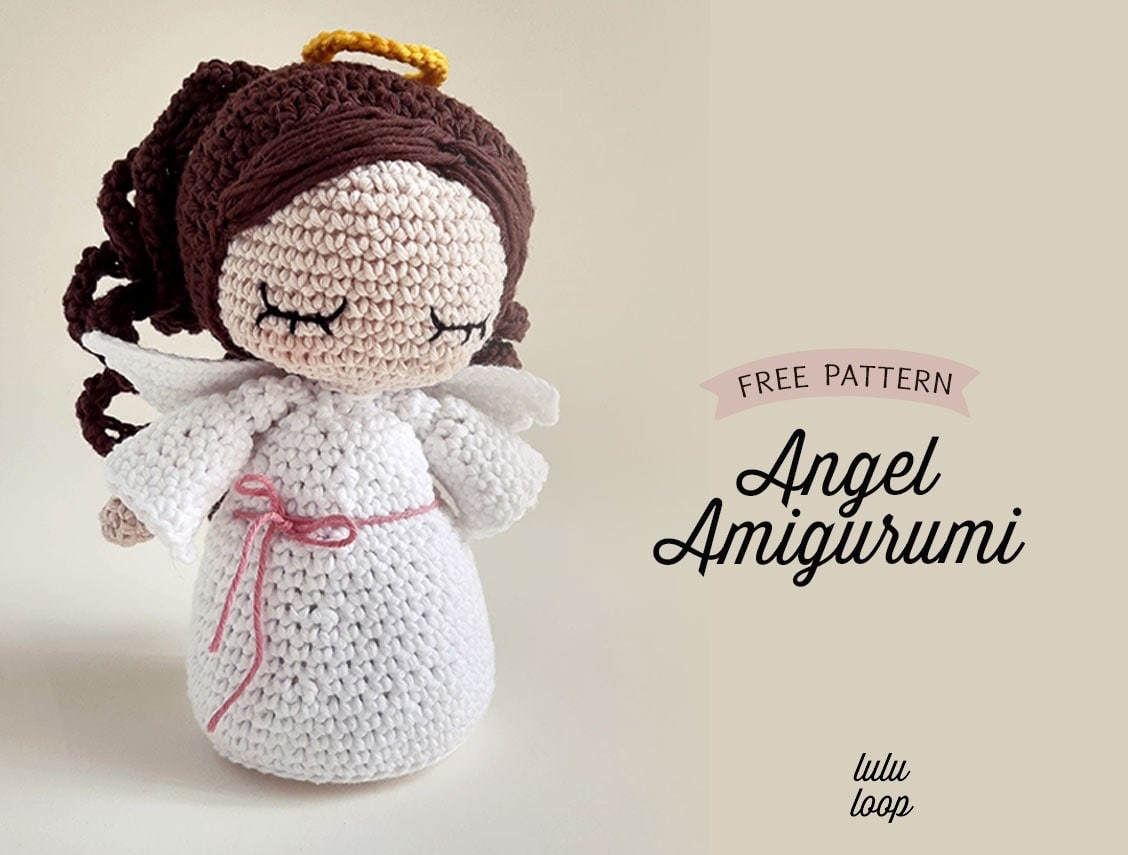
Are you looking for a project that is as sweet as it is heavenly? This Crochet Angel Amigurumi is the perfect addition to your crochet collection. Whether you are looking to create a charming nursery decoration, a thoughtful baby shower gift, or a cute little companion for a bookshelf, this angel is sure to bring a smile to everyone’s face. This pattern is designed with an intermediate level of skill in mind, meaning it is perfect for those who have mastered the basics and are ready to try something a little more detailed, like shaping and working with different stitch heights.
This little angel stands approximately 6.25 inches tall, making it a wonderful size for display. In this tutorial, we will walk you through every single step, from crafting the tiny arms to assembling that beautiful, curly hair. Grab your favorite cotton yarn and your favorite hook, and let’s get started on this divine little project!
Materials & Abbreviations
To ensure your angel turns out perfectly, I recommend using 100% cotton yarn. Cotton provides great stitch definition, which is essential for amigurumi to keep its shape and look crisp.
Materials Needed
- Yarn (DK or 4-ply weight):
- White (Body, sleeves, and wings): Approximately 2 oz/50g
- Skin tone (Arms and head): Approximately 1 oz/25g
- Dark Brown (Hair): Approximately 1 oz/25g
- Yellow (Aura/Halo): Approximately 1 oz/25g
- Black (Eyelashes): Small amount of embroidery thread or thin yarn
- Crochet Hooks:
- 2.75 mm (US size B/2 – C/3) for the main body
- 2.25 mm (US size D/4) for the wings
- Other Tools:
- Soft polyester stuffing (fiberfill)
- Tapestry needle
- Stitch markers
- Scissors
- Pipe cleaner (to be used for head support)
- Pink embroidery thread or thin yarn (approximately 9 inches) for the waist ribbon
- Pink blush (makeup or fabric marker) for the cheeks
Abbreviations (US Terms)
- mr: magic ring
- sc: single crochet
- inc: single crochet increase (2 sc in the same stitch)
- dec: single crochet decrease (use the invisible decrease method for a cleaner look)
- ch: chain stitch
- slst: slip stitch
- st(s): stitch(es)
- hdc: half double crochet
- dc: double crochet
- tr: treble crochet
- BLO: back loop only
- FLO: front loop only
- FO: fasten off
- rnd(s): round(s)
- […]..x: repeat the instructions in brackets … times
Step-by-Step Instructions
Note: Always work in a continuous spiral. Do not join or turn at the end of a round unless specifically instructed. Use a stitch marker to keep track of the start of each round.
Arms and Sleeves
Make 2 arms. Use Skin color first, then switch to White.
The Arm (Skin Color):
- Rnd 1: 6 sc into a magic ring (6)
- Rnd 2: [sc 5, inc] (7)
- Rnd 3 – 8: sc in each st (7)
Switch to White Color:
- Rnd 9: sc in each st (7)
- Rnd 10: BLO sc in each st (7)
- Rnd 11 – 12: sc in each st (7)
Stuff the arm lightly every 4 rounds. Fasten off, leaving a long tail for sewing.
The Sleeve (White Color):
Attach your white yarn to the last stitch of the front loop of round 10 of the arm.
- Rnd 1: [sc 1, inc] 3x, sc (10)
- Rnd 2: [sc 4, inc] 2x (12)
- Rnd 3: sc in each st (12)
- Rnd 4: [sc 3, inc] 3x (15)
- Rnd 5: sc in each st (15)
- Rnd 6: [sc 4, inc] 3x (18)
- Rnd 7 – 8: sc in each st (18)
Fasten off, leaving a tail for assembly.
Head Support
This provides stability to the head. Use White color.
- Rnd 1: 7 sc into a magic ring (7)
- Rnd 2 – 12: sc in each st (7)
Fasten off. Fold the pipe cleaner and insert it into this support piece.
The Body
Use White color.
- Rnd 1: 8 sc into a magic ring (8)
- Rnd 2: [inc] 8x (16)
- Rnd 3: [sc, inc] 8x (24)
- Rnd 4: [sc 2, inc] 8x (32)
- Rnd 5: [sc 3, inc] 8x (40)
- Rnd 6: sc in each st (40)
- Rnd 7: [sc 4, inc] 8x (48)
- Rnd 8: BLO sc in each st (48)
- Rnd 9 – 12: sc in each st (48)
- Rnd 13: [sc 6, dec] 6x (42)
- Rnd 14 – 16: sc in each st (42)
- Rnd 17: [sc 5, dec] 6x (36)
- Rnd 18 – 20: sc in each st (36)
- Rnd 21: [sc 4, dec] 6x (30)
- Rnd 22 – 24: sc in each st (30)
- Rnd 25: [sc 3, dec] 6x (24)
- Rnd 26 – 27: sc in each st (24)
- Rnd 28: [sc 2, dec] 6x (18)
- Rnd 29: [sc, dec] 6x (12)
- Rnd 30: [sc 2, dec] 3x (9)
Continue to the Head section.
The Head
Switch to Skin color.
- Rnd 1: [inc] 9x (18)
- Rnd 2: [sc, inc] 9x (27)
- Rnd 3: [sc 2, inc] 9x (36)
- Rnd 4: [sc 5, inc] 6x (42)
- Rnd 5: [sc 6, inc] 6x (48)
- Rnd 6 – 16: sc in each st (48)
Important: After Round 16, insert the prepared Head Support piece.
- Rnd 17: [sc 7, dec] 6x (42)
- Rnd 18: [sc 6, dec] 6x (36)
- Rnd 19: [sc 5, dec] 6x (30)
- Rnd 20: [sc 2, dec] 9x (27)
- Rnd 21: [sc, dec] 9x (18)
- Rnd 22: [sc, dec] 6x (12)
- Rnd 23: [dec] 6x (6)
Leave a long tail, cut the yarn, and use your tapestry needle to weave through the remaining 6 stitches to close the head.
The Hair
Work in Dark Brown color.
Hair Cap
- Rnd 1: 8 sc into a magic ring (8)
- Rnd 2: [inc hdc] 8x (16)
- Rnd 3: [hdc, inc] 8x (24)
- Rnd 4: [sc 2, inc] 8x (32)
- Rnd 5: [sc 3, inc] 8x (40)
- Rnd 6: sc in each st (40)
- Rnd 7: [sc 7, inc] 5x (45)
- Rnd 8 – 9: hdc in each st (45)
- Rnd 10: sc in each st (45)
Curly Strands (Make 2)
- Rnd 1: Ch 31. Start from the 3rd chain from the hook: [hdc, make 2 hdc together in the next stitch] 13x, sc 4.
Do not cut the thread. Repeat Rnd 1 until you have 4 curly strands of hair. In the final round, join the last stitch to the first stitch of the first strand with a slip stitch.
The Wings
Use a 2.25 mm crochet hook and White color. At the end of every round, just turn—do not make a chain stitch.
- Rnd 1: Ch 16. Starting from the 2nd chain from the hook, sc 15, turn (15)
- Rnd 2: sc 15, turn (15)
- Rnd 3: sc 15, turn (15)
- Rnd 4: slst 2, sc 13, turn (13)
- Rnd 5 – 6: sc 13, turn (13)
- Rnd 7: sc 11, turn (11)
- Rnd 8: sc 11, turn (11)
- Rnd 9: sc 9, turn (9)
- Rnd 10: sc 1, hdc 1, dc 4, hdc 1, sc 1, slst 1 (9)
Leave a long tail to sew the wings to the body. To shape them, pass the yarn through the previous rounds and pull slightly.
The Aura (Halo)
Use Yellow color and a 2.25 mm hook.
- Rnd 1: Ch 26. Starting from the 2nd chain from the hook, slst along the entire chain (25)
Leave a long tail to sew the aura to the head.
Finishing & Assembly
Now comes the most rewarding part—bringing your angel to life!
Face Details
For the eyes, find the position between rounds 9 and 10 of the head. Using black thread, embroider a horizontal line. To create the eyelashes, embroider three small lines 2 rounds below the initial eye line, leaving about 2 stitches of space between each lash.
To add personality, use a tiny bit of pink blush to mark the cheeks and a subtle point for the nose.
Assembly Steps
- Hair: Sew the hair cap onto the head. Sew the curly strands into the hair cap between rounds 4 and 5, leaving about 8 stitches of space between each strand. You can also embroider a small fringe at the front using dark brown yarn.
- Arms: Sew each completed arm to the sides of the body.
- Wings: Sew the wings onto the back of the body, specifically between rounds 25 and 29.
- Waist Ribbon: Cut a 9-inch piece of pink thread and tie it around the waist of the angel, finishing with a cute little bow.
Pro Tips for Success
- Tension is Key: When working with amigurumi, try to keep your stitches relatively tight. This prevents the stuffing from peeking through the holes.
- Invisible Decreases: For the best results, always use the invisible decrease method (inserting the hook into the front loops only of the next two stitches). This prevents unsightly gaps in your work.
- Firm Stuffing: Don’t be afraid to stuff your doll firmly! A well-stuffed amigurumi holds its shape much better over time.
- Use Markers: It is incredibly easy to lose your place in a spiral. Always use a stitch marker at the start of every round.