DIY Crochet Pinocchio Pattern: Make Your Own Amigurumi Wooden Boy
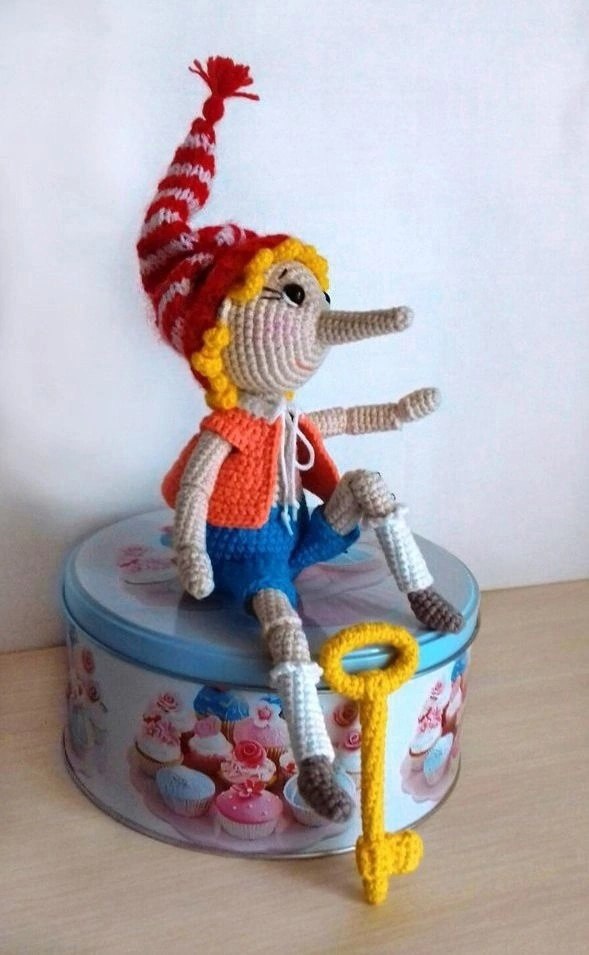
Bring a classic fairytale to life with this detailed, step-by-step crochet pattern! Perfect for intermediate crocheters or ambitious beginners, this tutorial will guide you through creating your very own amigurumi wooden boy, complete with his signature long nose, striped stocking cap, adorable little jacket, and iconic golden key.
Using jointed limbs, this doll can sit, stand, and pose beautifully, making him a wonderful keepsake gift or a nostalgic addition to your home decor. Let’s grab our hooks and get crocheting!
Materials & Abbreviations
Materials Needed
- Main Yarn: Sport weight cotton/acrylic blend yarn (such as Alize Cotton Gold) in Flesh/Beige (approx. 30g / 100 yards)
- Accent Yarns: Sport weight yarn in Orange (for the jacket), Turquoise/Blue (for the shorts), Brown (for the shoes), Yellow (for the key and hair), White (for the socks), and Red (for the hat)
- Crochet Hook: US Size 4/0 (1.75 mm or 2.0 mm)
- Knitting Needles: US 1 or 2 (2.0 mm or 2.5 mm) for the striped hat
- Safety Eyes or Beads: Two black half-beads or safety eyes (approx. 6mm)
- Stuffing: Premium polyester fiberfill
- Wire: One pipe cleaner or chenille stem (for the nose and key structure)
- Additional Tools: Thick cardboard or plastic (for the body base), craft glue, tapestry needle, embroidery thread (black/brown for lashes and mouth, pink for cheeks)
Crochet Abbreviations (US Terms)
- ch: Chain
- sc: Single crochet
- inc: Increase (2 sc in the same stitch)
- dec: Decrease (invisible decrease recommended)
- hdc: Half double crochet
- sl st: Slip stitch
- BLO: Back loops only
- FLO: Front loops only
- MR: Magic Ring
- st(s): Stitch(es)
- t-ch: Turning chain
Step-by-Step Instructions
Head
Using Flesh/Beige yarn. Stuff firmly as you go.
- Rnd 1: 6 sc in MR (6)
- Rnd 2: 6 inc (12)
- Rnd 3: (1 sc, inc) x 6 (18)
- Rnd 4: (2 sc, inc) x 6 (24)
- Rnd 5: (3 sc, inc) x 6 (30)
- Rnd 6: 2 sc, inc, (4 sc, inc) x 5, 2 sc (36)
- Rnd 7: (5 sc, inc) x 6 (42)
- Rnd 8: 3 sc, inc, (6 sc, inc) x 5, 3 sc (48)
- Rnd 9–17: sc in each st around (48)
- Rnd 18: (6 sc, dec) x 6 (42)
- Rnd 19: (5 sc, dec) x 6 (36)
- Rnd 20: (4 sc, dec) x 6 (30)
- Rnd 21: (3 sc, dec) x 6 (24)
- Rnd 22: (2 sc, dec) x 6 (18)
- Rnd 23: (1 sc, dec) x 6 (12)
- Rnd 24: 6 dec (6)
Fasten off and weave in the tail.
Long Nose
Using Flesh/Beige yarn. Do not stuff. You will insert a section of pipe cleaner inside later to keep it sturdy.
- Rnd 1: 6 sc in MR (6)
- Rnd 2: sc in each st around (6)
- Rnd 3: inc, 5 sc (7)
- Rnd 4: sc in each st around (7)
- Rnd 5: inc, 6 sc (8)
- Rnd 6–8: sc in each st around (8)
- Rnd 9: inc, 7 sc (9)
- Rnd 10: sc in each st around (9)
- Rnd 11: inc, 8 sc (10)
- Rnd 12: sc in each st around (10)
- Rnd 13: inc, 9 sc (11)
- Rnd 14: sc in each st around (11)
- Rnd 15: 7 sc, sl st (incomplete round)
Fasten off, leaving a long tail for sewing.
Ears (Make 2)
Using Flesh/Beige yarn.
- Row 1: 6 sc in MR. Do not join into a circle. Fasten off, leaving a long tail for sewing.
Body
Start with Turquoise yarn (for the shorts). Stuff firmly as you progress.
- Rnd 1: 6 sc in MR (6)
- Rnd 2: 6 inc (12)
- Rnd 3: (1 sc, inc) x 6 (18)
- Rnd 4: (2 sc, inc) x 6 (24)
- Rnd 5: (3 sc, inc) x 8 (32)
- Rnd 6: (4 sc, inc) x 8 (40)
- Rnd 7: 2 sc, inc, (4 sc, inc) x 7, 2 sc (48)
- Rnd 8–9: sc in each st around (48)
Tip: At this point, trace the bottom circle of your work onto thick cardboard or plastic. Cut it out and place it at the bottom of the body. You can also place a small coin or clean pebble at the bottom to give the doll weight and stability.
- Rnd 10: (6 sc, dec) x 6 (42)
- Rnd 11–13: sc in each st around (42)
- Rnd 14: (5 sc, dec) x 6 (36)
- Rnd 15–16: sc in each st around (36)
Switch to Flesh/Beige yarn.
- Rnd 17: sc in each st around (36)
- Rnd 18: (4 sc, dec) x 6 (30)
- Rnd 19–20: sc in each st around (30)
- Rnd 21: (3 sc, dec) x 6 (24)
- Rnd 22–25: sc in each st around (24)
- Rnd 26: 2 sc, dec, (4 sc, dec) x 3, 2 sc (20)
- Rnd 27: 2 sc, dec, (3 sc, dec) x 3, 1 sc (16)
- Rnd 28: 1 sc, dec, (2 sc, dec) x 3, 1 sc (12)
- Rnd 29–30: sc in each st around (12)
- Rnd 31: 12 sc, sl st (12)
Fasten off, leaving a long tail for sewing the head to the body.
Arms (Make 2 Sets)
The arms are constructed in three separate parts: Upper Arm, Middle Arm, and Palm. This allow us to thread-joint them for realistic movement!
Upper Arm
Using Flesh/Beige yarn.
- Rnd 1: 6 sc in MR (6)
- Rnd 2: (1 sc, inc) x 3 (9)
- Rnd 3–11: sc in each st around (9)
Fasten off and weave in ends.
Middle Arm
Using Flesh/Beige yarn.
- Rnd 1: 6 sc in MR (6)
- Rnd 2: (1 sc, inc) x 3 (9)
- Rnd 3–9: sc in each st around (9)
Fasten off and weave in ends.
Palm/Hand
Using Flesh/Beige yarn.
- Rnd 1: 6 sc in MR (6)
- Rnd 2: (2 sc, inc) x 2 (8)
- Rnd 3: sc in each st around (8)
- Rnd 4: 3 sc, 2 inc, 3 sc (10)
- Rnd 5: sc in each st around (10)
- Rnd 6: 3 sc, 2 dec, 3 sc (8) — Stuff lightly at this stage.
- Rnd 7: (2 sc, dec) x 2 (6)
Pull the hole closed, fasten off, and weave in ends.
Legs & Shoes (Make 2 Sets)
Like the arms, the legs consist of three parts: Upper Leg, Middle Leg/Sock, and Shoe.
Upper Leg
Using Flesh/Beige yarn.
- Rnd 1: Ch 10, join into a ring with a sl st (10)
- Rnd 2–11: sc in each st around (10)
Fasten off and weave in ends.
Middle Leg & Sock
Start with Brown yarn.
- Rnd 1: 6 sc in MR (6)
- Rnd 2: (1 sc, inc) x 3 (10) — Wait, check row count: (1 sc, 2 inc) x 2 = 10 ? Let’s use (2 sc, inc) to get to 10.
- Rnd 3–7: sc in each st around (10)
Switch to White yarn.
- Rnd 8: BLO sc in each st around (10)
- Rnd 9–18: sc in each st around (10)
Fasten off and weave in ends.
Sock Ruffle: Attach White yarn to the front loops of Round 8. (Ch 2, sl st in the next loop) repeat 10 times around. Fasten off and hide the tails.
Shoes
Using Brown yarn.
- Rnd 1: 6 sc in MR (6)
- Rnd 2: (2 sc, inc) x 2 (8)
- Rnd 3: sc in each st around (8)
- Rnd 4: 3 sc, 2 inc, 3 sc (10)
- Rnd 5–6: sc in each st around (10)
- Rnd 7: 1 sc, 2 inc, 1 sc, 2 dec (9)
- Rnd 8: 2 sc, 2 inc, 1 sc, 2 dec (9) — Stuff firmly.
- Rnd 9: 4 dec, 1 sc (5)
Pull the hole closed, fasten off, and weave in ends.
Shorts Legs (Make 2)
Using Turquoise yarn.
- Rnd 1: Ch 13, join into a ring, sc in each ch around (13)
- Rnd 2–5: sc in each st around (13)
- Rnd 6–7: BLO sc in each st around (13)
Fasten off and weave in ends.
Jacket
Start with White yarn. This jacket is worked in rows, meaning we chain 1 and turn at the end of each row.
- Row 1: Ch 18, starting in 2nd ch from hook: 17 sc (17), ch 1, turn.
- Row 2: 1 sc, inc, 2 sc, inc, (3 sc, inc) x 2, 2 sc, inc, 1 sc (22), ch 1, turn.
Switch to Orange yarn. Do not cut the white yarn yet; leave a 4-inch tail at the corner to slip stitch up the edge later.
- Row 3: BLO 1 sc, inc, (2 sc, inc) x 3, 3 sc, inc, (2 sc, inc) x 2, 2 sc, inc, 1 sc (29), ch 1, turn.
- Row 4–5: sc in each st across (29), ch 1, turn.
- Row 6: 4 sc, (1 sc, inc) x 3, 9 sc, (1 sc, inc) x 3, 4 sc (35), ch 1, turn.
- Row 7 (Armholes): 4 sc, inc, 1 sc, ch 8, skip 10 sts, 1 sc, inc, (2 sc, inc) x 2, 1 sc, ch 8, skip 10 sts, 1 sc, inc, 4 sc (38), ch 1, turn.
- Row 8: 4 sc, 8 sc along the chain, 12 sc, 8 sc along the chain, 4 sc (36), ch 1, turn.
- Row 9: sc in each st across (36), ch 1, turn.
- Row 10: 3 sc, inc, (5 sc, inc) x 5, 2 sc (42), ch 1, turn.
- Row 11–12: sc in each st across (42), ch 1, turn.
- Row 13: 3 sc, inc, (6 sc, inc) x 5, 3 sc (48), ch 1, turn.
- Row 14: sc in each st across (48), ch 1, turn.
- Row 15: 3 sc, inc, (7 sc, inc) x 5, 3 sc (54), ch 1, turn.
Fasten off. Using Orange yarn, slip stitch up the front openings of the jacket to give it a clean, finished edge.
Curly Hair (Make 2 Pieces)
Using Yellow yarn.
- Ch 26. Starting in the 2nd chain from hook: 2 sc, [ch 7, 6 sc down the chain, sl st into next main chain, 3 sc along main chain, ch 8, 7 sc down the chain, sl st into next main chain, 3 sc along main chain] x 3, ch 7, 6 sc down the chain, sl st to main chain, ch 9, 8 sc down the chain, 2 sc (25 sts total).
Fasten off, leaving a long tail to sew onto the sides of the head.
Striped Hat
The stocking cap is knitted to give it a soft, realistic fabric texture. Use US 1 or 2 needles (2.0 mm or 2.5 mm).
Using Red yarn, cast on 44 stitches (42 pattern stitches + 2 edge/selvedge stitches).
- Rows 1–3: Work in 1×1 Rib (Knit 1, Purl 1) (42 sts).
Now, alternate colors every 2 rows between White and Red. Work in Stockinette Stitch (Knit on Right Side rows, Purl on Wrong Side rows).
- Row 4 (White): K6, dec, (K12, dec) x 2, K6 (39 sts).
- Rows 5–11: Maintain stockinette stitch over 39 sts.
- Row 12 (White): K5, dec, (K11, dec) x 2, K6 (36 sts).
- Row 13: Purl all sts.
- Row 14 (White): K5, dec, (K10, dec) x 2, K5 (33 sts).
- Row 15: Purl all sts.
- Row 16: K5, dec, (K9, dec) x 2, K4 (30 sts).
- Row 17: Purl all sts.
- Row 18: K4, dec, (K8, dec) x 2, K4 (27 sts).
- Row 19: Purl all sts.
- Row 20: K4, dec, (K7, dec) x 2, K3 (24 sts).
- Row 21: Purl all sts.
- Row 22: K3, dec, (K6, dec) x 2, K3 (21 sts).
- Row 23: Purl all sts.
- Row 24: K3, dec, (K5, dec) x 2, K2 (18 sts).
- Row 25: Purl all sts.
- Row 26: Dec, K14, dec (16 sts).
- Row 27: Purl all sts.
- Row 28: Dec, K12, dec (14 sts).
- Row 29: Purl all sts.
- Row 30: Dec, K10, dec (12 sts).
- Row 31: Purl all sts.
- Row 32: Dec, K8, dec (10 sts).
- Row 33: Purl all sts.
- Row 34: Dec, K6, dec (8 sts).
- Row 35: Purl all sts.
- Row 36: Dec, K4, dec (6 sts).
- Row 37: Purl all sts.
Thread the remaining stitches onto your yarn tail, pull tight, sew up the back seam of the hat, and attach a yarn pom-pom or tassel to the tip!
Golden Key
Using Yellow yarn, this key uses a wire insert to keep its shape.
Key Shaft
- Rnd 1: 6 sc in MR (6)
- Rnd 2–22: sc in each st around (6)
- From Row 23, work in rows:
- Row 23–30: 2 sc, ch 1, turn.
Fasten off, leaving a tail.
Key Ring
- Rnd 1: 6 sc in MR (6)
- Rnd 2–25: sc in each st around (6). Work odd rounds from 3 to 23 in BLO.
Fasten off.
Key Flange (Lower Teeth)
- Row 1: Ch 4, starting in 2nd ch: 3 sc, ch 1, turn.
- Row 2–13: 3 sc, ch 1, turn.
Fasten off. Wrap this piece around the bottom of the key shaft and sew it secure.
Finishing & Assembly
1. Designing the Face
Mark the positions of the eyes using pins. Find a spot about 6 rounds up from the magic ring on the front of the face, spacing them about 10 stitches apart. Thread a long needle with matching flesh yarn and sink the eye sockets slightly by pulling yarn back through the base of the head. Glue or sew the safety beads in place.
Embroider eyelashes, eyebrows, and a cheerful smiling mouth. Lightly apply pink blush or soft pink pastel to the cheeks.
2. Adding the Nose & Hair
Insert a small segment of pipe cleaner inside the long nose. Sew the nose centered between the eyes. Stitch the curly hair pieces to the sides of the head where his ears would sit, then stitch the ears just behind the curls.
3. Jointing the Limbs
To make the jointed limbs movable, we will use a thread-jointing method:
Using a long doll-making needle and strong thread, pass through the upper arm, down through the middle arm, and secure to the palm, then run the thread back up through all segments and tie off firmly inside the body. This creates an “internal skeleton” effect that allows the elbows and knees to bend!
Repeat this process for the legs, threading through the upper leg, sock segment, and shoe, securing them to the lower body so Pinocchio can sit easily on a shelf.
Amigurumi Success Tips
- Tight Stitches: Use a smaller hook size than recommended on your yarn label. Tight stitches prevent the stuffing from peeking through!
- Invisible Decrease: When working decreases, insert your hook into the Front Loops Only of the next two stitches. Yarn over and draw through, then yarn over and draw through both loops. This makes decreases nearly seamless.
- Cardboard Base: Don’t skip the cardboard insert for the body! It helps your doll sit upright without tipping over.