Crazy Frog Crochet Pattern: A Step-by-Step Amigurumi Tutorial
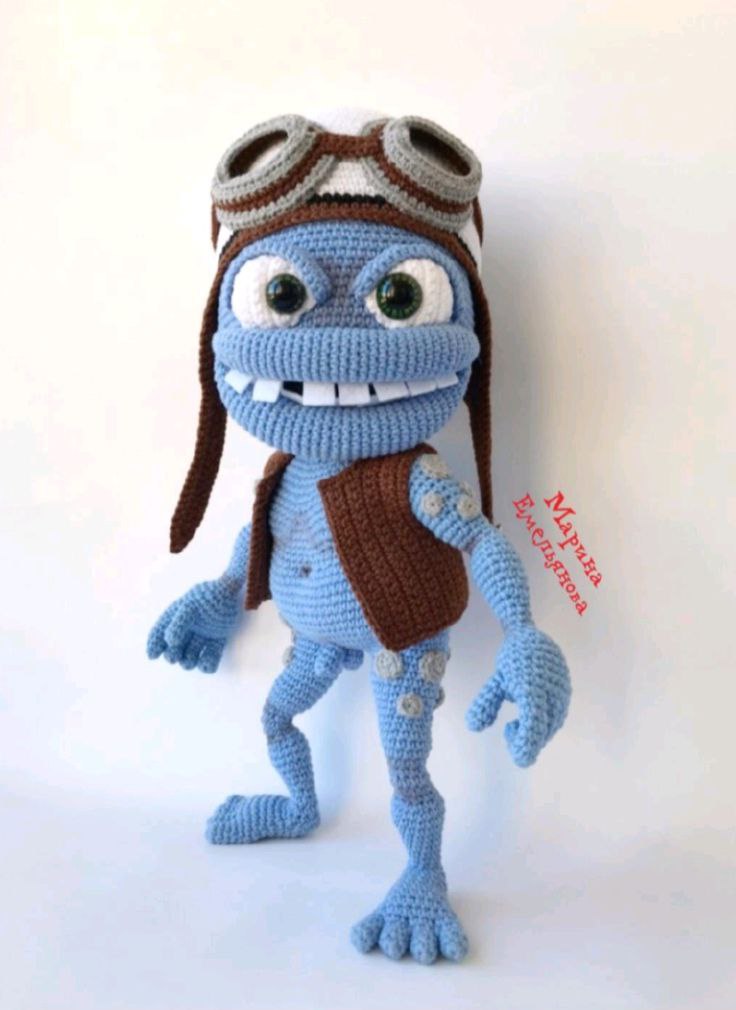
Are you looking for a unique, quirky, and expressive project to add to your crochet collection? This Crazy Frog amigurumi is the perfect challenge for intermediate crocheters or ambitious beginners! With its wide, toothy grin, expressive eyes, and cool aviator gear, this little character is sure to steal the show on any shelf.
In this detailed tutorial, we will walk through the process of creating this poseable, character-driven toy. From sculpting the fingers to assembling the aviator helmet, this guide covers everything you need to bring your very own Crazy Frog to life. Grab your hook and let’s get started!
Materials and Abbreviations
To ensure your frog looks just like the one in the photos, I recommend using high-quality cotton yarn and a sturdy hook. Because this toy uses an internal wire structure for posing, make sure you have your armature supplies ready!
Yarn Requirements
- Blue Yarn: Approximately 1.5 skeins (Medium weight/DK)
- White Yarn: Approximately 1/2 skein
- Brown Yarn: Approximately 1/2 skein
- Grey Yarn: A small amount
- Black Yarn: A small amount
Tools and Notions
- Crochet Hook: 1.75 mm
- Stuffing: Polyester fiberfill
- Eyes: Plastic safety eyes (one 13mm and one 15mm for that slightly asymmetrical, crazy look!)
- Wire (Armature): 1.5 feet of 2mm thick wire and about 20 inches of 0.5mm thick wire
- Felt: White felt (for teeth) and Black felt (for the mouth area)
- Other: Sewing needle, scissors, masking tape (to secure wire), and a small buckle (approx. 0.4 in x 0.6 in)
Abbreviations (US Terms)
- mr: magic ring
- ch: chain
- sc: single crochet
- inc: increase (2 sc in one stitch)
- dec: decrease (sc 2 together)
- sl st: slip stitch
- BLO: back loops only
- st(s): stitch(es)
Step-by-Step Instructions
The Hands (Make 2)
We begin by crocheting the fingers individually using blue yarn. Work in continuous rounds.
The Thumb
Rnd 1: 6 sc in mr (6)
Rnd 2-6: 6 sc (5 rounds total) (6)
Fasten off and leave a tail.
The Other 4 Fingers
Rnd 1: 6 sc in mr (6)
Rnd 2-7: 6 sc (6 rounds total) (6)
Fasten off for the first three fingers. Important: For the 4th finger, do not fasten off!
Joining the Fingers
Now, we join the fingers to form the hand. Work around the edges of the fingers: 3 sc around the 4th finger, 3 sc around the 3rd, 3 sc around the 2nd, 6 sc around the 1st (thumb), 3 sc around the 2nd, 3 sc around the 3rd, and 3 sc around the 4th (24).
Rnd 1-2: 24 sc (24)
Rnd 3: 9 sc, 3 sc together with the thumb, 12 sc (24)
Rnd 4: 9 sc, 3 sc around the thumb, 12 sc (24)
Rnd 5-6: 24 sc (24). Insert a thin 0.5mm wire structure shaped like a hand into the palm so it reaches every finger.
Rnd 7: (2 sc, 1 dec) * 18. Stuff the palm lightly; do not stuff the fingers.
Rnd 8: (1 sc, 1 dec) * 6 (12). Take a 7.8 inch piece of 2mm wire, connect it to the thin wire using masking tape, and insert it into the hand.
Rnd 9: (2 sc, 1 dec) * 3 (9)
Rnd 10-11: 9 sc (9). Mark the edge of the palm near the thumb; this marker will be used for assembly.
Rnd 12: 4 sc, 1 inc, 3 sc, 1 inc (11)
Rnd 13: 5 sc, 1 inc, 4 sc, 1 inc (13)
Rnd 14: 13 sc (13)
Rnd 15: 6 sc, 1 inc, 5 sc, 1 inc (15)
Rnd 16: 15 sc (15)
Rnd 17: 7 sc, 1 inc, 6 sc, 1 inc (17). Stuff as you go.
Rnd 18-19: 17 sc (17)
Rnd 20: (1 sc, 1 dec) * 5, 2 sc (12)
Rnd 21: (2 sc, 1 dec) * 3 (9)
Rnd 22 (Elbow): 3 sc, 3 inc, 3 sc (12). Ensure the elbow is positioned correctly.
Rnd 23: 12 sc (12)
Rnd 24: (3 sc, 1 inc) * 3 (15)
Rnd 25-27: 15 sc (15)
Rnd 28: 3 sc, 1 inc, 7 sc, 1 inc, 3 sc (17)
Rnd 29: 17 sc (17)
Rnd 30: 4 sc, 1 inc, 8 sc, 1 inc, 3 sc (19)
Rnd 31-34: 19 sc (19). Stuff fully, fasten off, and weave in ends.
The Legs (Make 2)
The feet are made of 4 toes each. Use blue yarn and work in continuous rounds.
The Toes
Rnd 1: 6 sc in mr (6)
Rnd 2-4: 6 sc (3 rounds) (6)
Fasten off for the first three toes. For the 4th toe, do not fasten off!
Join the toes: 3 sc around the 4th, 3 sc around the 3rd, 3 sc around the 2nd, 6 sc around the 1st, 3 sc around the 2nd, 3 sc around the 3rd, 3 sc around the 4th (24).
The Foot and Leg
Rnd 1: 24 sc (24)
Rnd 2: 1 dec, 8 sc, 1 dec, 12 sc (22)
Rnd 3: 1 dec, 7 sc, 11 sc (20)
Rnd 4: 1 dec, 6 sc, 1 dec, 10 sc (18)
Rnd 5: 1 dec, 5 sc, 1 dec, 9 sc (16)
Rnd 6: 1 dec, 4 sc, 1 dec, 8 sc (14)
Rnd 7 (Heel): 7 sc, ch 7, skip 7 sc (14)
Rnd 8: 7 sc, 7 sc in ch (14)
Rnd 9: 7 dec (7). Close the hole, stuff the foot firmly, and fasten off.
Lower Leg and Thigh
Take a 20-inch piece of 2mm wire, bend it into a loop, and secure it with tape. Insert it into the foot. Stuff the foot and leg.
Rnd 1-2: 14 sc (14)
Rnd 3: (1 dec, 1 sc) * 4, 1 dec (9). Stuff as you go.
Rnd 4-5: 9 sc (9). Mark the back of the shin.
Rnd 6: 1 sc, 1 inc, 4 sc, 1 inc, 2 sc (11)
Rnd 7: 11 sc (11)
Rnd 8: 2 sc, 1 inc, 5 sc, 1 inc, 2 sc (13)
Rnd 9: 1 inc, 2 sc, 1 inc, 5 sc, 1 inc, 2 sc (17)
Rnd 10-11: 17 sc (17)
Rnd 12: 1 sc, (1 dec, 1 sc) * 5, 1 sc (12)
Rnd 13: (2 sc, 1 dec) * 3 (9)
Rnd 14 (Knee): 3 sc, 3 dec, 3 sc (12)
Rnd 15: 12 sc (12)
Rnd 16: (2 sc, 1 dec) * 3 (9)
Rnd 17: (2 sc, 1 inc) * 3 (12)
Rnd 18: (3 sc, 1 inc) * 3 (15)
Rnd 19-21: 15 sc (15)
Rnd 22: 3 sc, 1 inc, 7 sc, 1 inc, 3 sc (17)
Rnd 23: 17 sc (17)
Rnd 24: 4 sc, 1 inc, 8 sc, 1 inc, 3 sc (19)
Rnd 25: 4 sc, 1 inc, 9 sc, 1 inc, 4 sc (21)
Rnd 26-27: 21 sc (21). Stuff fully. This is the left leg. For the right leg, repeat the process but complete the final 5 sc of the last round. This ensures the legs can be joined easily.
The Body
Twist the two leg wires together. Join the legs using an 8-ch slip stitch join.
Rnd 1: 21 sc around the right leg, 8 sc in the ch, 21 sc around the left leg, and continue to the middle of the back. Mark the center of the spine.
Rnd 2-3: 58 sc (58)
Rnd 4: 3 inc, 20 sc, (1 inc, 1 sc) * 6, 20 sc, 3 inc (70)
Rnd 5-14: 70 sc (70). Start stuffing here.
Rnd 15: 3 dec, 24 sc, 1 dec, 6 sc, 1 dec, 24 sc, 3 dec (62)
Rnd 16: 25 sc, 1 dec, 8 sc, 1 dec, 25 sc (60)
Rnd 17: 26 sc, 1 dec, 5 sc, 1 dec, 25 sc (58)
Rnd 18: 58 sc (58)
Rnd 19: 21 sc, 5 inc, 6 sc, 5 inc, 21 sc (68)
Rnd 20: 30 sc, 1 dec, 4 sc, 1 dec, 30 sc (66)
Rnd 21: 30 sc, 1 dec, 2 sc, 1 dec, 30 sc (64)
Rnd 22: 30 sc, 2 dec, 30 sc (62)
Rnd 23: 30 sc, 1 dec, 28 sc, 1 dec (60)
Rnd 24: 60 sc (60)
Rnd 25: 11 sc, 10 sc joined with the left arm, 18 sc, 10 sc joined with the right arm, 11 sc (60)
Rnd 26: 11 sc, 9 sc around the left arm, 18 sc, 9 sc around the right arm, 11 sc (58). Secure the arm wires by wrapping them around the main body wire and using tape.
Rnd 27: 58 sc (58)
Rnd 28: 7 sc, (1 dec, 1 sc) * 5, 14 sc, (1 dec, 1 sc) * 5, 7 sc (48)
Rnd 29: (1 dec, 3 sc) * 9, 1 dec, 1 sc (38)
Rnd 30: (3 sc, 1 dec) * 7, 3 sc (31)
Rnd 31: (1 sc, 1 dec) * 5, 2 sc, (1 dec, 1 sc) * 4, 1 dec (21)
Rnd 32: 5 sc, 1 dec, 6 sc, 1 dec, 4 sc, 1 dec (18)
Rnd 33-35 (Neck): 18 sc (18). Stuff fully and fasten off.
The Head
Using blue yarn, start with a magic ring, but do not pull it tight—this allows for more shape flexibility later.
Rnd 2: 6 inc (12)
Rnd 3: (1 sc, 1 inc) * 6 (18)
Rnd 4: (2 sc, 1 inc) * 6 (24)
Rnd 5: (3 sc, 1 inc) * 6 (30)
Rnd 6: 1 sc, 1 inc, (4 sc, 1 inc) * 5, 3 sc (36)
Rnd 7: (5 sc, 1 inc) * 6 (42)
Rnd 8: (6 sc, 1 inc) * 6 (48)
Rnd 9: 2 sc, 1 inc, (7 sc, 1 inc) * 5, 5 sc (54)
Rnd 10: (8 sc, 1 inc) * 6 (60)
Rnd 11: (9 sc, 1 inc) * 6 (66)
Rnd 12: 3 sc, 1 inc, (10 sc, 1 inc) * 5, 7 sc (72)
Rnd 13: (11 sc, 1 inc) * 6 (78)
Rnd 14: (12 sc, 1 inc) * 6 (84)
Rnd 15-29: 84 sc (84). Place the head on the wire structure and sew it securely. Stuff the head firmly.
Rnd 30: (12 sc, 1 dec) * 6 (78)
Rnd 31: (11 sc, 1 dec) * 6 (72)
Rnd 32: (10 sc, 1 dec) * 6 (66)
Rnd 33: (9 sc, 1 dec) * 6 (60)
Rnd 34: (8 sc, 1 dec) * 6 (54)
Rnd 35: (7 sc, 1 dec) * 6 (48)
Rnd 36: (6 sc, 1 dec) * 6 (42)
Rnd 37: (5 sc, 1 dec) * 6 (36)
Rnd 38: (4 sc, 1 dec) * 6 (30)
Rnd 39: (3 sc, 1 dec) * 6 (24)
Rnd 40: (2 sc, 1 dec) * 6 (18)
Rnd 41: (1 sc, 1 dec) * 6 (12)
Rnd 42: 6 dec (6). Close and fasten off.
Face and Facial Features
The Eyes (White)
We will work in rows (turning the work) using white yarn.
Start: ch 2, work into 2nd ch.
Rnd 1: 1 sc, ch, turn (1)
Rnd 2: 1 inc, ch, turn (2)
Rnd 3: 1 sc, 1 inc, ch, turn (3)
Rnd 4: 1 inc, 1 sc, 1 inc, ch, turn (5)
Rnd 5: 1 sc, 1 inc, 1 sc, 1 inc, 1 sc, ch, turn (7)
Rnd 6: 1 sc, 1 inc, 1 sc, 1 inc, 1 sc, 1 inc, 1 sc, ch, turn (10)
Rnd 7-11: 10 sc (10)
Rnd 12: 1 sc, 1 dec, 1 sc, 1 dec, 1 sc, 1 dec, 1 sc, ch, turn (7)
Rnd 13: 1 sc, 1 dec, 1 sc, 1 dec, 1 sc, ch, turn (5)
Rnd 14: 1 dec, 1 sc, 1 dec, ch, turn (3)
Rnd 15: 1 sc, 1 dec, ch, turn (2)
Rnd 16: 1 dec (1). Fasten off.
Eyelids (Blue)
Start: ch 21.
Rnd 1: 20 sc, ch, turn (20)
Rnd 2: 20 sc (20). Fasten off.
Lips and Mouth
First, cut a piece of black felt to create the mouth area. Then, crochet the lips using blue yarn.
Upper Lip: Ch 5, join in circle. R1: 5 sc. R2: 2 sc, 1 inc, 2 sc. R3: (2 sc, 1 inc) * 2. R4: (3 sc, 1 inc) * 2. R5: 10 sc. R6: (4 sc, 1 inc) * 2. R7: 12 sc. R8: (5 sc, 1 inc) * 2. R9-35: 14 sc. R36: (5 sc, 1 dec) * 2. R37: 12 sc. R38: (4 sc, 1 dec) * 2. R39: 10 sc. R40: (3 sc, 1 dec) * 2. R41: 2 sc, 1 dec, 2 sc. R42: 5 sc.
Lower Lip: Ch 5, join in circle. R1: 5 sc. R2: 2 sc, 1 inc, 2 sc. R3: (2 sc, 1 inc) * 2. R4: (3 sc, 1 inc) * 2. R5: 10 sc. R6: (4 sc, 1 inc) * 2. R7: 12 sc. R8: (5 sc, 1 inc) * 2. R9: (6 sc, 1 inc) * 2. R10-36: 16 sc. R37: (6 sc, 1 dec) * 2. R38: (5 sc, 1 dec) * 2. R39: 12 sc. R40: (4 sc, 1 dec) * 2. R41: 10 sc. R42: (3 sc, 1 dec) * 2. R43: 5 sc. R44: 2 sc, 1 dec, 2 sc. R45: 5 sc.
Teeth: Cut 7 teeth for the top jaw and 9 for the bottom from white felt. Glue them to the lips. For the top, skip one tooth after the second one to give him that “crazy” look!
The Accessories
The Vest (Brown)
Using brown yarn, work in rows.
Start: ch 18.
Rnd 1-3: 17 sc, turn (17)
Rnd 4: 17 sc, ch 6, turn (17)
Rnd 5-9: 22 sc, turn (22)
Rnd 10-18: 10 sc, turn (10)
Rnd 19: 10 sc, ch 13, turn (10)
Rnd 20-24: 22 sc, turn (22)
Rnd 25-34: 19 sc, turn (19)
Rnd 35: 19 sc, ch 4, turn (19)
Rnd 36-40: 22 sc, turn (22)
Rnd 41-49: 10 sc, turn (10)
Rnd 50: 10 sc, ch 13, turn (10)
Rnd 51-55: 22 sc, turn (22)
Rnd 56-58: 17 sc, turn (17).
Pro-tip: Steam the vest with an iron to help it hold its shape and stretch the bottom slightly before sewing the shoulders together and edging with sc.
Goggles and Helmet
Goggles: Using grey yarn, ch 36 and join in a circle. R1: 36 sc. R2: 36 sc in BLO. R3: 36 sc in BLO using brown yarn. R4: 36 sc. R5: 36 inc, sl st (72).
Nose Bridge: Using brown yarn, ch 7. R1: 6 sc, turn (6).
Goggle Strap: Using brown yarn, ch 78. R1: 77 sc, turn (77). R2: 77 sc (77).
Helmet: Using white yarn. R1: 6 sc in mr. R2: 6 inc (12). R3: (1 sc, 1 inc) * 6 (18). R4: (2 sc, 1 inc) * 6 (24). R5: (3 sc, 1 inc) * 6 (30). R6: 1 sc, 1 inc, (4 sc, 1 inc) * 5, 3 sc (36). R7: (5 sc, 1 inc) * 6 (42). R8: (6 sc, 1 inc) * 6 (48). R9: 2 sc, 1 inc, (7 sc, 1 inc) * 5, 5 sc (54). R10: (8 sc, 1 inc) * 6 (60). R11: (9 sc, 1 inc) * 6 (66). R12: 3 sc, 1 inc, (10 sc, 1 inc) * 5, 7 sc (72). R13: (11 sc, 1 inc) * 6 (78). R14: (12 sc, 1 inc) * 6 (84). R15-29: 84 sc (84).
Assembly: Place the head on the wire, sew the helmet on, and attach the goggles and strap.
Finishing and Assembly
Now for the magic! It’s time to put all your hard work together.
- Face Placement: Count 19 rows down from the top of the head. This is where the eyes go. Place the white eye pieces, leaving 2 stitches between them. Pin them with safety pins, add a little stuffing, and sew them to the face.
- Eyelids: Sew the blue eyelids along the top edge of the white eyes.
- Mouth: Pin the black felt piece to the face first, then pin the upper and lower lips. Ensure the lips are unfolded so the teeth point forward and don’t twist. Sew the sides of the lips together and sew the entire mouth assembly to the face from the back.
- Eyes: Fit your plastic safety eyes into the white eye sockets. Remember: for this character, the right eye should be slightly smaller (13mm) than the left (15mm). Glue them into place once you are happy with the position.
- Final Touches: Add the goggles to the helmet and attach the goggle strap. Don’t forget to sew the vest onto the body!
Tips for Success
- Wire Safety: Always wrap the ends of your wire with masking tape or electrical tape to prevent them from poking through the crochet fabric.
- Stitch Markers: Because amigurumi is worked in continuous rounds, using a stitch marker is essential to avoid losing your place.
- Shading: For a professional look, use a little bit of brown eyeshadow or dry pastel to shade the elbows, knees, belly button, and brow area. This adds incredible depth to your toy!
- Blocking: Steaming your accessories (like the vest and helmet straps) is the secret to making them look clean and well-shaped rather than curly or messy.