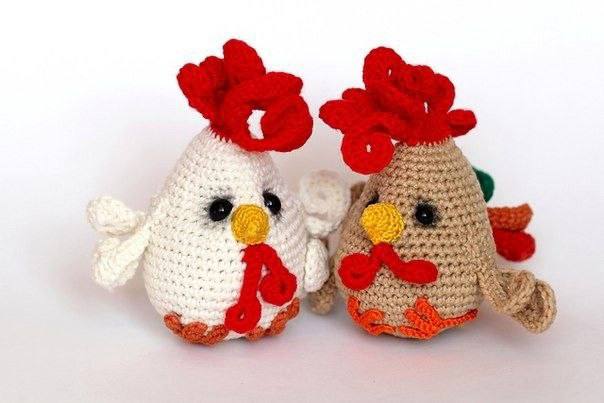
Adorable Crochet Rooster Keychain Pattern: A Beginner-Friendly Tutorial
Looking for a quick, cute, and satisfying crochet project to brighten up your keys or bag? This mini crochet rooster keychain is the perfect way to use up those small scraps of yarn hiding in your stash. Whether you are a seasoned pro or just picking up a crochet hook for the first time, this project is designed for success.
This little farm friend stands at approximately 3 inches tall, making it a delightful gift or a charming accessory for yourself. In this tutorial, we will walk you through every step, from the rounded body to the curly comb and tiny feet. Let’s dive in and create your own feathered companion!
Materials & Abbreviations
Before we begin, gather your supplies. One of the best parts of this pattern is that you can customize the colors to make a traditional red and brown rooster, a snowy white hen, or even a fantasy-colored bird!
Materials Needed
- Yarn: Small amounts of yarn in your chosen colors (Main body color, Red for the comb/wattle, Yellow for the beak, and colorful scraps for the tail). It is recommended to use yarns of the same weight/thickness for a consistent look.
- Crochet Hook: A size that matches your chosen yarn (typically a 2.0mm to 3.0mm hook for amigurumi).
- Stuffing: Polyester fiberfill or a similar stuffing material.
- Eyes: 2 small black beads or safety eyes.
- Keychain Hardware: A lobster clasp or jump ring.
- Tools: Yarn needle, scissors, and stitch markers.
US Crochet Terms & Abbreviations
- ch: Chain
- sc: Single crochet
- hdc: Half double crochet
- dc: Double crochet
- sl st: Slip stitch
- inc: Increase (work two stitches into the same stitch)
- dec: Decrease (work two stitches together)
- MR: Magic Ring
- st(s): Stitch(es)
Step-by-Step Instructions
The Main Body
The body is worked in a continuous spiral. Do not join rounds with a slip stitch unless specified. Use a stitch marker to keep track of the beginning of each round.
- Round 1: Create a magic ring and work 6 sc into it. (6 sts)
- Round 2: inc in each stitch around. (12 sts)
- Round 3: (1 sc, inc) repeat 6 times. (18 sts)
- Round 4: (2 sc, inc) repeat 6 times. (24 sts)
- Round 5: (3 sc, inc) repeat 6 times. (30 sts)
- Round 6: (4 sc, inc) repeat 6 times. (36 sts)
- Round 7: (5 sc, inc) repeat 6 times. (42 sts)
- Round 8: (6 sc, inc) repeat 6 times. (48 sts)
- Rounds 9-12: sc in each stitch around. (48 sts)
- Round 13: (6 sc, dec) repeat 6 times. (42 sts)
- Rounds 14-16: sc in each stitch around. (42 sts)
- Round 17: (5 sc, dec) repeat 6 times. (36 sts)
- Rounds 18-19: sc in each stitch around. (36 sts)
- Round 20: (4 sc, dec) repeat 6 times. (30 sts)
- Rounds 21-22: sc in each stitch around. (30 sts)
- Round 23: (3 sc, dec) repeat 6 times. (24 sts)
- Rounds 24-25: sc in each stitch around. (24 sts)
- Round 26: (2 sc, dec) repeat 6 times. (18 sts)
Now, stuff the body firmly with fiberfill. Be careful not to overstuff to the point where the stitches stretch and gaps appear.
Switch to Red Yarn for the top of the head.
- Round 27: sc in each stitch around. (18 sts)
To close the top, fold the piece in half and crochet through both layers to seal it.
- Round 28: sc across the folded edge. (9 sts)
The Comb (Crest)
The comb is made of several “petals” worked directly into the top edge of the body from Round 28. Continue using red yarn.
- Petal 1: ch 13. Starting from the 3rd chain from the hook, work 10 dc into the first chain, 10 sc across the remaining chains, and finish with a sl st back into the body.
- Petal 2: ch 12. From 3rd ch, 10 dc in one, 9 sc across, sl st back into body.
- Petal 3: ch 11. From 3rd ch, 10 dc in one, 8 sc across, sl st back into body.
- Petal 4: ch 10. From 3rd ch, 10 dc in one, 7 sc across, sl st back into body.
- Petal 5: ch 9. From 3rd ch, 10 dc in one, 6 sc across, sl st back into body.
- Petal 6: ch 8. From 3rd ch, 7 hdc in one, 5 sl st across, sl st back into body.
- Petal 7: ch 7. From 3rd ch, 7 hdc in one, 4 sl st across, sl st back into body.
- Petal 8: ch 6. From 3rd ch, 7 hdc in one, 3 sl st across, sl st back into body.
- Petal 9: ch 5. From 3rd ch, 7 hdc in one, 2 sl st across, sl st back into body.
Fasten off and weave in your ends.
Wings (Make 2)
Use the main body color.
- Round 1: ch 4.
- Round 2: Starting from the 2nd chain from hook, work 3 sc, ch 1, turn.
- Round 3: dec, 1 sc, ch 1, turn.
- Round 4: dec, ch 1, turn.
- Round 5 (Feather curls):
- ch 9, from 3rd ch: 10 dc in one, 6 sl st across, sl st in same stitch.
- ch 11, from 3rd ch: 10 dc in one, 8 sl st across, sl st in same stitch.
- ch 9, from 3rd ch: 10 dc in one, 6 sl st across, sl st in same stitch.
Fasten off, leaving a long tail for sewing.
The Tail (Make 1)
Follow the same instructions as the wings for Rounds 1-4 using the main body color. For Round 5, switch to a contrasting color (or a mix of colors) to create the tail feathers:
- Feather 1: ch 9, from 3rd ch: 10 dc in one, 6 sl st, sl st in same stitch.
- Feather 2: ch 11, from 3rd ch: 10 dc in one, 8 sl st, sl st in same stitch.
- Feather 3: ch 13, from 3rd ch: 10 dc in one, 10 sl st, sl st in same stitch.
- Feather 4: ch 11, from 3rd ch: 10 dc in one, 8 sl st, sl st in same stitch.
- Feather 5: ch 9, from 3rd ch: 10 dc in one, 6 sl st, sl st in same stitch.
The Beak (Make 1)
Use yellow yarn.
- Round 1: 4 sc in MR, ch 1, turn.
- Round 2: inc, 2 sc, inc, ch 1, turn.
- Round 3: inc, 4 sc, inc, ch 1, turn.
- Round 4: inc, 6 sc, inc, ch 1, turn.
- Round 5: inc, 8 sc, inc, ch 1.
- Round 6: 12 sc.
Fold the piece in half and work 6 sl st across the edges to close. Fasten off leaving a sewing tail.
The Wattle (Make 1)
Use red yarn.
- Row 1: ch 8.
- Row 2: From 3rd ch, work 7 hdc in one, 5 sl st across, sl st.
- Row 3: ch 6.
- Row 4: From 3rd ch, work 7 hdc in one, 3 sl st across, sl st.
The Feet (Make 2)
Use red yarn.
- Row 1: ch 16.
- Row 2: Starting from 2nd ch, work 6 sl st.
- Row 3: ch 6.
- Row 4: Starting from 2nd ch, work 6 sl st.
- Row 5: ch 6.
- Row 6: Starting from 2nd ch, work 15 sl st around the base to create a flat foot shape.
Finishing & Assembly
Now comes the magic part where all the pieces come together to create your little rooster!
- The Beak: Sew the beak to the front of the body, positioning it just below the largest petal of the comb.
- The Eyes: Attach your beads or safety eyes on either side of the beak. Space them slightly apart for a cute, wide-eyed look.
- The Wattle: Sew the red wattle directly underneath the beak.
- The Wings: Attach the wings to the sides of the body, centered roughly halfway between the head and the bottom.
- The Tail: Sew the colorful tail feathers to the back of the rooster.
- The Feet: Attach the feet to the bottom of the body.
- Final Touch: Secure your keychain hardware to the top of the head, between the comb petals.
Tips for a Perfect Rooster
Tension Matters
Since this is a small project, your tension will greatly affect the final size. Keep your stitches tight to ensure the stuffing doesn’t peek through. If you see holes, try dropping down a hook size.
Customizing Your Bird
Want a different look? Try using a variegated yarn for the tail to create a rainbow effect, or use a soft white yarn for the body to make a tiny hen. You can also add a small felt heart or a tiny bow around the neck for extra personality.
Seamless Sewing
When attaching the limbs and beak, use a yarn needle and a matching color of yarn. For a cleaner look, weave your ends back and forth through the body before clipping them short.