Adorable Crochet Amigurumi Cat in a Basket Pattern
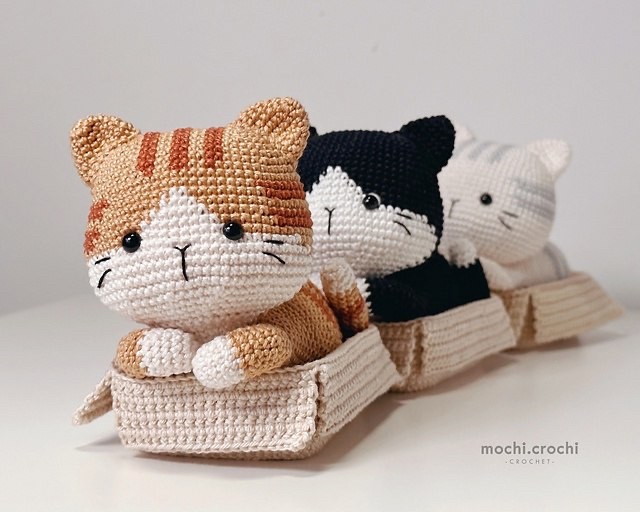
Are you looking for the perfect weekend project to brighten up your home or create a sweet gift for a cat lover? Look no further! This adorable amigurumi cat pattern features the cutest little kittens nestled inside a cozy crochet basket. Whether you want a classic ginger tabby, a striking black and white kitty, or a soft grey striped friend, this pattern is versatile enough to let your creativity run wild.
This tutorial is designed to be beginner-friendly. While it involves some color changes to create those charming stripes, the stitches used are fundamental crochet basics. By the end of this project, you’ll have a set of miniature feline friends ready to sit on your desk, bookshelf, or nursery!
Materials & Abbreviations
To ensure your kitty turns out perfectly, I recommend using a smooth cotton yarn. This provides excellent stitch definition, making those colorful stripes pop!
Materials Needed
- Yarn: 100% Cotton yarn (such as Schachenmayr Catania). You will need enough for your chosen colorway. For reference, a 50g ball is approximately 137 yards (125m).
- Colors for Ginger Tabby: Light brown (Main Color), Orange (Stripes), and White (Accents).
- Colors for Black & White: Black (Main Color) and White (Accents).
- Colors for Grey Tabby: White (Main Color) and Grey (Stripes).
- Color for Basket: Sand or tan brown.
- Hook: 2.2 mm (roughly a B-1 crochet hook).
- Eyes: 7 mm safety eyes.
- Embroidery Thread: Black thread for the mouth and whiskers.
- Stuffing: Polyester fiberfill.
- Notions: Yarn needle, stitch markers, pins, and scissors.
Abbreviations (US Terms)
- ch: chain
- sl st: slip stitch
- sc: single crochet
- inc: increase (2 sc in one stitch)
- dec: decrease (sc 2 together)
- hdc: half double crochet
- dc: double crochet
- tr: treble crochet
- mr: magic ring
- BLO: back loop only
- FLO: front loop only
- st(s): stitch(es)
- rnd: round
Step-by-Step Instructions
Note: All pieces are worked in a continuous spiral unless otherwise noted. For the color-changing cats, follow the color instructions in parentheses.
The Head
The head is worked in a spiral. Make sure to change colors only where indicated to create the stripe pattern.
- Rnd 1: Using Light Brown (for ginger cat), ch 14. From the 2nd ch from the hook: inc, (orange 2 sc), 2 sc, (orange 2 sc), 2 sc, (orange 2 sc), 1 sc, 4 sc in one st, (orange 2 sc), 2 sc, (orange 2 sc), 2 sc, (orange 2 sc), 1 sc, inc. (30 sts)
- Rnd 2: 2 inc, (orange 2 sc), 2 sc, (orange 2 sc), 2 sc, (orange 2 sc), 1 sc, 4 inc, (orange 2 sc), 2 sc, (orange 2 sc), 2 sc, (orange 2 sc), 1 sc, 2 inc. (38 sts)
- Rnd 3: (sc, inc) * 2, (orange 2 sc), 2 sc, (orange 2 sc), 2 sc, (orange 2 sc), 1 sc, (inc, sc) * 2, (sc, inc) * 2, (orange 2 sc), 2 sc, (orange 2 sc), 2 sc, (orange 2 sc), 1 sc, (inc, sc) * 2. (46 sts)
- Rnd 4: 6 sc, (orange 2 sc), 2 sc, (orange 2 sc), 2 sc, (orange 2 sc), 13 sc, (orange 2 sc), 2 sc, (orange 2 sc), 2 sc, (orange 2 sc), 7 sc. (46 sts)
- Rnd 5: (2 sc, inc) * 2, (orange 2 sc), 2 sc, (orange 2 sc), 2 sc, (orange 2 sc), 1 sc, (inc, 2 sc) * 2, (2 sc, inc) * 2, (orange 2 sc), 2 sc, (orange 2 sc), 2 sc, (orange 2 sc), 1 sc, (inc, 2 sc) * 2. (54 sts)
- Rnd 6: 8 sc, (orange 2 sc), 2 sc, (orange 2 sc), 2 sc, (orange 2 sc), 17 sc, (orange 2 sc), 2 sc, (orange 2 sc), 2 sc, (orange 2 sc), 9 sc. (54 sts)
- Rnd 7: 8 sc, (orange 2 sc), 2 sc, (orange 2 sc), 2 sc, (orange 2 sc), 18 sc, (orange 1 sc), 2 sc, (orange 2 sc), 2 sc, (orange 1 sc), 10 sc. (54 sts)
- Rnd 8: 3 sc, inc, 4 sc, (orange 2 sc), 2 sc, (orange 2 sc), 2 sc, (orange 2 sc), 4 sc, inc, (6 sc, inc) * 4, 3 sc. (60 sts)
- Rnd 9: 10 sc, (orange 1 sc), 2 sc, (orange 2 sc), 2 sc, (orange 1 sc), 42 sc. (60 sts)
- Rnd 10: 52 sc, (orange 8 sc). (60 sts)
- Rnd 11: (orange 6 sc), 16 sc, (orange 14 sc), 15 sc, (orange 9 sc). (60 sts)
- Rnd 12: (orange 4 sc, inc), 8 sc, (white 2 sc), 8 sc, (orange 1 sc, inc, 7 sc, inc, 4 sc), 3 sc, inc, (7 sc, inc) * 2, 3 sc. (66 sts)
- Rnd 13: 13 sc, (white 4 sc), 39 sc, (orange 10 sc). (66 sts)
- Rnd 14: (orange 6 sc), 6 sc, (white 6 sc), 6 sc, (orange 16 sc), 15 sc, (orange 11 sc). (66 sts)
- Rnd 15: (orange 5 sc), 6 sc, (white 8 sc), 6 sc, (orange 16 sc), 25 sc. (66 sts)
- Rnd 16: 10 sc, (white 10 sc), 46 sc. (66 sts)
- Rnd 17: 3 sc, (white 1 sc, inc, (4 sc, inc) * 4, 3 sc), sc, inc, 36 sc. (72 sts)
- Rnd 18: 1 sc, (white 34 sc), 37 sc. (72 sts)
- Rnds 19-21: (white 36 sc), 36 sc. (72 sts)
- Rnd 22: (white (4 sc, dec) * 6), (4 sc, dec) * 6. (60 sts)
- Rnd 23: 1 sc, (white 2 sc, dec, (3 sc, dec) * 5), (3 sc, dec) * 6. (48 sts)
- Rnd 24: 1 sc, (white 5 sc, dec, (6 sc, dec) * 2), (6 sc, dec) * 3. (42 sts)
- Rnd 25: 2 sc, (white 3 sc, dec, (5 sc, dec) * 2), (5 sc, dec) * 3. (36 sts)
Stop here and stuff the head firmly. Insert safety eyes between rounds 16 and 17, about 10 stitches apart. Leave long tails of the main color and white for sewing the opening closed.
The Paws (Make 2)
- Rnd 1: Using White, 6 sc in magic ring. (6 sts)
- Rnd 2: 6 inc. (12 sts)
- Rnd 3: 12 sc. (12 sts)
- Rnd 4: 2 sc, (4 sc in BLO), 6 sc. (12 sts)
- Rnd 5: (8 sc in BLO), 4 sc. (12 sts)
- Rnd 6: (2 sc in BLO of Rnd 5), (4 sc in FLO of Rnd 4), (2 sc in BLO of Rnd 5), 4 sc. (12 sts)
- Rnd 7: 2 sc, (4 sc in BLO), 6 sc. (12 sts)
- Rnd 8: (8 sc in BLO), 4 sc. (12 sts)
- Rnd 9: (2 sc in FLO of Rnd 7), (4 sc in FLO of Rnd 8), (2 sc in FLO of Rnd 7), 4 sc. (12 sts)
- Rnds 10-15: Repeat rounds 7-9. (12 sts)
- Rnd 16: 4 sc. (Do not finish the round; leave a tail for sewing).
Note: For the ginger and black & white cats, switch to the main color after round 6. For the white cat, continue with white. Ensure the last stitch is centered on the inner part of the paw.
The Body
To start the body, change to white, ch 8, change to main color, and join to the first paw. Use a stitch marker to mark the first stitch of the body.
- Rnd 17: 11 sc around 1st paw, (8 sc via ch), 12 sc around 2nd paw, (8 sc via ch). (40 sts)
- Rnd 18: (12 sc, (8 sc white) * 2). (40 sts)
- Rnd 19: 8 sc, (sc, inc) * 2, (white (sc, inc) * 4), (sc, inc) * 2, 8 sc, (8 sc white). (48 sts)
- Rnd 20: 11 sc, 2 inc, 2 sc, (white inc, (2 sc, inc) * 3), 2 sc, 2 inc, 11 sc, (8 sc white). (56 sts)
- Rnd 21: 12 sc, 2 inc, 3 sc, (inc from sc, (white sc), (white (3 sc, inc) * 3), 4 sc, 2 inc, 13 sc, (white 6 sc), 1 sc. (64 sts)
- Rnd 22: 14 sc, 8 ch, skip 28 sc, 16 sc, (white 4 sc), 2 sc. (44 sts)
- Rnd 23: 14 sc, 8 sc via ch, 22 sc. (44 sts)
- Rnd 24: 44 sc. (44 sts)
- Rnd 25: 6 sc, (4 sc, inc) * 4, 18 sc. (48 sts)
- Rnds 26-27: 48 sc. (48 sts)
- Rnd 28: 6 sc, (3 sc, inc) * 6, 18 sc. (54 sts)
- Rnds 29-31: 54 sc. (54 sts)
- Rnd 32: 6 sc, (4 sc, inc) * 6, 18 sc. (60 sts)
- Rnd 33: 13 sc, (orange 26 sc), 21 sc. (60 sts)
- Rnd 34: 12 sc, (orange 28 sc), 20 sc. (60 sts)
- Rnds 35-36: 60 sc. (60 sts)
- Rnds 37-38: 12 sc, (orange 28 sc), 20 sc. (60 sts)
- Rnds 39-40: 60 sc. (60 sts)
- Rnd 41: 12 sc, (orange 28 sc), 20 sc. (60 sts)
- Rnd 42: 13 sc, (orange 26 sc), 21 sc. (60 sts)
- Rnd 43: (8 sc, dec) * 6. (54 sts)
- Rnd 44: 54 sc. (54 sts)
- Rnd 45: (7 sc, dec) * 6. (48 sts)
- Rnd 46: 48 sc. (Stuff the body firmly now).
- Rnd 47: (4 sc, dec) * 8. (40 sts)
- Rnd 48: (3 sc, dec) * 8. (32 sts)
- Rnd 49: (2 sc, dec) * 8. (24 sts)
- Rnd 50: (sc, dec) * 8. (16 sts)
- Rnd 51: 8 dec. (8 sts)
Fasten off and weave in ends.
The Ears (Make 2)
- Rnd 1: Using Main Color, 6 sc in magic ring. (6 sts)
- Rnd 2: 6 inc. (12 sts)
- Rnd 3: (5 sc, inc) * 2. (14 sts)
- Rnd 4: (6 sc, inc) * 2. (16 sts)
- Rnd 5: (7 sc, inc) * 2. (18 sts)
- Rnd 6: (8 sc, inc) * 2. (20 sts)
Fasten off, leaving a long tail for sewing.
The Tail
Use White for ginger/black cats, or Grey for the white cat.
- Rnd 1: 5 sc in magic ring. (5 sts)
- Rnd 2: 5 inc. (10 sts)
- Rnds 3-4: 10 sc. (10 sts)
- Rnds 5-7: Main Color, 10 sc. (10 sts)
- Rnds 8-9: Orange/Accent Color, 10 sc. (10 sts)
- Rnds 10-12: Main Color, 10 sc. (10 sts)
- Rnd 13: Orange, (4 sc in BLO), 6 sc. (10 sts)
- Rnd 14: (4 sc in FLO of Rnd 13), 6 sc. (10 sts)
- Rnd 15: Main Color, 10 sc. (10 sts)
- Rnd 16: (4 sc in BLO), 6 sc. (10 sts)
- Rnd 17: (4 sc in FLO of Rnd 16), 6 sc. (10 sts)
- Rnds 18-32: Repeat rounds 13-17. (10 sts)
Fasten off and leave a tail for sewing.
The Crochet Basket
Use sand/tan color.
- Rnd 1: ch 13. From 2nd ch from hook: inc, 10 sc, 4 sc in one st, 10 sc, inc. (28 sts)
- Rnd 2: 2 inc, 10 sc, 4 inc, 10 sc, 2 inc. (36 sts)
- Rnd 3: (sc, 2 inc, 12 sc, 2 inc, sc) * 2. (44 sts)
- Rnd 4: (2 sc, 2 inc, 14 sc, 2 inc, 2 sc) * 2. (52 sts)
- Rnd 5: (3 sc, 2 inc, 16 sc, 2 inc, 3 sc) * 2. (60 sts)
- Rnd 6: (4 sc, 2 inc, 18 sc, 2 inc, 4 sc) * 2. (68 sts)
- Rnd 7: (5 sc, 2 inc, 20 sc, 2 inc, 5 sc) * 2. (76 sts)
- Rnd 8: (6 sc, 2 inc, 22 sc, 2 inc, 6 sc) * 2. (84 sts)
- Rnd 9: (7 sc, 2 inc, 24 sc, 2 inc, 7 sc) * 2. (92 sts)
- Rnd 10: (8 sc, 2 inc, 26 sc, 2 inc, 8 sc) * 2. (100 sts)
- Rnd 11: 100 sc in BLO. (100 sts)
- Rnds 12-21: 100 sc. (100 sts)
The last stitch should be in a corner. Do not cut the yarn.
Basket Sides
Side 1: Join yarn to the last round of the basket to the left of Side 1. Working in rows: 1. 30 sc in FLO, ch, turn. 2-9. 30 sc, ch, turn. 9. 30 sc. Fasten off.
Side 2: Join yarn to the last round to the left of Side 1. Working in rows: 1. 20 sc in FLO, ch, turn. 2-9. 20 sc, ch, turn. 9. 20 sc. Fasten off.
Side 3: Join yarn to the left of Side 2. Repeat Side 1 instructions. Fasten off.
Side 4: Join yarn to the left of Side 3. Repeat Side 2 instructions. Fasten off.
Finishing
Assembly Instructions
- Ears: Sew the ears to the head between rounds 1 and 9. Space them approximately 10 stitches apart.
- Face: Using black embroidery thread, carefully stitch the mouth and the whiskers.
- Head to Body: Sew the head to the body. Pro Tip: Before closing the neck opening, stuff the neck area extra firmly to give the head good support. When sewing, start from the front using white thread so the colors match perfectly. Once the front is secure, switch to the main color to sew the back of the head to the body.
- Tail: Sew the tail to the body between rounds 47 and 49. You can pose the tail in any position you like!
Tips
- Stiffening the Basket: To make your crochet basket hold its shape better, use a little bit of spray starch. Lightly spray the basket and let it air dry. This will make the sides stand upright without making the yarn too stiff.
- Color Changes: When working with stripes, always pull the new color through the last two loops of the previous stitch to ensure a clean transition.
- Safety First: If you are making these for a small child, ensure all safety eyes are securely fastened or consider embroidering the eyes instead to avoid any choking hazards.