Colorful Floral Granny Square Afghan Crochet Pattern
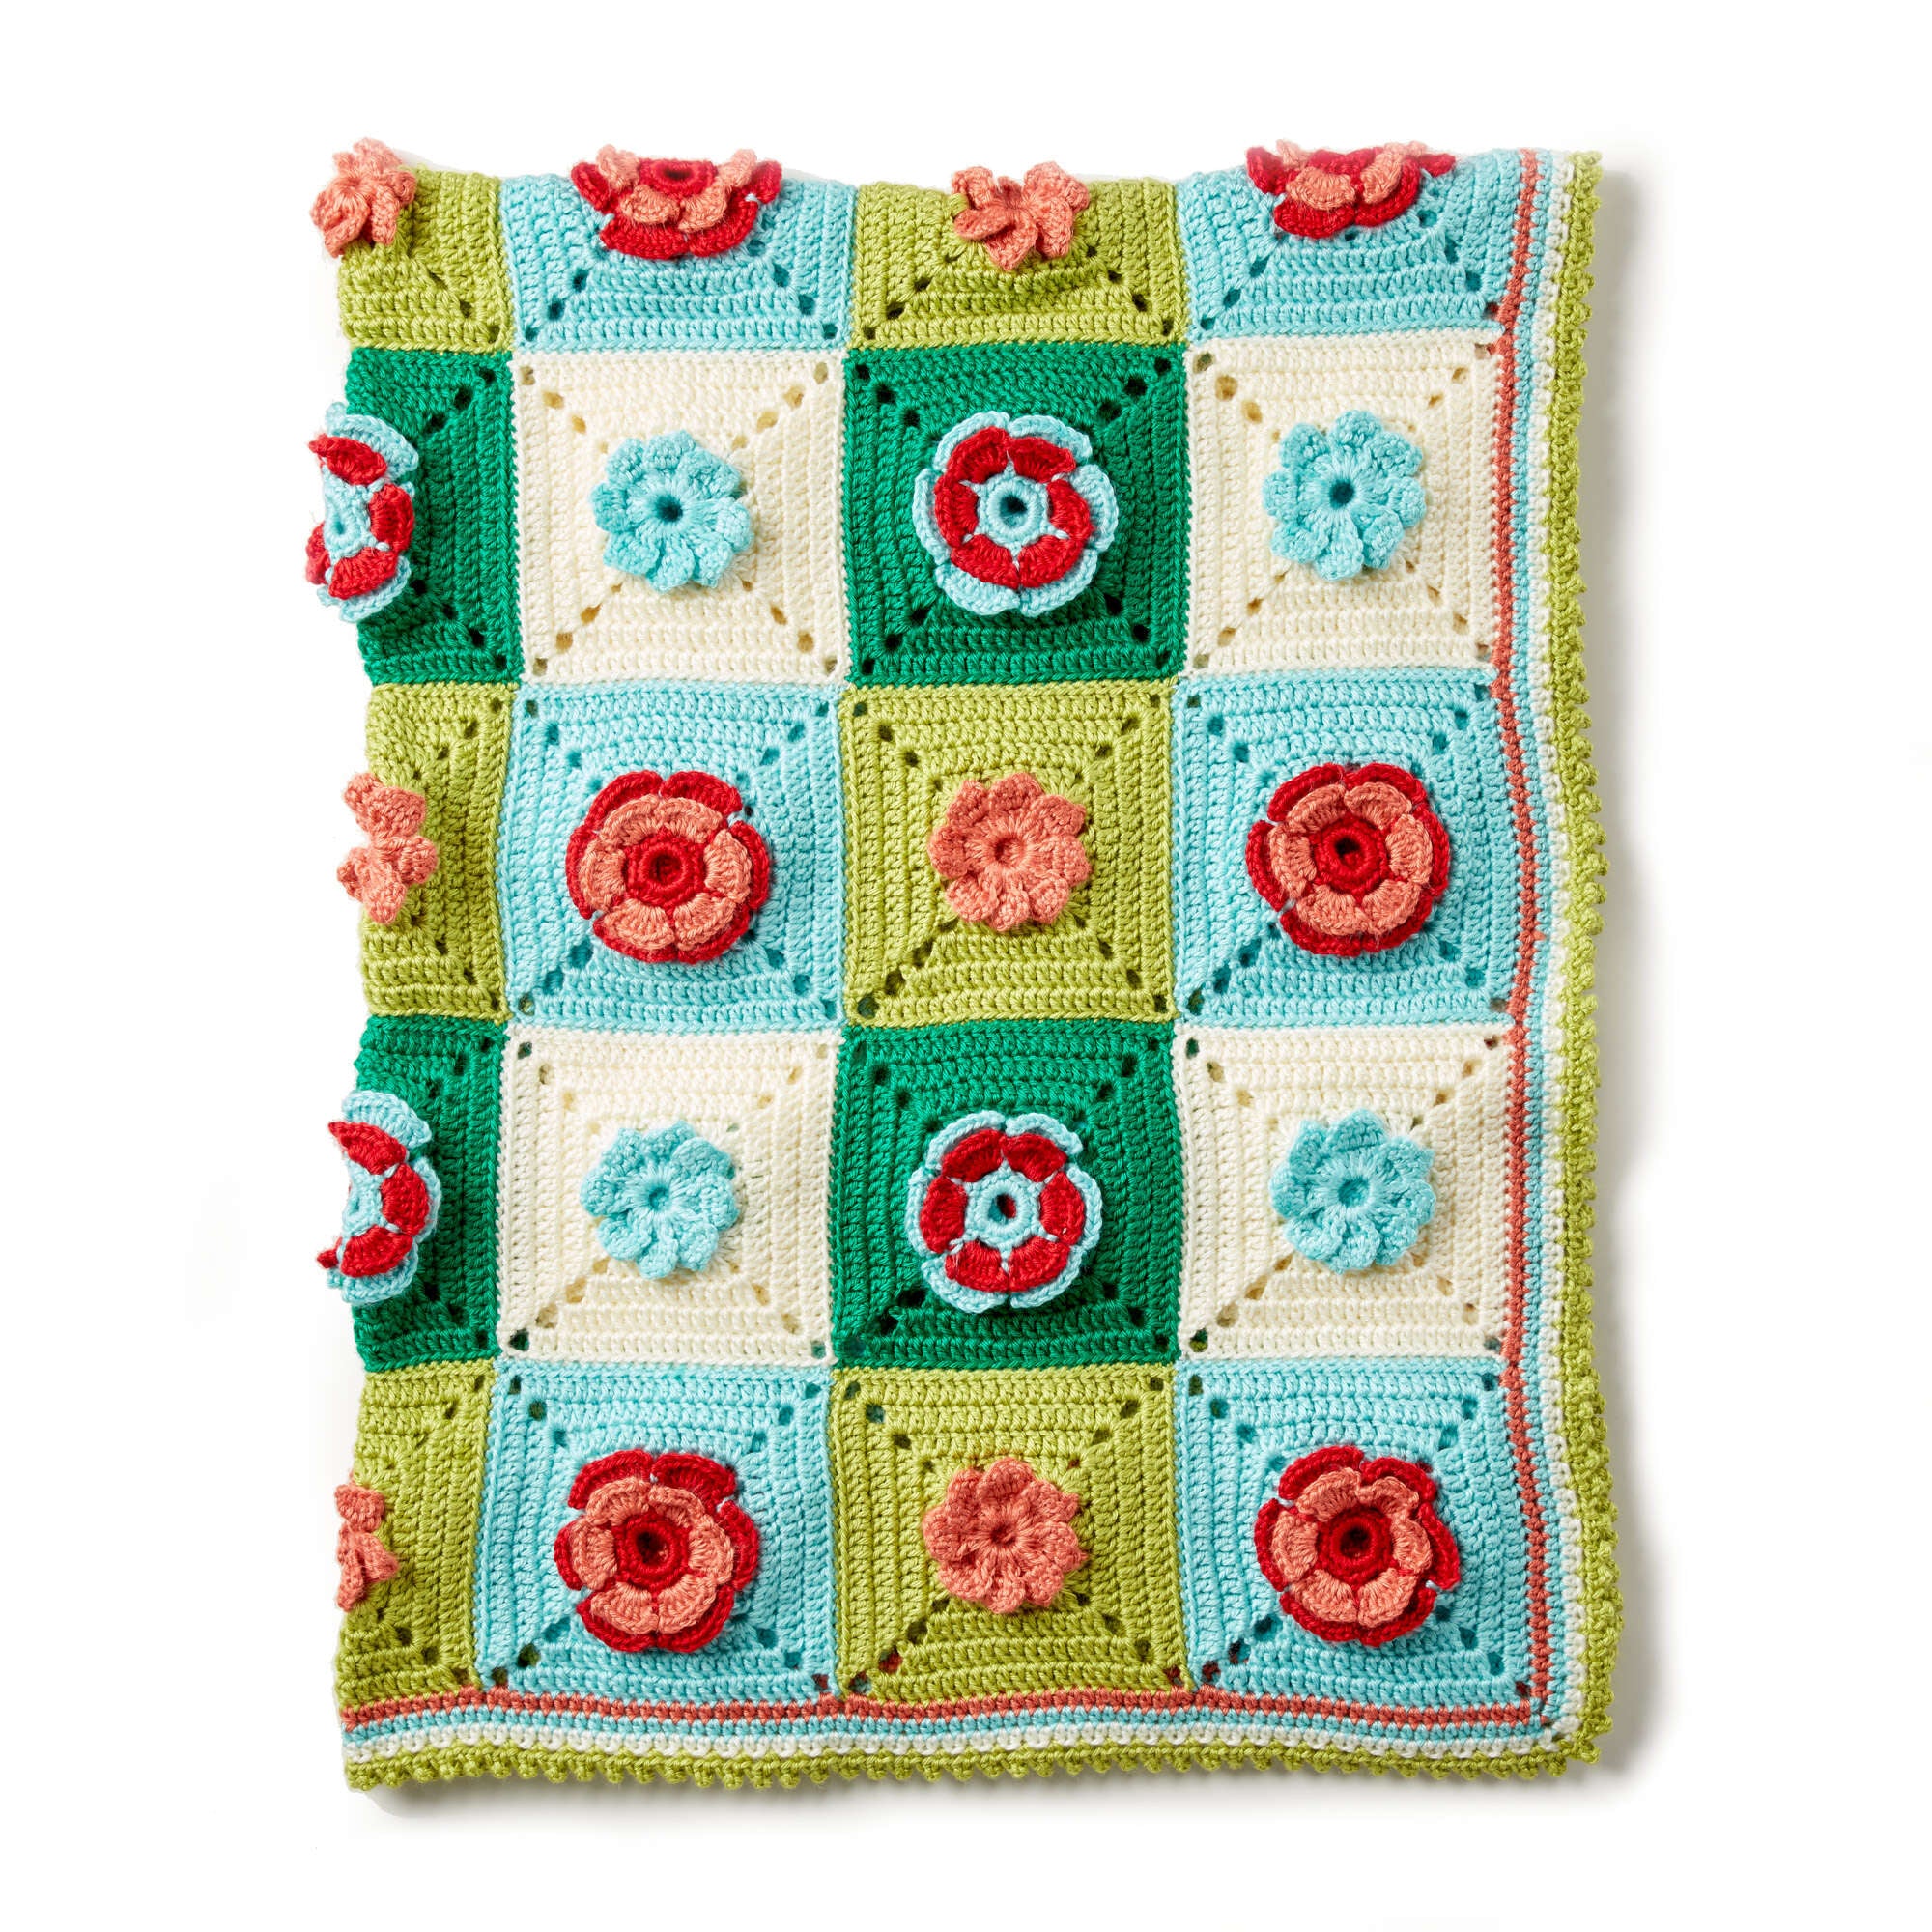
There is nothing quite as cozy or timeless as a granny square blanket. While the traditional granny square is a staple in every crocheter’s repertoire, adding a floral twist takes this project to a whole new level of charm. This Floral Granny Square Afghan blends vintage vibes with a fresh, botanical aesthetic, resulting in a stunning heirloom piece that is perfect for draping over a sofa or keeping you warm during chilly evenings.
This project is designed for intermediate crocheters, as it involves working with multiple colors, creating specialized motifs, and assembling them into a cohesive layout. The finished afghan measures approximately 48″ x 61″, making it a versatile size for a throw blanket. Whether you choose a bright, sunny palette or soft, muted pastels, this pattern allows for endless customization.
Materials & Abbreviations
To get started on your floral afghan, you will need the following materials. We recommend using a soft, durable acrylic or a blend that holds its shape well.
Materials
- Yarn: Medium weight (Worsted) yarn. You will need six contrasting colors (labeled Contrast A through F). For a standard version, you’ll need approximately:
- Contrast A: 3 balls
- Contrast B: 1 ball
- Contrast C: 2 balls
- Contrast D: 1 ball
- Contrast E: 2 balls
- Contrast F: 2 balls
- Crochet Hook: US Size 7 (4.5 mm) or a size that helps you achieve the correct gauge.
- Other Tools: Yarn needle for weaving in ends, scissors, and stitch markers.
Gauge
15 double crochet (dc) and 8 rows = 4″ square. Each completed motif should measure approximately 6.5″ square. If your squares are too large or too small, adjust your hook size accordingly.
Abbreviations (US Terms)
- Approx: Approximately
- Beg: Beginning
- Ch: Chain
- Dc: Double crochet
- Hdc: Half double crochet
- Rep: Repeat
- Rnd(s): Round(s)
- RS: Right side
- Sc: Single crochet
- Sl st: Slip stitch
- Sp(s): Space(s)
- St(s): Stitch(es)
- Tog: Together
Step-by-Step Instructions
This afghan is composed of four different types of motifs. You will need to create a specific number of each to complete the assembly diagram.
Motifs I and II
You will need to make 20 of Motif I and 12 of Motif II. For Motif I, use Color D (1), Color B (2), and Color A (3). For Motif II, use Color A (1), Color D (2), and Color E (3).
The Foundation: With Color 1, chain 8. Join with a slip stitch to the first chain to form a ring.
- 1st Rnd: Chain 1. Work 18 sc into the ring. Join with a sl st to the first sc.
- 2nd Rnd: Chain 1. 1 sc in the same stitch as the sl st. *Chain 3, skip next 2 stitches, 1 sc in the next stitch. Repeat from * until 2 stitches remain. Chain 3, skip the last 2 stitches. Join with a sl st to the first sc. Fasten off.
- 3rd Rnd: Join Color 2 with a sl st to the first ch-3 space. In the same space, work (1 sc, ch 3, 5 dc, ch 3, 1 sc). In the next ch-3 space, work (1 sc, ch 3, 5 dc, ch 3, 1 sc). Repeat around. Join with a sl st to the first sc. Fasten off.
- 4th Rnd: Join Color 1 with a sl st between two sc. *1 sc in the same space as the sl st. Working behind the stitches of the previous row, chain 5, then 1 sc between the next 2 sc. Repeat from * around, ending with a chain 5. Join with a sl st to the first sc.
- 5th Rnd: Sl st into the next ch-5 space. Chain 1. (1 sc, ch 3, 7 dc, ch 3, 1 sc) all in the same ch-5 space. (1 sc, ch 3, 7 dc, ch 3, 1 sc) in the next ch-5 space. Repeat around. Join with a sl st to the first sc. Fasten off.
- 6th Rnd: Join Color 3 with a sl st in the space between any 2 sc. *1 sc in the same space as the sl st. Working behind the stitches of the previous row, chain 7, then 1 sc in the space between the next 2 sc. Repeat from * around, ending with a chain 7. Join with a sl st to the first sc.
- 7th Rnd: Sl st into the next ch-7 space. Chain 5 (counts as 1 dc and ch-2 space). 4 dc in the same ch-7 space. (5 dc, ch 2, 1 dc) in the next ch-7 space. 7 dc in the next ch-3 space. (1 dc, ch 2, 4 dc) in the next ch-7 space. (5 dc, ch 2, 1 dc) in the next ch-7 space. 7 dc in the next ch-7 space. Join with a sl st to the 3rd chain of the ch-5.
- 8th Rnd: Sl st into the next ch-2 space. Chain 5 (counts as dc and ch 2). 2 dc in the same space as the last sl st. *1 dc in each dc to the next ch-2 space. (2 dc, ch 2, 2 dc) in the next ch-2 space. Repeat from * twice more. 1 dc in each dc to the next ch-2 space. 1 dc in the same space as the ch-5. Join with a sl st to the 3rd chain of the ch-5.
- 9th Rnd: Sl st into the next ch-2 space. Chain 7 (counts as dc and ch 4). 2 dc in the same space as the last sl st. *1 dc in each dc to the next ch-2 space. (2 dc, ch 4, 2 dc) in the next ch-2 space. Repeat from * twice more. 1 dc in each dc to the next ch-2 space. 1 dc in the same space as the ch-7. Join with a sl st to the 3rd chain of the ch-7.
- 10th Rnd: Repeat the 9th round once more. Fasten off.
Motifs III and IV
You will need 15 of Motif III and 16 of Motif IV. For Motif III, use Color B (1) and Color C (2). For Motif IV, use Color A (1) and Color F (2).
The Flower Center: With Color 1, chain 8. Join with a sl st to the first chain to form a ring.
- 1st Rnd: Chain 3 (counts as dc). 3 dc in the ring. Turn. Chain 3, 1 dc in the first dc, 1 dc in each of the next 2 dc, 1 dc in the 3rd chain of the ch-3. Turn. (Beginning petal made). Chain 3. Working across the back of the petal just made, 4 dc in the ring. Turn. Chain 3, 1 dc in the first dc, 1 dc in each of the next 3 dc. Turn. (Petal made). Repeat this petal process 6 more times. Join with a sl st to the top of the ch-3 of the beginning petal. Fasten off.
- 2nd Rnd: Join Color 2 with a sl st to the first ch-3 space. Chain 5 (counts as 1 dc and ch-2 space). 3 dc in the same ch-3 space. *3 dc in the next ch-3 space. (3 dc, ch 2, 3 dc) in the next ch-3 space. Repeat from * twice more. 3 dc in the next ch-3 space. 2 dc in the next ch-3 space. Join with a sl st to the 3rd chain of the ch-5.
- 3rd Rnd: Sl st into the next ch-2 space. Chain 7 (counts as dc and ch 4). 2 dc in the same space as the last sl st. *1 dc in each dc to the next ch-2 space. (2 dc, ch 4, 2 dc) in the next ch-2 space. Repeat from * twice more. 1 dc in each dc to the next ch-2 space. 1 dc in the same space as the ch-7. Join with a sl st to the 3rd chain of the ch-7.
- 4th Rnd: Sl st into the next ch-4 space. Chain 7 (counts as dc and ch 4). 2 dc in the same space as the last sl st. *1 dc in each dc to the next ch-4 space. (2 dc, ch 4, 2 dc) in the next ch-4 space. Repeat from * twice more. 1 dc in each dc to the next ch-4 space. 1 dc in the same space as the ch-7. Join with a sl st to the 3rd chain of the ch-7.
- 5th Rnd: Repeat the 4th round once more. Fasten off.
Finishing
Assembly
Sew your motifs together using a yarn needle and a whipstitch or a slip stitch join. Arrange them in a grid pattern. The layout follows a repeating sequence: Rows 1, 3, 5, 7, and 9 should alternate between Motif I and Motif III. Rows 2, 4, 6, 8, and 10 should alternate between Motif IV and Motif II.
The Border
1st Rnd: Join Color B with a sl st to any corner ch-4 space. Chain 2. 2 hdc in the same space. Work 1 hdc in each chain and stitch across the top edge. In the next corner ch-4 space, work (2 hdc, ch 4, 2 hdc). Continue working 1 hdc in each stitch down the left edge, (2 hdc, ch 4, 2 hdc) in the corner, 1 hdc across the bottom, and so on around the blanket. Join with a sl st to the first hdc. Fasten off.
2nd Rnd: Join Color A with a sl st to any corner ch-4 space. Chain 2. 2 hdc in the same space. Work 1 hdc in each hdc across the edges, working (2 hdc, ch 4, 2 hdc) into each corner space. Join with a sl st to the first hdc. Fasten off.
3rd Rnd: Repeat the 2nd round using Color F.
Picot Edging
Join Color C with a sl st to the first hdc on the top edge. Chain 1. 1 sc in the same space as the last sl st. *Chain 3, 1 sc in the 2nd and 3rd chain from the hook, skip the next stitch or chain, 1 sc in the next stitch. Repeat from * around the entire blanket. Join with a sl st to the first sc. Fasten off.
Tips for Success
Maintain Consistent Tension: Because this blanket uses a lot of chains and clusters, your tension can affect the size of your squares. Try to keep your chains loose and your stitches consistent to ensure the motifs line up perfectly during assembly.
Weaving in Ends: With so many motifs and color changes, you will have many ends to weave in. To avoid a “lumpy” blanket, weave your ends back and forth through the stitches of the same round for at least an inch before clipping.
Blocking Your Squares: If your squares aren’t perfectly flat, give them a light steam block. Pin the squares to a blocking mat in a perfect 6.5″ square shape and lightly steam them with an iron (without touching the fabric). This makes sewing them together much easier and gives the final afghan a professional, polished look.
Choosing Colors: While we suggested specific colors, the floral look works with any palette. For a modern look, try monochromatic shades of blue or green. For a vintage feel, go with creams, soft pinks, and sage greens.