Easy Crochet Bunny Stacking Toy Pattern: A Fun Amigurumi Tutorial
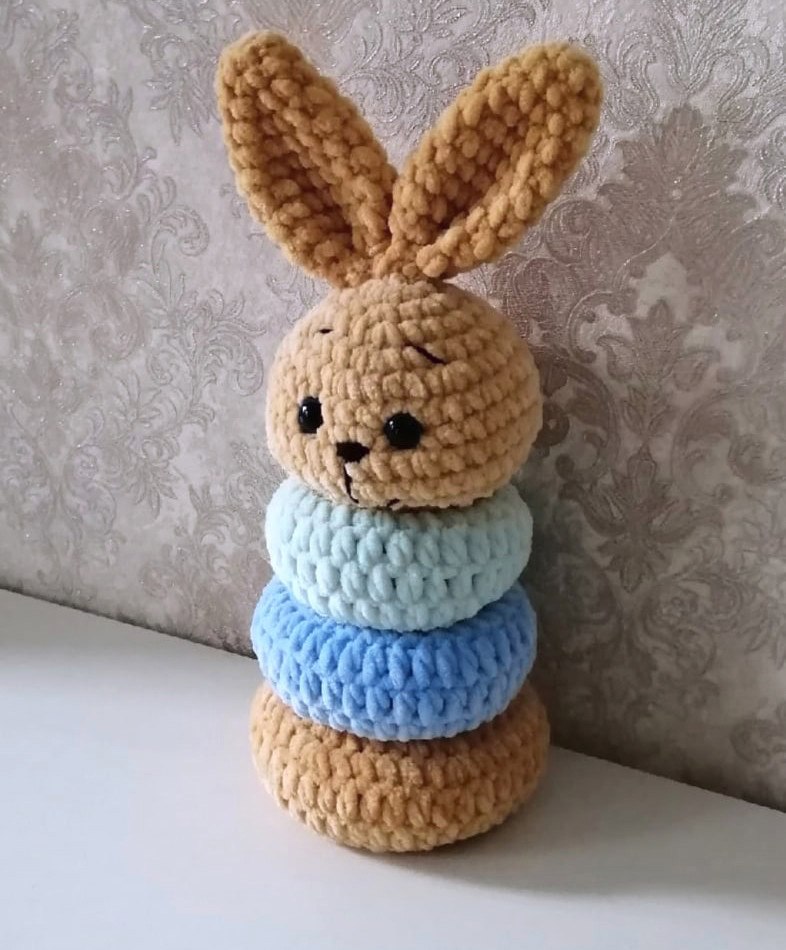
Are you looking for the perfect, handmade gift for a baby shower, or perhaps a sweet addition to a nursery bookshelf? This crochet bunny stacking toy is a delightful project that combines sensory play with adorable amigurumi charm. This stacking toy features a cute bunny head perched atop colorful, soft rings that slide onto a sturdy base. It is perfect for little hands to grasp, move, and stack, helping to develop fine motor skills while providing endless entertainment.
Whether you are a seasoned amigurumi artist or a beginner looking for your next intermediate challenge, this tutorial will guide you through every stitch. The use of plush, chenille-style yarn makes this toy extra soft and huggable, creating a high-end boutique look with just a few simple steps. Grab your hook and some colorful yarn, and let’s get started on this adorable bunny pyramid!
Materials & Abbreviations
To ensure your bunny turns out soft and sturdy, I recommend using a velvet or chenille-style plush yarn. This gives the toy that chunky, professional appearance seen in high-quality children’s toys.
Materials Needed
- Plush Yarn: Use a soft, bulky chenille yarn (like Wolans Bunny Baby or similar). You will need one color for the bunny head and ears (tan or beige), and three different colors for the stacking rings (e.g., yellow, light blue, and medium blue).
- Detail Yarn: A thin black cotton yarn (such as YarnArt Jeans in black) for embroidering the nose and mouth.
- Safety Eyes: 14 mm safety eyes.
- Crochet Hook: A 4 mm crochet hook (this is roughly equivalent to a US G/4 size).
- Stuffing: High-quality polyester fiberfill (poly-fill).
- Tools: A long tapestry needle for stuffing and sewing, sharp scissors, and a stitch marker to keep track of your rounds.
Abbreviations (US Terms)
- MR: Magic Ring
- ch: Chain
- sc: Single crochet
- hdc: Half double crochet
- inc: Increase (2 sc in one stitch)
- dec: Decrease (sc 2 together)
- BLO: Back loop only
- FLO: Front loop only
- sl st: Slip stitch
- [ ] * 6: Repeat the instructions inside the brackets 6 times.
Step-by-Step Instructions
Note: When working with plush yarn, tension can be tricky. Try to keep your stitches tight enough so that the stuffing does not peek through the gaps.
The Large Ring (Bottom Ring)
This is the widest ring of your stack. Start with your chosen color for the base ring.
- Round 1: Ch 24, then join with a sl st to the first ch to form a circle.
- Round 2: 24 sc around.
- Round 3: [3 sc, inc] repeat 6 times (30).
- Round 4: [4 sc, inc] repeat 6 times (36).
- Round 5: [5 sc, inc] repeat 6 times (42).
- Round 6: 42 hdc around.
- Round 7: 42 hdc around.
- Round 8: [5 sc, dec] repeat 6 times (36).
- Round 9: [4 sc, dec] repeat 6 times (30).
- Round 10: [3 sc, dec] repeat 6 times (24).
- Round 11: 24 sc around.
Finishing the ring: Fold the center of the circle inward toward the middle. As you sew the center shut, begin adding stuffing to create a “donut” shape. Ensure the hole in the middle is large enough for the base rod to pass through.
The Medium Ring
Use your second color for this ring.
- Round 1: Ch 24, join to form a circle.
- Round 2: 24 sc around.
- Round 3: [3 sc, inc] repeat 6 times (30).
- Round 4: [4 sc, inc] repeat 6 times (36).
- Round 5: 36 hdc around.
- Round 6: 36 hdc around.
- Round 7: 36 hdc around.
- Round 8: [4 sc, dec] repeat 6 times (30).
- Round 9: [3 sc, dec] repeat 6 times (24).
- Round 10: 24 sc around.
Finishing the ring: Fold the center shut and sew, adding stuffing as you go to maintain the donut shape.
The Small Ring (Top Ring)
Use your third color for the final ring.
- Round 1: Ch 24, join to form a circle.
- Round 2: 24 sc around.
- Round 3: [3 sc, inc] repeat 6 times (30).
- Rounds 4-8: 30 hdc around (work 5 rounds total of hdc).
- Round 9: [3 sc, dec] repeat 6 times (24).
- Round 10: 24 sc around.
Finishing the ring: Fold the center shut and sew, adding stuffing as you go.
The Bunny Head
Use your tan or beige color for the head.
- Round 1: 6 sc in a MR.
- Round 2: 6 inc (12).
- Round 3: [1 sc, inc] repeat 6 times (18).
- Round 4: [2 sc, inc] repeat 6 times (24).
- Round 5: [3 sc, inc] repeat 6 times (30).
- Round 6: [4 sc, inc] repeat 6 times (36).
- Rounds 7-10: 36 sc (work 4 rounds total).
Safety Eye Placement: Insert the 14mm safety eyes between rounds 7 and 8. Make sure they are spaced approximately 5 stitches apart.
- Round 11: [4 sc, dec] repeat 6 times (30).
- Round 12: [3 sc, dec] repeat 6 times (24).
- Round 13: [2 sc, dec] repeat 6 times (18).
- Round 14: 18 sc in the BLO (Back Loop Only). This creates a flat bottom for the head.
- Rounds 15-18: 18 sc (work 4 rounds total).
Shaping and Stuffing: The head should begin to look pear-shaped. Stuff the head firmly. When stuffing, try to distribute the poly-fill toward the walls of the head to ensure it stays stable. To finish the bottom, perform 6 decreases (Round 19: [1 sc, dec] * 6) and then close the hole by pulling the remaining stitches tight.
The Bunny Ears
Make two ears using your tan/beige yarn.
- Round 1: 6 sc in a MR.
- Round 2: [1 sc, inc] repeat 3 times (9).
- Round 3: [2 sc, inc] repeat 3 times (12).
- Round 4: 12 sc around.
- Round 5: [3 sc, inc] repeat 3 times (15).
- Rounds 6-9: 15 sc (work 4 rounds total).
- Round 10: [3 sc, dec] repeat 3 times (12).
- Round 11: [2 sc, dec] repeat 3 times (9).
Finishing the ears: Fold the ear in half so the sides meet. Using your crochet hook, single crochet through both layers (4 sc) to close the ear. Fold it in half once more and sew the seam. Leave a long tail of yarn at the base for easy attachment.
The Base Rod
This serves as the center of the pyramid.
- Round 1: 8 sc in a MR.
- Round 2: [1 sc, inc] repeat 4 times (12).
- Rounds 3-4: 12 sc around.
- Round 5: 12 sc in the BLO.
- Round 6: [4 sc, dec] repeat 2 times (10).
- Rounds 7-21: 10 sc (work 15 rounds total).
- Round 22: 5 dec.
Close the hole, cut the yarn, and hide the tail inside the rod.
Finishing
Creating Eye Sockets
To give your bunny an adorable, expressive face, you need to create “sockets” for the safety eyes. This prevents the eyes from looking flat.
- Take a long needle and a sturdy thread.
- Insert the needle into the head at a point near the eye (Point 1), pull it through to a second point (Point 2), and back to the first point (Point 3).
- Repeat this threading motion in a small circular pattern around each eye to pull the fabric inward.
- Repeat the process on the other side of the eye to deepen the socket. This creates a beautiful, recessed look for the eyes.
Embroidery and Final Assembly
Now it is time to bring your bunny to life!
- Nose and Mouth: Using your black embroidery yarn, stitch a small nose directly underneath the eyes. A good size is about 2 stitches wide. Then, count 3 stitches down from the nose and embroider a small, happy mouth.
- Attaching Ears: Sew the ears onto the very top of the head, near where the magic ring was placed.
- Assembling the Pyramid: First, sew the bunny head onto the very top of the base rod. Ensure it sits securely. Finally, slide your colorful rings onto the rod in order: Large ring on the bottom, Medium in the middle, and Small on top.
Tips
- Consistent Tension: When working with chunky plush yarn, try to maintain a consistent tension to avoid large gaps where stuffing might show.
- Stuffing Tip: When stuffing the head, use small chunks of fiberfill at a time to ensure even distribution and to prevent lumps.
- Safety First: If you are making this for an infant, ensure the safety eyes are extremely secure, or consider embroidering the eyes instead to prevent any choking hazards.
- Color Play: Don’t feel limited to the colors in the photos! This project looks beautiful in pastels, autumnal tones, or even bright primary colors.