Adorable Amigurumi Plant Character Crochet Pattern: A Step-by-Step Guide
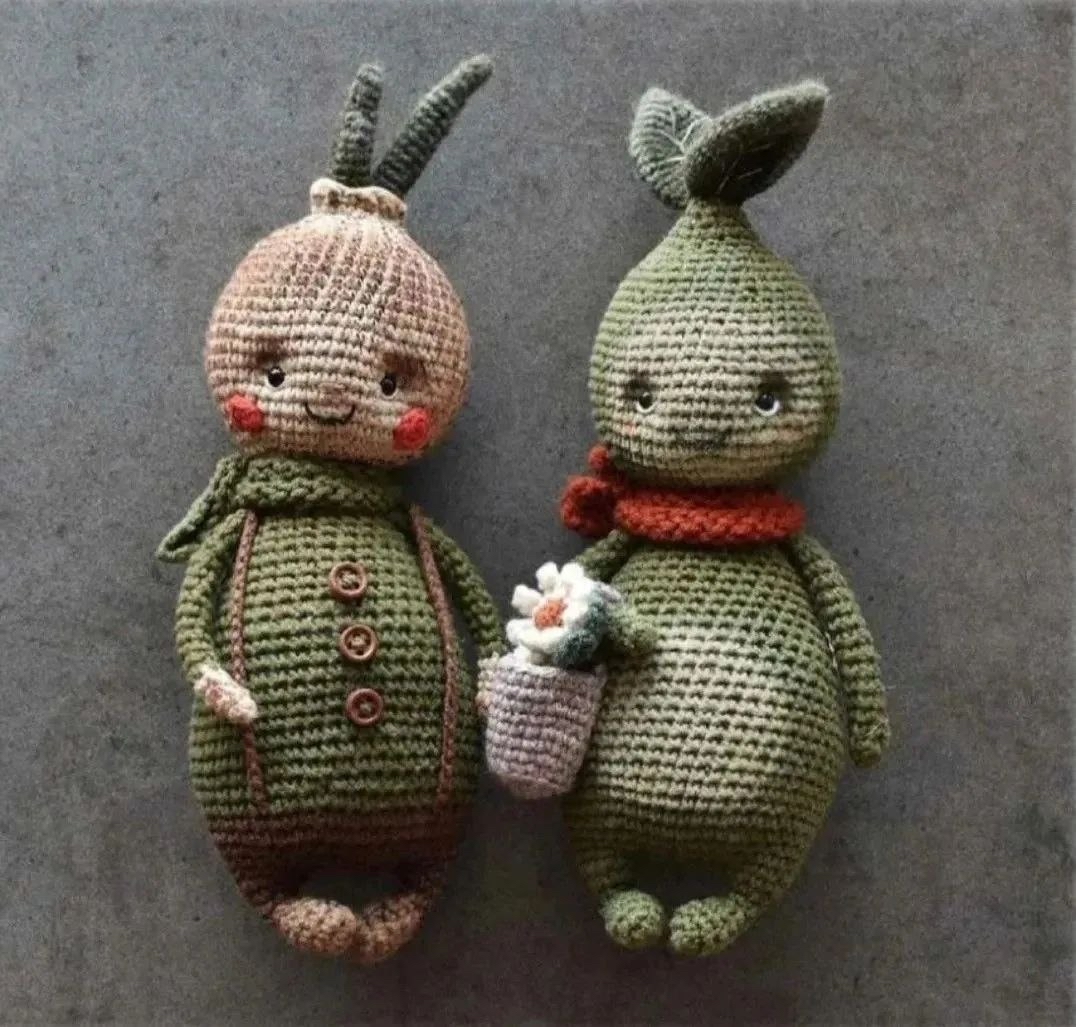
Are you looking for a unique and whimsical crochet project? Welcome to our latest tutorial! Today, we are diving into the world of tiny, magical garden friends. This pattern will guide you through creating two adorable, tiny plant-themed characters: a leafy Green Bush and a charming little Onion. These little cuties stand approximately 6.3 inches tall, making them the perfect size for desk companions, nursery decor, or even a unique gift for a plant lover.
Whether you are a seasoned amigurumi artist or a beginner looking to practice your stitch work, these characters are designed to be accessible and fun. They feature whimsical features like little leaves, tiny arms, and even a cozy knitted scarf. Grab your favorite hook and let’s get growing!
Materials & Abbreviations
To ensure your little garden friends turn out perfectly, please gather the following supplies. Since these are small characters, we use fine yarn and a small hook to achieve a tight, professional-looking stitch.
Supplies Needed
- Yarn:
- For the Green Bush: A medium weight cotton or blend yarn (approx. 160 yards/50g).
- For the Little Onion: Light brown, dark brown, and green yarns (approx. 300 yards/100g).
- For the Leaves: A soft alpaca or similar yarn in green (approx. 167 yards/50g).
- For the Scarf: A small amount of red yarn.
- Crochet Hook: 1.15mm (or a size that produces a very tight tension).
- Safety Eyes: 4mm to 5mm eyes.
- Buttons: 3 small buttons (6mm to 7mm) for the character’s outfit.
- Embroidery Thread: White thread for detailing the eyes.
- Stuffing: Poly-fill or fiberfill.
- Tools: Large tapestry needle, stitch markers, pins, scissors, and white or brown pastels for shading.
Abbreviations (US Terms)
- MR: Magic Ring
- ch: Chain
- sc: Single crochet
- inc: Increase (2 sc in one stitch)
- dec: Decrease (sc 2 together)
- sl st: Slip stitch
- hdc: Half double crochet
- dc: Double crochet
- tr: Treble crochet
Step-by-Step Instructions
Note: Throughout the pattern, remember to use a stitch marker to keep track of the beginning of every round. This is essential for amigurumi to ensure your shapes remain symmetrical.
Part 1: Creating the Green Bush Character
Legs and Body
We will start by making the two legs and then join them to form the body. It is important that the legs are stuffed firmly.
First Leg:
- R1: 6 sc in MR (6)
- R2: (1 sc, inc) x3 (9)
- R3-4: 9 sc (2 rounds)
- R5: 2 sc, 2 dec, 3 sc (7)
- R6: 1 sc, 2 dec, 2 sc (5)
- R7: 1 sc, inc, 3 sc (6)
- R8: 1 sc, 4 inc, 1 sc (10)
- R9: 2 sc (do not fasten off)
Fasten off the first leg. Now, we will make the second leg and join it to the first to create the torso.
Second Leg & Body:
- Repeat R1 through R8 for the second leg, but do not fasten off the yarn.
- R9: 8 sc (do not fasten off)
Pro Tip: Ensure the legs are placed symmetrically so they “face forward” when you join them.
Joining the Body:
- Chain 6.
- R10: 10 sc around the first leg, 6 sc along the chain, 10 sc around the second leg, 6 sc along the other side of the chain (32)
- R11: 10 sc, inc, 4 sc, inc, 10 sc, inc, 4 sc, inc (36)
- R12: 10 sc, inc, 6 sc, inc, 10 sc, inc, 6 sc, inc (40)
- R13: 10 sc, inc, 8 sc, inc, 10 sc, inc, 8 sc, inc (44)
At this stage, stuff the legs and the body firmly with poly-fill.
- R14-23: 44 sc (10 rounds)
Shaping the Torso:
To create a waist, we will perform decreases on the sides. To keep the decreases centered, work 5-7 sc before starting your decreases.
- R24: (dec, 20 sc) x2 (42)
- R25: 42 sc
- R26: (dec, 19 sc) x2 (40)
- R27: 40 sc
- R28: (dec, 18 sc) x2 (38)
- R29: (dec, 17 sc) x2 (36)
- R30: (dec, 16 sc) x2 (34)
- R31: (dec, 15 sc) x2 (32)
- R32: (dec, 14 sc) x2 (30)
- R33: (dec, 13 sc) x2 (28)
- R34: (dec, 12 sc) x2 (26)
- R35: (dec, 11 sc) x2 (24)
- R36: (dec, 10 sc) x2 (22)
- R37: (dec, 9 sc) x2 (20)
- R38: (dec, 8 sc) x2 (18)
- R39: (dec, 1 sc) x6 (12)
- R40: 6 dec
Fasten off, leaving a long tail for sewing.
The Head
The head is a large, rounded shape that will eventually house the leaves.
- R1: 6 sc in MR (6)
- R2: 6 inc (12)
- R3: (1 sc, inc) x6 (18)
- R4: (2 sc, inc) x6 (24)
- R5: (3 sc, inc) x6 (30)
- R6: (4 sc, inc) x6 (36)
- R7: (5 sc, inc) x6 (42)
- R8: (6 sc, inc) x6 (48)
- R9: (7 sc, inc) x6 (54)
- R10-14: 54 sc (5 rounds)
Stuff the head firmly as you work.
- R15: (7 sc, dec) x6 (48)
- R16-17: 48 sc (2 rounds)
- R18: (6 sc, dec) x6 (42)
- R19-20: 42 sc (2 rounds)
- R21: (5 sc, dec) x6 (36)
- R22: 36 sc
- R23: (4 sc, dec) x6 (30)
- R24: 30 sc
- R25: (3 sc, dec) x6 (24)
- R26: (2 sc, dec) x6 (18)
- R27: (1 sc, dec) x6 (12)
- R28-29: 12 sc (2 rounds)
- R30: 3 sc, 1 dc (do not fasten off)
Fasten off, leaving a long tail. Leave the top opening unclosed; this is where you will sew in the leaves!
Leaves and Arms
Leaves (Make 2):
- R1: 6 sc in MR (6)
- R2: (1 sc, inc) x3 (9)
- R3: (2 sc, inc) x3 (12)
- R4: (3 sc, inc) x3 (15)
- R5: (4 sc, inc) x3 (18)
- R6: (5 sc, inc) x3 (21)
- R7-13: 21 sc (7 rounds)
- R14: (5 sc, dec) x3 (18)
- R15: (4 sc, dec) x3 (15)
- R16: (3 sc, dec) x3 (12)
- R17: (2 sc, dec) x3 (9)
Fold the leaf in half and join the two sides with 4 sc. Use a needle to embroider a vein down the center. Repeat for the second leaf.
Arms (Make 2):
- R1: 6 sc in MR (6)
- R2-16: 6 sc (15 rounds)
Stuff the arms lightly (up to about round 8), fold them in half, and join the two sides with 3 sc. Leave a tail for sewing.
Part 2: Creating the Little Onion Character
Legs and Body
The onion character uses a similar base to the bush, but with color changes to create the bulb look.
- R1-5: Work in light brown yarn following the Bush pattern.
- R6-14: Switch to dark brown yarn following the Bush pattern.
- R15: Switch to green yarn. Work 5-7 sc, then change to green to make the transition seamless.
- R15-40: Continue following the Bush body pattern.
The Head and Shoots
Head:
- R1-26: Work in light brown yarn following the Bush head pattern.
- R27: (7 sc, dec) x2 (16)
- R28: (sl st, dc, tr, dc) x4 (16)
Fasten off, leaving a tail. Leave the top open to insert the shoots.
Shoots (Make 3):
Make three shoots of varying lengths (one 18 rounds, one 14 rounds, and one 10 rounds) to create a natural look.
- R1: 4 sc in MR (4)
- R2: (1 sc, inc) x2 (6)
- R3: 6 sc
- R4: (5 sc, inc) (7)
- R5: 7 sc
- R6: (6 sc, inc) (8)
- R7-18: 8 sc (adjust length as needed)
Sew the three shoots together and insert them into the top of the head.
The Cozy Scarf (Knitting Pattern)
For an extra touch of warmth, you can knit a tiny red scarf!
- Cast on 70 stitches on knitting needles.
- R1: Knit all stitches.
- R2: Purl all stitches.
- R3: Knit all stitches.
- Fasten off and weave in ends.
Assembly and Finishing Touches
Now comes the fun part—bringing your characters to life!
- Body & Head: Sew the head onto the body (around the level of R39 on the body).
- Limbs: Sew the arms onto the sides of the body symmetrically.
- Leaves: Fold your two leaves together and sew them into the opening at the top of the head.
- Outfit: Sew three small buttons down the center of the “tummy.” To add suspenders, crochet a chain of 55-60 stitches and sew them across the back.
- Face: Sew the safety eyes at the level of R10-12 of the head. Use white thread to embroider small highlights in the eyes. Embroider a tiny nose at R9-10.
- Cheeks: Sew small pink circles (made from pink yarn) onto the cheeks at R9-11.
- Shading: For a professional, “boutique” look, use white, brown, or dark brown pastels to lightly shade the face, tummy, and the tips of the leaves.
Expert Tips for Amigurumi Success
- Tension is Key: When working with small hooks and fine yarn, try to keep your stitches very tight. This prevents the stuffing from peeking through the holes.
- Use Pins: Before you start sewing, use stitch markers or sewing pins to position the eyes, arms, and head. This ensures everything is symmetrical before you commit with a needle.
- Stuffing Technique: When stuffing the body, use small pieces of poly-fill at a time. This allows you to push the stuffing into all the corners, preventing lumps.
- Mastering the Magic Ring: If you struggle with the Magic Ring, don’t worry! You can practice this technique separately. It is the foundation of most amigurumi.