Cute Crochet Elephant Amigurumi Pattern: Mambo the Little Elephant
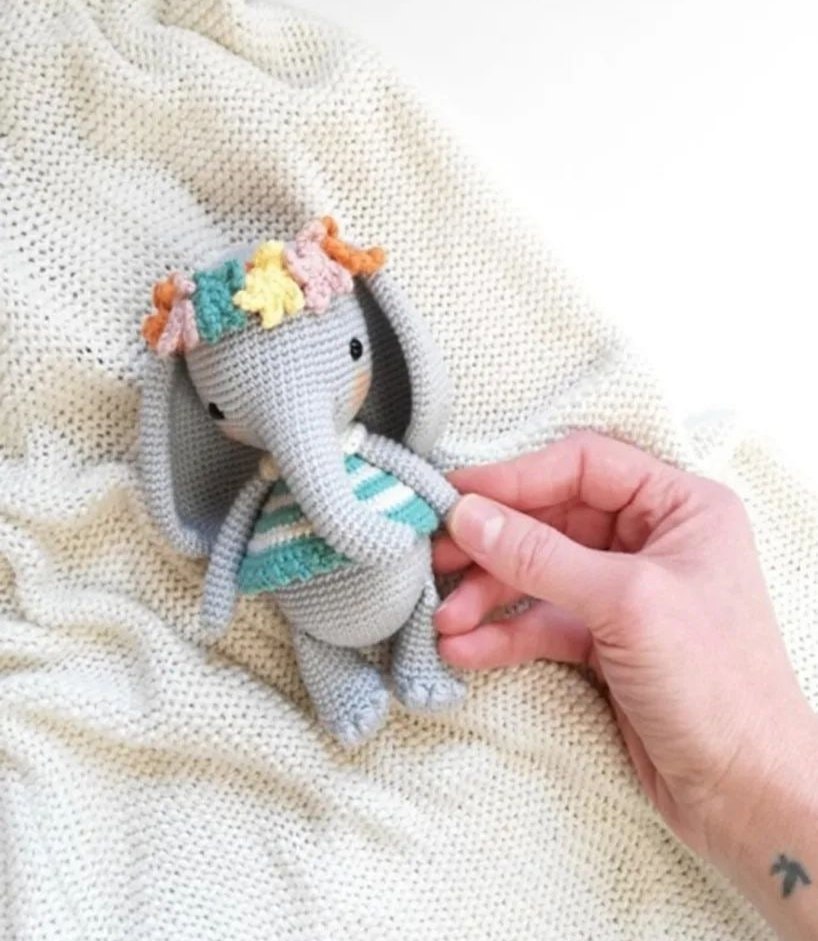
Are you looking for your next adorable amigurumi project? Welcome to our step-by-step tutorial for Mambo, a whimsical and sweet little elephant! This project is perfect for creating a nursery decoration, a unique gift for a baby shower, or a charming new friend for a child’s toy collection. With his tiny sweater and colorful flower headband, Mambo is designed to bring a smile to anyone’s face.
This pattern is written in a way that is friendly for beginners, though you should be comfortable with basic crochet stitches like the single crochet and working in a continuous spiral. We will guide you through creating the body, the head, the trunk, and those iconic floppy ears, all finished off with a tiny custom-sized sweater and adorable accessories. Grab your hook and some soft cotton yarn, and let’s get started on this delightful little elephant!
Materials & Abbreviations
To ensure your Mambo turns out perfectly, please gather the following supplies before you begin. Using a mercerized cotton yarn will give your elephant a beautiful, smooth finish that holds its shape well.
Required Materials
- Main Yarn: 100% Mercerized Cotton (approx. 2 balls of 125 yards/50g each). A lovely light grey (Color 0172) is recommended for the body.
- Sweater & Flower Yarn: Cotton baby yarn in two contrasting colors of your choice (for the striped sweater and colorful flowers).
- Safety Eyes: One pair of 6 mm safety eyes.
- Crochet Hook: 2.20 mm (or a size that produces tight, even stitches).
- Stuffing: Polyester fiberfill (holofiber) to make him firm and huggable.
- Buttons: 2 small buttons for the sweater.
- Notions: Scissors, a stitch marker (essential!), and a tapestry needle for sewing and weaving in ends.
Abbreviations (US Terms)
- MR: Magic Ring
- ch: Chain
- sc: Single crochet
- inc: Increase (2 sc in one stitch)
- dec: Decrease (sc two stitches together)
- sc3tog: Single crochet 3 together (triple decrease)
- sl st: Slip stitch
- dc: Double crochet
- BLO: Back Loop Only
- ch-sp: Chain space
Note: Always work in a continuous spiral for amigurumi unless otherwise stated. Use your stitch marker to keep track of the beginning of each round!
Step-by-Step Instructions
The Body
The body is a sturdy, rounded shape that provides a great base for our elephant. As you work, remember to stuff the body firmly with fiberfill.
- Round 1: 6 sc in a MR (6)
- Round 2: 6 inc (12)
- Round 3: (1 sc, inc) x 6 (18)
- Round 4: (2 sc, inc) x 6 (24)
- Round 5: (3 sc, inc) x 6 (30)
- Round 6: (4 sc, inc) x 6 (36)
- Round 7: (5 sc, inc) x 6 (42)
- Round 8: (6 sc, inc) x 6 (48)
- Round 9: (7 sc, inc) x 6 (54)
- Rounds 10–18: 54 sc (9 rounds total) (54)
- Round 19: 11 sc, (dec, 4 sc) x 5, dec, 11 sc (48)
- Round 20: 48 sc (48)
- Round 21: 11 sc, (dec, 3 sc) x 5, dec, 10 sc (42)
- Round 22: 42 sc (42)
- Round 23: 11 sc, (dec, 2 sc) x 5, dec, 9 sc (36)
- Round 24: 36 sc (36)
- Round 25: 11 sc, (dec, 1 sc) x 5, dec, 8 sc (30)
- Round 26: 30 sc (30)
- Round 27: (3 sc, dec) x 6 (24)
- Rounds 28–29: 24 sc (2 rounds) (24)
Fasten off, leaving a long tail for sewing the head to the body later.
The Head
The head features a special row to create an opening for the trunk. Make sure to stuff the head well.
- Round 1: 6 sc in a MR (6)
- Round 2: 6 inc (12)
- Round 3: (1 sc, inc) x 6 (18)
- Round 4: (2 sc, inc) x 6 (24)
- Round 5: (3 sc, inc) x 6 (30)
- Round 6: (4 sc, inc) x 6 (36)
- Round 7: (5 sc, inc) x 6 (42)
- Round 8: (6 sc, inc) x 6 (48)
- Round 9: (7 sc, inc) x 6 (54)
- Rounds 10–21: 54 sc (12 rounds) (54)
- Round 22: 21 sc, ch 12, skip 12 stitches, 21 sc (54). This ch-space is where the trunk will be attached!
- Round 23: 54 sc (54)
- Round 24: (7 sc, dec) x 6 (48)
- Round 25: (6 sc, dec) x 6 (42)
- Round 26: (5 sc, dec) x 6 (36)
- Round 27: (4 sc, dec) x 6 (30)
- Round 28: (3 sc, dec) x 6 (24)
Fasten off, leaving a short tail. Before closing, insert your 6 mm safety eyes between Rounds 19 and 20. The distance between the eye attachments should be 21 stitches, leaving a gap of 19 stitches between the visible parts of the eyes.
The Trunk
Join your yarn to the bottom right corner of the 12-chain opening created in the head.
- Round 1: 24 sc (24)
- Round 2: (1 sc, dec) x 4, 12 sc (20)
- Round 3: 20 sc (20)
- Round 4: 2 sc, dec, 16 sc (19)
- Round 5: 2 sc, dec, 15 sc (18)
- Rounds 6–11: 18 sc (6 rounds) (18)
- Round 12: 2 sc, dec, 14 sc (17)
- Round 13: 2 sc, dec into 3 sc, 12 sc (15)
- Rounds 14–17: 15 sc (4 rounds) (15)
- Round 18: dec, 13 sc (14)
- Round 19: dec, 12 sc (13)
- Round 20: dec, 11 sc (12)
- Rounds 21–22: 12 sc (2 rounds) (12)
- Round 23: Working in BLO, (dec) x 6 (6)
Fasten off and use your tapestry needle to pull the remaining 6 stitches closed, creating a flat, clean edge at the tip of the trunk.
The Ears (Make 2)
The ears are worked in a way that allows them to fold and lay flat against the head.
- Round 1: 8 sc in a MR (8)
- Round 2: 8 inc (16)
- Round 3: (1 sc, inc) x 8 (24)
- Round 4: (2 sc, inc) x 8 (32)
- Round 5: (3 sc, inc) x 8 (40)
- Round 6: (4 sc, inc) x 8 (48)
- Rounds 7–8: 48 sc (2 rounds) (48)
- Round 9: (5 sc, inc) x 8 (56)
- Rounds 10–21: 56 sc (12 rounds) (56)
- Round 22: (5 sc, dec) x 8 (48)
- Rounds 23–24: 48 sc (2 rounds) (48)
- Round 25: (4 sc, dec) x 8 (40)
- Rounds 26–27: 40 sc (2 rounds) (40)
- Round 28: (3 sc, dec) x 8 (32)
- Rounds 29–30: 32 sc (2 rounds) (32)
- Round 31: (2 sc, dec) x 8 (24)
- Rounds 32–33: 24 sc (2 rounds) (24)
- Round 34: Working in BLO, fold the piece in half and crochet through both layers to close it.
Do not stuff the ears. Sew them to the head between Rounds 8 and 9. For a more polished look, you can stitch the back half of each ear to the head to ensure they sit neatly against the sides.
The Tiny Sweater
You can customize Mambo’s look by choosing any two colors of yarn for his sweater. We will call them “Color 1” and “Color 2.”
- Round 1 (Color 1): ch 38.
- Round 2 (Color 1): Working in the 2nd ch from the hook, skip the first 8 chains (this creates the button loop), and sc in the remaining 30 chains (30).
- Round 3 (Color 1): ch 1, turn, sc 30 (30).
- Round 4 (Color 2): ch 1, turn, 5 sc, ch 6 (skip 6 stitches), sc in the 7th ch from hook, 7 sc, ch 6 (skip 6 stitches), sc in the 7th ch from hook, 4 sc (30). This round creates the button holes!
- Round 5 (Color 1): ch 1, turn, 11 sc, 8 inc, 11 sc (38).
- Round 6 (Color 1): ch 1, turn, 38 sc (38).
- Round 7 (Color 1): ch 1, turn, 5 sc, (inc, 2 sc) x 9, inc, 5 sc (48).
- Round 8 (Color 2): ch 1, turn, 48 sc (48).
- Round 9 (Color 1): ch 1, turn, 5 sc, (inc, 3 sc) x 10, 3 sc (58).
- Round 10 (Color 2): ch 8, turn, sc in 9th ch from hook (this is your second button loop). Sc in the remaining 58 stitches (58).
- Rounds 11–13 (Color 2): 58 sc (3 rounds) (58).
- Round 14 (Color 1): ch 3, turn, sc in 4th ch from hook, sl st in next stitch, ch 3, sc in next stitch, sl st in next stitch. Repeat this pattern to the end of the row to create decorative edging.
Fasten off and sew the sweater onto the body. Don’t forget to attach your two buttons to the button holes! If you want a longer sweater, simply add more rounds of sc in the middle section.
Tail, Headband, & Flowers
The Tail
- Round 1: ch 12. Working in the 3rd ch from the hook, sc in each ch (10 sc).
- Round 2: Attach a tassel of any length to the end of the tail for a cute effect.
The Headband
- Ch 32. Working in the 3rd ch from the hook, sc in each ch (30 sc).
- Attach a length of yarn to both ends of the headband so you can tie it onto the elephant’s head.
Flower Decorations
Make 6 small flowers in various colors to decorate the headband.
- Round 1: In a MR, ch 6, sl st in the 3rd ch from the hook, sl st in the next ch, sl st in the MR.
- Repeat this process 5 more times to create 6 petals, then pull the MR tight to close the flower.
Finishing
Now comes the most rewarding part: assembly! Use your tapestry needle and the long yarn tails left from the body and head to sew the pieces together securely. Ensure the trunk is centered and the ears are positioned symmetrically. Once the elephant is assembled, sew the tiny flowers onto the headband and wrap the headband around the base of the head. Finally, attach the tail and the sweater. Your Mambo elephant is ready for his new home!
Tips for Success
- Tension is Key: Since amigurumi involves stuffing, try to keep your stitches tight so the stuffing doesn’t show through the gaps.
- Continuous Spirals: Most amigurumi patterns are worked in a continuous spiral rather than joining with a slip stitch at the end of every round. This prevents a visible seam on the toy.
- Eye Placement: Double-check your eye placement before you start stuffing the head. It is much easier to adjust the eyes while the head is empty!
- Customization: Don’t be afraid to get creative! You can change the color of the sweater, add a tiny hat, or even crochet a small blanket for your elephant.