How to Crochet a Cute Sleepy Sheep Keychain: A Step-by-Step Amigurumi Pattern
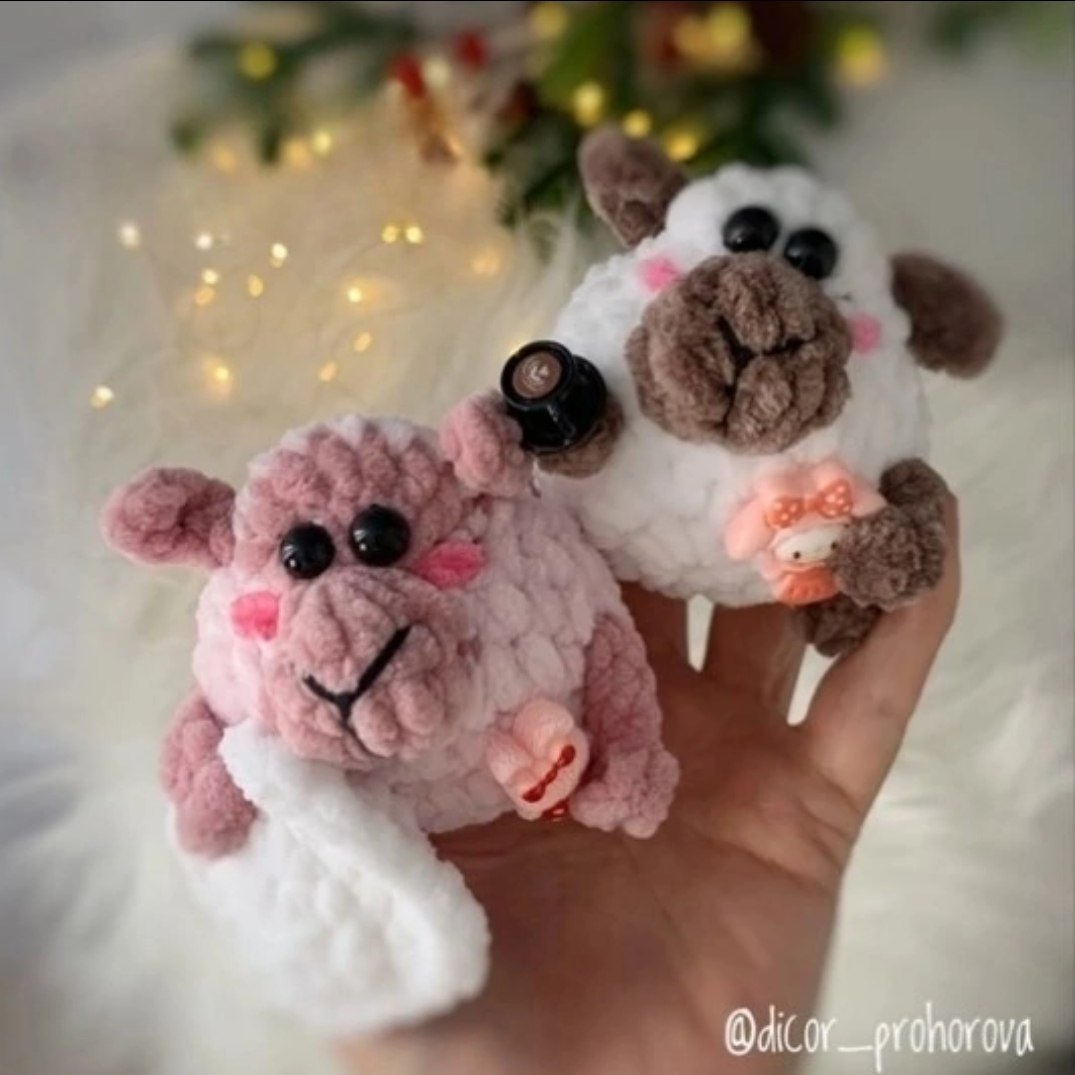
Are you looking for a quick, adorable, and budget-friendly crochet project? This Sleepy Sheep keychain is the perfect solution! Whether you want to decorate your backpack, add some charm to your keys, or create handmade gifts for friends and family, this little amigurumi sheep is a guaranteed crowd-pleaser. This project is designed to be worked up quickly with minimal yarn, making it an ideal “stash-buster” project.
In this tutorial, we will walk you through creating a tiny, plush sheep complete with a cozy pillow and a whimsical little cap. This pattern is beginner-friendly and focuses on basic stitches, making it a great way to practice your amigurumi skills.
Materials & Tools
To create this sleepy sheep, you will need the following supplies. Since this is a small project, you won’t need much of anything!
- Crochet Hook: A 4.0 mm (approximately a G or H hook) works best for this project.
- Yarn: Plush/chenille-style yarn is recommended for that extra soft, “squishy” feel.
- Main Color: Approximately 0.7 oz (20g) for the body.
- Accent Color: Approximately 0.15 oz (4g) for the limbs, muzzle, head, and ears.
- Pink Yarn: A small scrap for the rosy cheeks.
- Pillow/Cap Color: Approximately 0.3 oz (9g) of any color you like!
- Eyes: 8 mm safety eyes or black half-beads.
- Stuffing: Polyfill or fiberfill stuffing.
- Adhesive: Instant gel glue for securing the eyes and decorations.
- Tapestry Needle: A large-eye needle for sewing and embroidery.
- Other Essentials: Stitch marker, scissors, and a keychain ring or carabiner.
- Decorations: Feel free to add charms, beads, or tiny bows to personalize your sheep!
Crochet Abbreviations
This pattern uses standard US crochet terminology. Please ensure you are using US terms before beginning.
- MR: Magic Ring
- sc: Single crochet
- ch: Chain
- sl st: Slip stitch
- inc: Increase (2 sc in the same stitch)
- dec: Decrease (sc 2 together)
- hdc: Half double crochet
- dc: Double crochet
- bobble: A 2-hdc bobble (work 2 hdc into one stitch, but do not finish the last one; pull the loop through all loops on hook to create a textured bump)
- FL: Front loop only
Step-by-Step Instructions
The Body
Note: Begin working with your main body color. For the limbs, muzzle, head, and ears, switch to your accent color as indicated.
Round 1: Start with a Magic Ring and work 9 sc into the ring (9).
Round 2: 9 inc (18).
Round 3: (2 sc, inc) repeat 5 times. Leg: Attach accent color. Ch 6. Starting from the 2nd ch from the hook, work: 2-hdc bobble, 4 sl st, 1 sl st into the base of the chain. Continue with 2 sc, inc (24).
Tip: As you work subsequent rounds, fold the legs toward the body to keep them tucked in.
Round 4: 3 sc, Leg: (using accent color) work 6 sc, 4 sc, Leg: work 6 sc, 4 sc, Muzzle: (using accent color) 6 dc into one single stitch, 4 sc, Leg: work 6 sc, 8 sc (29).
Round 5: 11 sc. Gather Muzzle: To create the snout, work an unfinished hdc into every loop of the muzzle created in the previous round. You should have 7 loops on your hook. Join these loops to the main body color, then continue with 12 sc. Tail: (using accent color) Ch 3. Starting from the 2nd ch from hook, work: 1 hdc, 1 sc. Continue with 24 stitches total.
Tip: Fold the tail toward the body for the next round.
Round 6: 11 sc, Head: (using accent color) 7 dc into one single stitch, 12 sc (30).
Round 7: 11 sc, Ear: (using accent color) Ch 4. Starting from the 2nd ch from hook, work: 1 inc-hdc (an increase made of hdc), 2 sc. 8 sc, Ear: (using accent color) repeat the ear instructions. 11 sc (30).
Fasten off the accent color and weave in ends. Fold the ears toward the body.
Round 8: (1 sc, dec) repeat 10 times (20).
Round 9: 10 dec (10).
Fasten off, leaving a long tail for sewing. Stuff the body lightly, paying extra attention to the head. Stuff the muzzle very lightly so it maintains its shape. Weave the tail through the remaining stitches to close the hole, then hide the tail inside the body.
The Tiny Pillow
Work these two pieces in your chosen pillow color.
Round 1: Start with a Magic Ring and work 8 sc (8).
Round 2: (1 sc, inc) repeat 4 times (16).
For the first piece, fasten off and weave in ends. For the second piece, do not fasten off.
Joining: Place the two pieces together with the “wrong sides” facing each other. Crochet through both layers around the perimeter using sl st. Stuff the pillow lightly as you go.
Round 3: (3 sc, decorative edge) repeat 4 times. The decorative edge is worked as: (1 inc-hdc, ch 1, 1 dc, ch 1, 1 hdc) in one stitch. Finish with one extra sc.
Fasten off and weave in all ends.
The Sleepy Cap
Work in your chosen cap color.
Round 1: Start with a Magic Ring and work 4 sc (4).
Rounds 2-4: 4 sc (4).
Round 5: (1 sc, inc) repeat 2 times (6).
Round 6: 6 sc (6).
Round 7: (2 sc, inc) repeat 2 times (8).
Round 8: (3 sc, inc) repeat 2 times (10).
Round 9: (4 sc, inc) repeat 2 times (12).
Round 10: (5 sc, inc) repeat 2 times (14).
Round 11: 5 sc. Base: Fold the cap in half and work 1 sc through both layers (the 2nd row and the current row), then continue with 8 sc (14).
Round 12: 14 sc (14).
Fasten off, weave in ends, and decorate the tip of the cap with a bead or star if desired!
Finishing
Now it’s time to bring your sleepy sheep to life with some facial details!
1. The Eyes
Using your instant gel glue, carefully attach the 8mm safety eyes or half-beads to the muzzle area. Place them relatively close together to give the sheep a cute, “sleepy” expression.
2. The Nose
Using a tapestry needle and thick black yarn, embroider a small triangle for the nose. A simple way to do this is to follow a triangular path: start from the base of the head, move to the side, cross over to the other side, and return to the center. Secure the yarn firmly inside the head.
3. The Cheeks
Using your pink scrap yarn and a tapestry needle, embroider two small horizontal lines or tiny “blush” marks on either side of the muzzle to create adorable rosy cheeks.
4. Final Assembly
You can use a thin, strong thread to sew the pillow and the cap to the sheep’s body, or simply let them sit alongside your sheep for a cute display. Attach your keychain ring to the top of the head or the cap. Your sleepy sheep is ready to go!
Tips for Success
- Tension is Key: When working with plush yarn, try to maintain a consistent tension. If your stitches are too loose, the stuffing might show through.
- The Muzzle Secret: When gathering the muzzle loops in the body section, don’t pull too hard! You want a defined snout, but you don’t want to distort the entire face.
- Safety First: If you are making this for a small child, please ensure all eyes and decorations are sewn on very securely rather than glued, to prevent choking hazards.
- Color Play: Don’t be afraid to experiment! A blue cap with a white pillow or a purple sheep can make for a very unique and colorful keychain.