
Adorable Plush Crochet Turtle Pattern: A Step-by-Step Amigurumi Tutorial
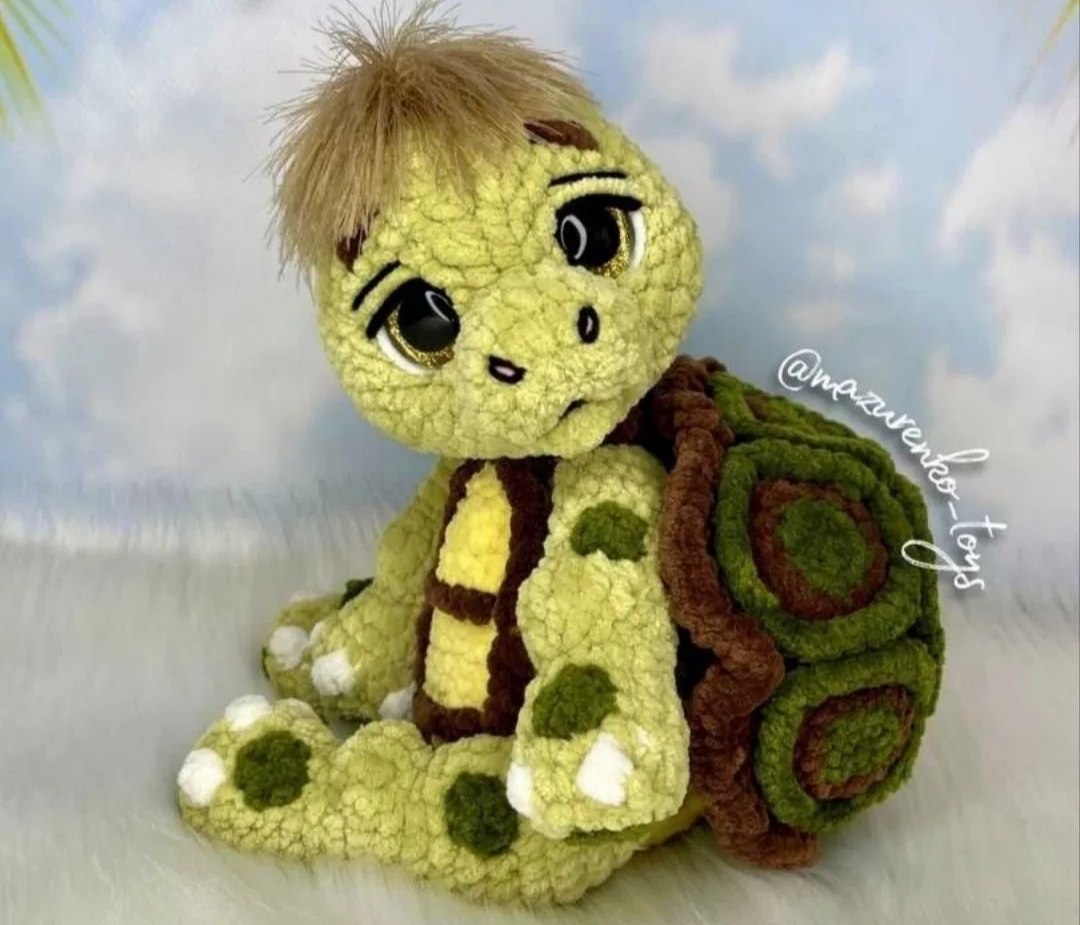
Are you looking for your next cozy crochet project? This adorable, ultra-plush turtle is the perfect addition to your amigurumi collection! With its big, expressive eyes, fuzzy hair, and a detailed, textured shell, this little guy is bound to become a favorite for both kids and collectors alike. This pattern is designed to result in a charming toy approximately 10 inches tall, making it a substantial and impressive piece to display or gift.
Whether you are making this for a nursery or as a gift for a fellow crafter, the soft texture of the plush yarn makes it incredibly huggable. Grab your favorite hook and let’s dive into this step-by-step guide to creating your very own crochet turtle friend!
Materials & Abbreviations
To ensure your turtle turns out looking exactly like the pictures, I recommend using high-quality plush yarn. If you cannot find the exact brands mentioned, any chenille or velvet-style plush yarn will work beautifully.
Materials Needed
- Plush Yarn (Himalaya Dolphin Baby or similar):
- Main Color (approx. 3 oz/84g): For the body, head, and limbs.
- Color A: For the shell, spots, and soles of the feet.
- Color B: For the shell details and eyebrows.
- Color C: For the front belly plate/tummy.
- White Plush Yarn: For the tiny claws.
- Fuzzy Yarn (Lanoso Single or YarnArt Tango): For the turtle’s signature fuzzy hair tuft.
- Embroidery Yarn (YarnArt Jeans or similar): Black and Pink for the eyes and nostrils.
- Fine White Plush Yarn: For the eye highlights.
- Safety Eyes: 20mm.
- Stuffing: High-quality polyester fiberfill.
- Strong Thread/Dental Floss: For sculpting the face and sewing pieces together.
- Crochet Hook: 3.5mm (US size E/4).
- Other: Long needle, scissors, and a stitch marker.
Abbreviations (US Terms)
- MR: Magic Ring
- CH: Chain
- SC: Single Crochet
- HDC: Half Double Crochet
- INC: Increase (2 stitches in one)
- DEC: Decrease (sc 2 together)
- SL ST: Slip Stitch
- BLO: Back Loop Only
- FLO: Front Loop Only
- HDC2Tog: Half Double Crochet decrease (or a decrease using HDC)
- Color Change: Switch to the specified color
Step-by-Step Instructions
The Arms (Make 2)
We begin by creating the claws using white yarn. To achieve the wide claw shape, we will cluster stitches. In the first stitch of the foundation, work 3 HDC, then work another HDC into that same stitch to get 5 stitches on your hook. Repeat this once more to reach 7 stitches. Work all 7 of these stitches together using a single HDC with your main color to secure the cluster.
- Start with the additional color: 5 SC in MR.
- 5 INC (10).
- (1 SC, INC) x 5 (15) [BLO].
- 2 SC, (Color change: White 3 HDC cluster in 1 st, then Color change: Main color 2 SC) x 4, 1 SC (15) [BLO].
- Switch to Main Body Color: 15 SC.
- (3 SC, DEC) x 3 (12).
- 12 SC.
- 4 SC, 2 DEC, 4 SC (10).
- 4 SC, (3 HDC cluster in 1 st) x 2, 4 SC (14).
- 4 SC, 6 HDC, 4 SC (14), then use a slip stitch to create an offset for the next round.
- 5 SC, 2 DEC, 5 SC (12).
- 12-16. 12 SC (5 rows).
- 2 SC, DEC, 4 SC, DEC, 2 SC (10).
Assembly: Fold the top of the arm in half so the claw cluster is facing forward. Using your strong thread, SC through both sides to close the arm. Stuff lightly, mostly in the bottom half.
The Legs (Make 2)
The legs follow a similar logic to the arms but are slightly sturdier.
- Start with the additional color: 6 SC in MR.
- 6 INC (12).
- Switch to Main Body Color: (1 SC, INC) x 6 (18) [BLO].
- 4 SC, (Color change: White 3 HDC cluster in 1 st, then Color change: Main color 2 SC) x 4, 2 SC (18) [BLO].
- 18 SC.
- (4 SC, DEC) x 3 (15).
- (3 SC, DEC) x 3 (12).
- 8-9. 12 SC (2 rows), then use a slip stitch for an offset.
- 5 SC, (3 HDC cluster in 1 st) x 2, 5 SC (16).
- 5 SC, 6 HDC, 5 SC (16).
- 5 SC, 2 DEC (using 3 SC), 5 SC (12).
- (3 SC, INC) x 3 (15).
- (4 SC, INC) x 3 (18).
- 15-18. 18 SC (4 rows).
- (1 SC, DEC) x 6 (12).
- 12 SC.
Assembly: Fold the top in half so the “knee” area faces forward. SC through both sides to close. Stuff firmly.
The Body
The body is worked from the bottom up. Use your main body color.
- 6 SC in MR.
- 6 INC (12).
- (1 SC, INC) x 6 (18).
- (2 SC, INC) x 6 (24).
- (3 SC, INC) x 6 (30).
- 2 SC, INC, (4 SC, INC) x 5, 2 SC (36).
- Attach Legs: In the next round, work 6 SC, 6 SC (attaching the first leg), 12 SC, 6 SC (attaching the second leg), 6 SC (36). Ensure the knees face forward.
- 8-10. 36 SC (3 rows).
- (4 SC, DEC) x 6 (30).
- 12-14. 30 SC (3 rows).
- (3 SC, DEC) x 6 (24).
- 16-17. 24 SC (2 rows).
- (2 SC, DEC) x 6 (18).
- 18 SC.
- Attach Arms: 2 SC, 5 SC (attaching the first arm), 4 SC, 5 SC (attaching the second arm), 2 SC (18).
- (4 SC, DEC) x 3 (15).
- 15 SC.
- 3 SC, SL ST (not a full round).
Finishing: Fasten off and stuff the body firmly.
The Head & Face Sculpting
The head starts at the muzzle. Use the main color and work in continuous rounds.
- 4 CH, from the 2nd CH from hook: INC, 1 SC, 4 SC in one stitch, 1 SC, INC (10).
- 2 INC, 1 SC, 4 INC, 1 SC, 2 INC (18).
- 3-5. 18 SC (3 rows), use a slip stitch for an offset.
- 6. 2 INC (HDC), 1 SC, INC (HDC), 1 HDC, INC (HDC), 1 SC, 2 INC (HDC), 9 SC (24).
- 7. INC (HDC), 1 HDC, INC (HDC), 3 HDC, 2 INC (HDC), 3 HDC, (INC (HDC), 1 HDC) x 2, 8 SC, 1 HDC (30).
- 8. INC (HDC), 1 HDC, INC (HDC), 4 SC, 1 HDC, 2 INC (HDC), 1 HDC, 4 SC, (INC (HDC), 1 HDC) x 2, 10 SC, 1 HDC (36).
- 9. (1 HDC, INC (HDC)) x 2, 6 SC, 1 HDC, 2 INC (HDC), 1 HDC, 6 SC, (INC (HDC), 1 HDC) x 2, 12 SC (42).
- 10-16. 42 SC (7 rows).
- 17. (5 SC, DEC) x 6 (36).
- 18. (4 SC, DEC) x 6 (30).
- 19. (3 SC, DEC) x 6 (24).
Installing Eyes & Sculpting
Place your 20mm safety eyes in Row 7, between the HDC stitches. The distance between the bottom of one eye to the other should be 10 HDC stitches. Important: As you stuff the head, focus on the cheek area. Use your strong thread to pull the stuffing inward (sculpting) to create chubby, rounded cheeks. This gives the turtle its cute expression.
- 20. (2 SC, DEC) x 6 (18).
- 21. (1 SC, DEC) x 6 (12).
- 22. DEC, DEC (Close the hole).
The Shell (Outer, Inner, & Tummy)
The Outer Shell
The outer shell consists of 7 interlocking pieces worked in two colors (Green and Brown).
Central Piece (Make 1)
- 6 SC in MR.
- 6 INC (12).
- Switch to Brown: (1 SC, INC) x 6 (18) [BLO].
- (2 SC, INC) x 6 (24).
Side Pieces (Make 6)
- Start with Green: 5 SC in MR.
- 5 INC (10).
- Switch to Brown: (1 SC, INC) x 5 (15) [BLO].
- (2 SC, INC) x 5 (20).
Assembly: Connect the central piece to the side pieces using Green (4 SC in BLO). Connect the side pieces to each other also using Green (4 SC in BLO). For the bottom edge, work 48 SC around (BLO). Finally, work around the outside of the 7 pieces using SC (FLO), adding an INC at every corner to smooth the shape.
The Inner Shell
Work this part in green yarn.
- 6 SC in MR.
- 6 INC (12).
- (1 SC, INC) x 6 (18).
- (2 SC, INC) x 6 (24).
- (3 SC, INC) x 6 (30).
- 2 SC, INC, (4 SC, INC) x 5, 2 SC (36).
- (5 SC, INC) x 6 (42).
- (6 SC, INC) x 6 (48).
Assembly: Join the inner and outer shells using SC. For the inner shell, work through both loops; for the outer shell, work through the front loop only. Stuff the shell firmly.
The Tummy (Belly Plate)
Use your Color C (Yellow). Attach the yarn to the bottom of the inner shell, between rows 1 and 2.
- 8 SC.
- 2-4. CH, 8 SC (3 rows).
- CH, INC, 6 SC, INC.
- 6-7. CH, 10 SC (2 rows).
- CH, INC, 8 SC, INC.
- CH, INC, 10 SC, INC.
- CH, INC, 12 SC, INC, 6 CH.
Attach to Shell: Attach to the side of the shell between rows 2 and 3, about 4 SC up from the bottom: CH, 22 SC, 6 CH. Attach to the other side symmetrically: CH, 28 SC. Continue attaching subsequent rows to the shell one row higher than the previous. Complete the remaining rows as instructed in the pattern, following the shape to create the plate. Finish by edging the sides and the leg openings with SC and adding decorative brown horizontal lines and straps.
Decorative Details: Spots & Hair
The Spots
- Small Spots (Make 10): 5 SC in MR.
- Large Spot (Make 1): 5 SC in MR, 2. 5 INC (10).
Assembly: Sew the spots onto the head, limbs, and shell as desired.
The Hair Tuft
- 6 SC in MR.
- 6 INC (12), SL ST.
Finishing: Fasten off, leave a long tail, and brush the yarn out with a fine-tooth comb to create a fuzzy, hair-like texture.
Finishing
To complete your turtle, add the final facial details:
- Mouth: Work a small lip using the main color by working 2 CH, 4 SC in the 2nd CH from the hook, then SL ST. Sew this below the nose.
- Eyes & Nose: Use black and pink embroidery yarn to detail the eyes (eyelids) and the tiny nostrils.
- Eyebrows: Embroider two small brown eyebrows above the eyes.
- Eye Highlights: Use fine white yarn to add a small “shine” to the eyes, making them look lively.
- Hair: Sew the fuzzy tuft to the top of the head.
Tips
If you want to make a version for a little girl, you can decorate the outside of the shell with rhinestones or beads to give it a magical, sparkly look!
Remember to keep your tension consistent, especially when working with plush yarn, to ensure the stuffing doesn’t peek through the stitches.