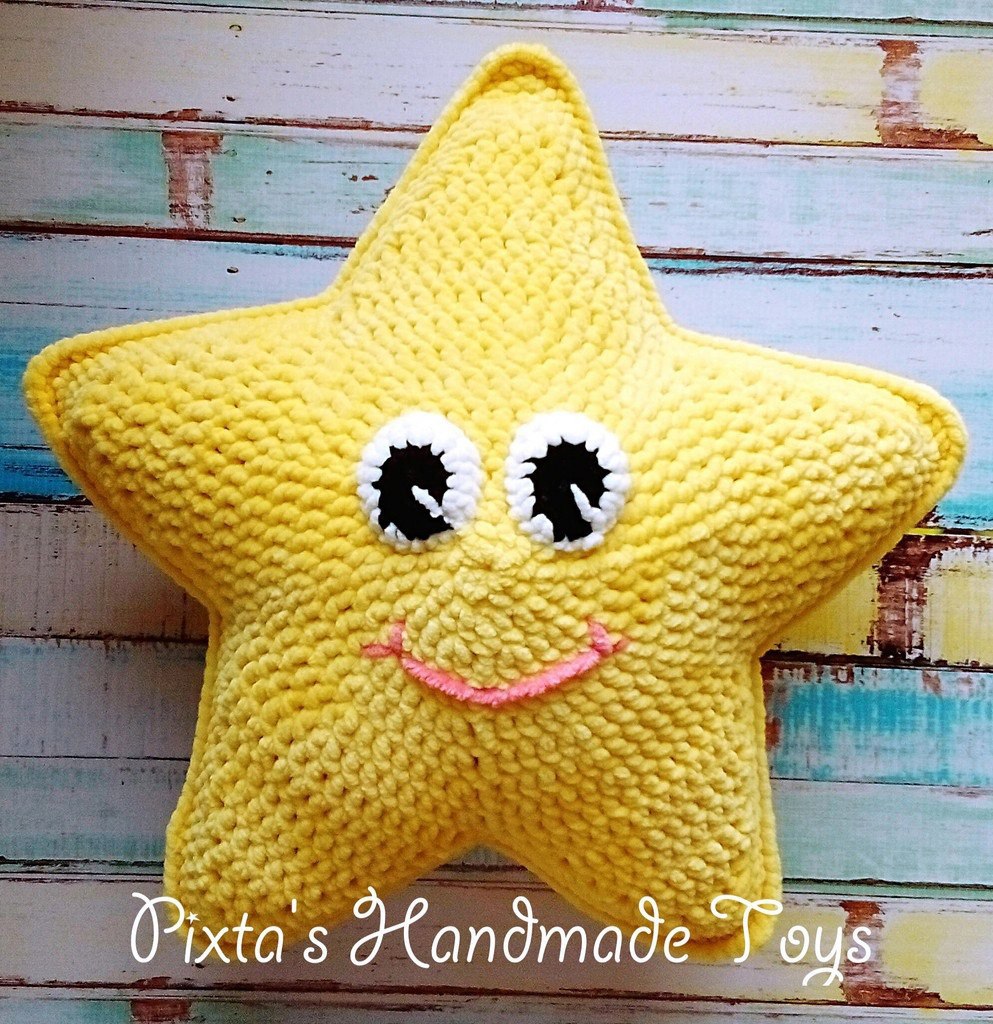
Crochet Star Pillow Pattern: A Cute and Easy Tutorial
Are you looking for a cozy, whimsical project to brighten up a nursery or add a touch of magic to your living room? This adorable crochet star pillow is the perfect project! With its friendly face and soft, squishy texture, it makes both a wonderful piece of home decor and a delightful companion for children.
This pattern is designed to be beginner-friendly. While it uses some standard crochet stitches like double crochet and half double crochet, the instructions are laid out clearly so you can follow along with confidence. By the end of this tutorial, you will have a chunky, approximately 16-inch star pillow that looks professional and feels incredibly soft.
Introduction
Crocheting a star shape can sometimes feel intimidating because of the points, but this specific method uses a clever combination of working in rounds to create the base and then working in rows to create the “spikes” or points. This technique ensures that your star looks plump and well-defined rather than flat. Because we are making two identical pieces and joining them, you’ll end up with a sturdy, three-dimensional pillow that is perfect for hugging.
Materials and Abbreviations
Before you dive in, gather all your supplies. Having everything ready will help you stay in the “crochet flow” without having to stop mid-row.
Materials
- Yarn: Approximately 1.5 skeins of medium weight (worsted) yarn. You will need a primary color (yellow), black, white, and a small amount of pink for the facial details.
- Crochet Hook: 4mm (US size G/6).
- Stuffing: Polyester fiberfill to make the pillow plush.
- Tools: A yarn needle for sewing, scissors, and stitch markers (optional but helpful).
Abbreviations
This pattern uses standard US crochet terminology. Please ensure you are using US terms to avoid confusion with stitch heights.
- ch: chain
- sc: single crochet
- hdc: half double crochet
- dc: double crochet
- sl st: slip stitch
- inc: increase (two stitches worked into the same stitch)
- MR: magic ring (also known as a magic circle)
Step-by-Step Instructions
Note: You will be making two identical star bodies. Follow the instructions for one, then repeat the entire process for the second one.
Part 1: Creating the Star Base
We begin by working the star in rounds using double crochet (dc) stitches. We will join the rounds using slip stitches (sl st) to keep the texture consistent. Start your round with 3 ch (this will count as your first dc).
Round 1: Ch 4. In the first chain from the hook, work 9 dc. Join with a sl st in the 3rd ch from the hook (counting the 3 ch as your first dc). You should have a total of 10 dc. = 10 sts
Round 2: Inc in every stitch around. = 20 sts
Round 3: (1 dc, inc) repeat 10 times. = 30 sts
Round 4: (2 dc, inc) repeat 10 times. = 40 sts
Round 5: (3 dc, inc) repeat 10 times. = 50 sts
Round 6: (4 dc, inc) repeat 10 times. = 60 sts
Round 7: (5 dc, inc) repeat 10 times. = 70 sts
Round 8: (6 dc, inc) repeat 10 times. = 80 sts
Part 2: Working the Star Points
Once you have completed the final round, do not cut your yarn. We will now work the five points (spikes) of the star by working in rows of double crochet. Each spike is worked by turning your work and crocheting back across the stitches.
The First Spike:
Row 1: Ch 2, work 16 dc.
Row 2: Sl st into the first stitch, then work 14 dc.
Row 3: Sl st into the first stitch, then work 12 dc.
Row 4: Sl st into the first stitch, then work 10 dc.
Row 5: Sl st into the first stitch, then work 8 dc.
Row 6: Sl st into the first stitch, then work 6 dc.
Row 7: Sl st into the first stitch, then work 4 dc.
Row 8: Sl st into the first stitch, then work 3 dc, and finish with a sl st.
After completing the first spike, cut the yarn. Reattach your yarn to the base circle at the starting point of your first spike (where those original 16 dc were) and repeat the “Spike” instructions for the remaining four points. Once all five spikes are finished, you will have a complete star shape.
Part 3: Adding the Border
To give the star a clean, finished look and to help it hold its shape, we will add a border around the entire perimeter using single crochet (sc).
Attach your yarn to the edge. Work sc around the perimeter. When you reach the “valleys” between the spikes (the base of the dc rows), work 2 sc into each stitch. When you reach the very tip of each spike, work 3 sc into that single stitch to help the point stay sharp.
Pro Tip: If you want an even larger star, you can work two additional rounds of sc around the entire perimeter before moving to assembly.
Part 4: Making the Eyes
The eyes are worked in a spiral using a magic ring. We will start with black yarn and then switch to white.
Round 1 (Black): Work 6 sc into a magic ring. = 6 sts
Round 2 (Black): Inc in every stitch around. = 12 sts
Round 3 (White): 1 sc in black, then change color to white. Work (hdc inc, 1 hdc), then (dc inc, 1 dc) repeat twice, then (hdc inc, 1 hdc) repeat twice. Finish with 3 sl st. Fasten off and weave in ends.
Finishing and Assembly
Now that you have two star bodies, two eyes, and your yarn supplies ready, it is time to bring your star to life!
Assembling the Body
Place the two star pieces together with the “right sides” (the pretty, finished sides) facing each other. Use your crochet hook and white yarn to join them together. Work hdc through both layers of the star around the entire perimeter. When you reach the tips of the spikes, work 3 hdc into each tip to ensure the corners are sturdy. Before you close the final gap, stuff the star firmly with your polyester fiberfill. Once stuffed, finish the last few stitches to close the star completely.
Adding the Face
The Eyes: Use your yarn needle to sew the white and black eyes onto the front of the star. For the most natural “look,” place them between rounds 2 and 5 of the star’s body.
The Mouth: Using your pink yarn and a yarn needle, embroider a simple, wide smile on the lower half of the star, roughly between rounds 4 and 5. You can make it a straight line or a gentle curve depending on the personality you want your star to have!
Tips for Success
- Tension is Key: Try to keep your tension consistent, especially when working the spikes. If your stitches are too loose, the points might look floppy.
- Counting Stitches: Especially in the early rounds of the star base, it is very easy to lose count. Use a stitch marker to keep track of your starting point.
- Stuffing Technique: Don’t be afraid to stuff the star firmly, but make sure to push the stuffing all the way into the points of the star so they don’t look hollow.
- Customization: This is a great pattern for color play! You can make a rainbow star by using different colors for each spike, or a pastel star for a soft nursery vibe.