Easy Crochet Christmas Candle Pattern: A Cozy DIY Holiday Decor
There is something inherently magical about the glow of a candle during the winter months. As the nights grow longer and the air turns crisp, a warm light can transform a room into a cozy sanctuary. If you are looking for a way to bring that festive spirit into your home without the fire hazard, this crochet Christmas candle is the perfect solution!
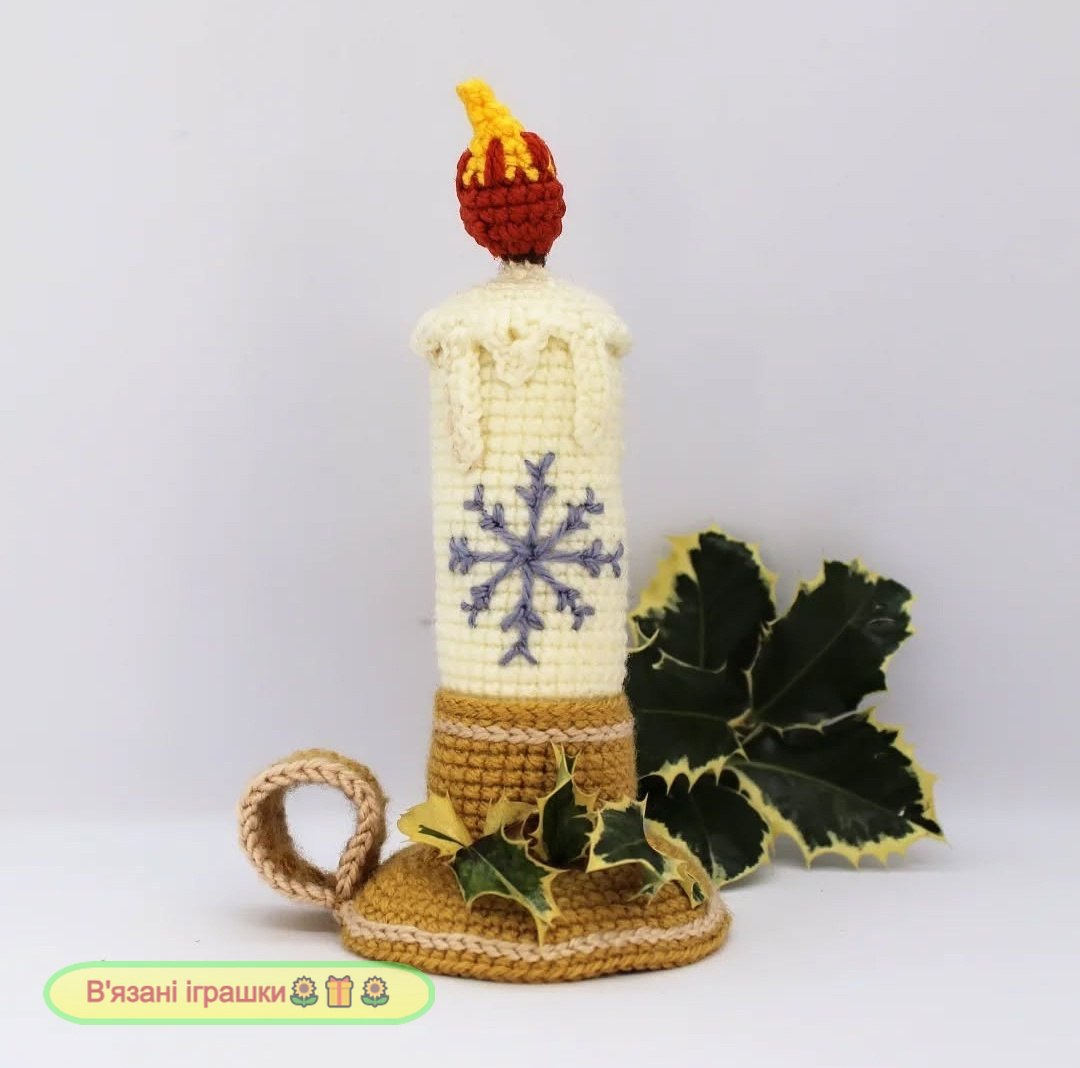
This delightful crochet project features a tall, elegant candle resting in a golden holder, complete with a flickering flame and even a delicate melting wax effect. Whether you want to decorate your mantle, create a centerpiece for your holiday table, or whip up some handmade gifts for friends and family, this pattern is designed to be a joy to make. Best of all, this is a beginner-friendly project that uses simple stitches to create a stunning, high-quality result.
Once finished, this candle stands approximately 6.7 inches tall, making it a perfect size for tiered trays, bookshelves, or small holiday displays. Let’s grab our hooks and get started on this festive adventure!
Materials & Abbreviations
Before you dive into the stitches, ensure you have all your supplies ready. Using the correct yarn weight and hook size is essential to achieving the finished size and structure shown in the photos.
Materials Needed
- Yarn: DK weight yarn in the following colors:
- White (for the candle body and wax drips)
- Gold (for the candle holder)
- Light Blue (for the snowflake embroidery)
- Brown (for the base of the flame)
- Orange (for the middle of the flame)
- Yellow (for the tip of the flame)
- Crochet Hook: 3 mm
- Tapestry Needle: For weaving in ends and embroidery
- Fiberfill: To stuff the candle and flame
- Stitch Marker: To keep track of your rounds
Abbreviations
This pattern uses standard US crochet terms. Please review these to ensure you are comfortable with the instructions:
- CH: Chain
- ST: Stitch
- R: Round or Row
- MG: Magic Ring
- SC: Single Crochet
- HDC: Half Double Crochet
- DC: Double Crochet
- SL ST: Slip Stitch
- FLO: Front Loop Only
- BLO: Back Loop Only
- INC: Increase (2 stitches in the same stitch)
- DEC: Decrease (Combine 2 stitches into one)
- () : Work instructions within parentheses as many times as directed or work a group of stitches all in the same stitch or space.
Step-by-Step Instructions
We will break this project down into three main parts: the candle body and flame, the decorative melting wax, and the golden candle holder.
Part 1: The Candle Body & Flame
Start with white yarn.
- Round 1: Start with 6 sc in a magic ring (6 sc)
- Round 2: 6 inc (12 sc)
- Round 3: 1 sc, 1 inc (18 sc)
- Round 4: 2 sc, 1 inc (24 sc)
- Round 5: 3 sc, 1 inc (30 sc)
- Round 6: Work in BLO: 30 sc (30 sc)
- Rounds 7-36: 30 sc (30 sc)
- Round 37: Work in BLO: 30 sc (30 sc)
- Round 38: 3 sc, 1 dec (24 sc)
- Round 39: 2 sc, 1 dec (18 sc)
- Round 40: 1 sc, 1 dec (12 sc)
- Round 41: 1 sc, 1 dec (6 sc)
Change to brown yarn.
- Round 42: 6 sc (6 sc)
Change to orange yarn.
- Round 43: 6 inc (12 sc)
- Round 44: 1 sc, 1 inc (18 sc)
- Rounds 45-46: 18 sc (18 sc)
Change to yellow yarn.
- Round 47: 1 sc, 1 dec (12 sc)
- Rounds 48-49: 12 sc (12 sc)
- Round 50: 6 dec (6 sc)
- Round 51: 6 sc (6 sc)
- Round 52: 3 dec (3 sc)
Fasten off and close the flame hole with your tapestry needle. Lightly stuff the flame with fiberfill.
Part 2: Creating the Melting Wax Effect
To give the candle a realistic look, we will add decorative white “drips” near the top of the candle body.
Using white yarn, go back to Round 37 (the round worked in BLO).
Working into the stitches of Round 37, follow this sequence carefully to create the scalloped effect:
- 4 sc, (9 ch, from the second ch from hook, 8 sc), 3 sc, (5 ch, from the second ch from hook, 4 sc), 2 sc, (13 ch, 12 sc), 2 sc, 1 hdc, 1 dc, 1 hdc, 2 sc, (7 ch, 6 sc), 3 sc, (3 ch, 2 sc), 4 sc, (6 ch, 5 sc), 1 sc, 1 hdc, 2 dc, 1 hdc, 1 sc, (4 ch, 3 sc), 1 slst.
Part 3: The Golden Candle Holder
Start with gold yarn.
- Round 1: Start 6 sc in a magic ring (6 sc)
- Round 2: 6 inc (12 sc)
- Round 3: 1 sc, 1 inc (18 sc)
- Round 4: 2 sc, 1 inc (24 sc)
- Round 5: 3 sc, 1 inc (30 sc)
- Round 6: Work in BLO: 30 sc (30 sc)
- Rounds 7-15: 30 sc (30 sc)
Creating the Handle:
While still using the gold yarn, go back to Round 6 (which was worked in BLO). Attach your thread there and begin working in rows rather than rounds:
- Row 1: 8 sc in BLO, 1 ch, and turn.
- Rows 2-24: 8 sc per row.
Once you have completed 25 rows, overlap the two ends to form a ring. Sew this ring onto the candle holder, following the 8 sc made at the end of Round 15 to secure the handle in place.
Finishing
Now that your candle and holder are assembled, it is time for the final decorative touches!
Embroider the Snowflake
Using your light blue yarn and a tapestry needle, embroider a snowflake onto the white body of the candle. You can use a simple star pattern or a more intricate snowflake design. This small detail adds a beautiful pop of color and a wintery feel to the piece.
Assembly
Carefully place the finished candle into the golden holder. If the candle feels a bit loose, you can add a small amount of fiberfill to the bottom of the holder to ensure a snug fit.
Tips
To ensure your crochet candle looks professional and polished, keep these tips in mind:
- Tension is Key: Try to maintain even tension, especially when working the increases and decreases. This prevents the candle from looking lumpy.
- Color Changes: When changing yarn colors, try to change the color on the final pull-through of the previous stitch. This creates a much cleaner line between colors.
- Stuffing: Don’t overstuff the flame, or it may become too heavy and tip the candle over. A little bit of fiberfill goes a long way!
- Blocking: If your candle holder feels a bit uneven, you can lightly steam it (be careful not to melt synthetic fibers!) to help it hold a more circular shape.
- Customization: Feel free to get creative! You could use different colors for the flame to represent different scents, or use silver yarn instead of gold for a “frozen” look.