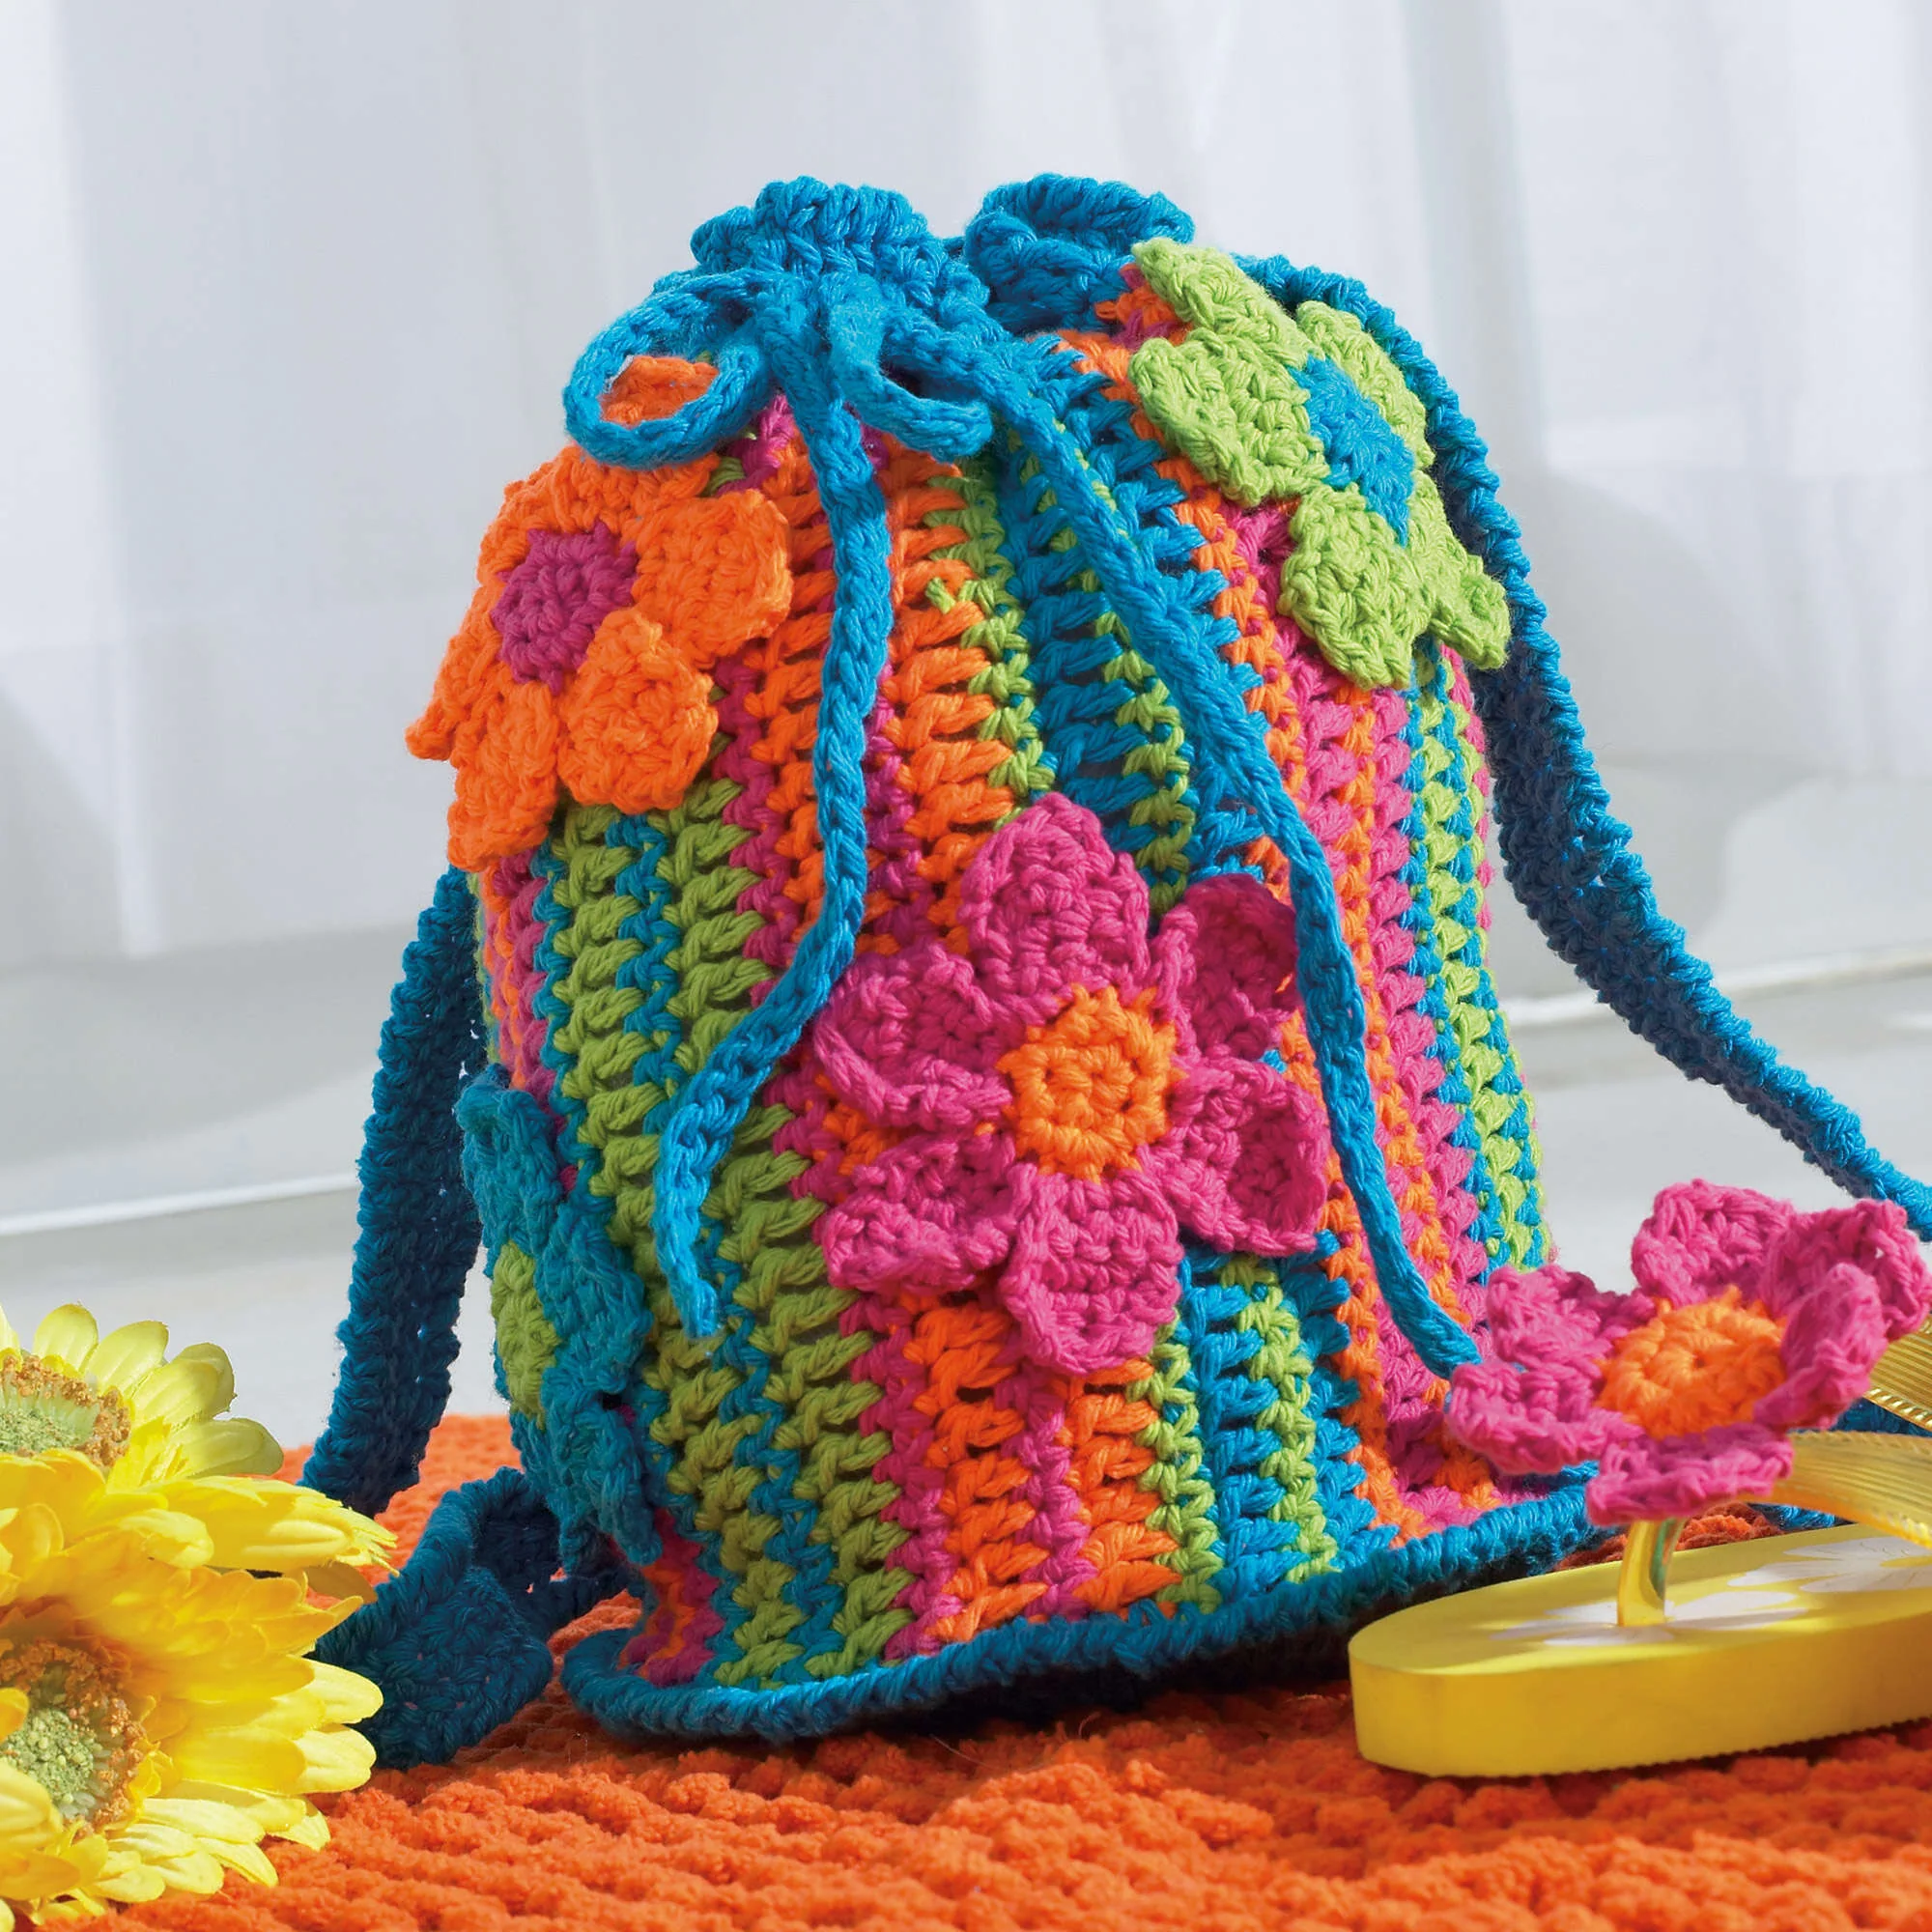
Colorful Crochet Striped Drawstring Tote Pattern
Are you looking for the perfect summer accessory to carry your beach essentials, farmer’s market finds, or books? This colorful crochet striped drawstring tote is a vibrant, practical, and stylish project that adds a pop of joy to any outfit. Made with durable cotton yarn, this bag is designed to hold its shape while looking effortlessly bohemian.
This pattern is perfect for intermediate crocheters or ambitious beginners who are comfortable with basic stitches like single crochet and double crochet. The combination of bold stripes and delicate flower appliques makes this bag a standout piece. Let’s dive into the details and get stitching!
Materials & Abbreviations
Before you begin, gather all your supplies. Because this project uses several colors, it is helpful to organize your yarn into separate baskets to avoid tangling.
Yarn Requirements
You will need medium weight (worsted) cotton yarn. Cotton is ideal for bags because it provides the necessary structure and durability for carrying items.
- Main Color (MC): Blue (approx. 2 balls)
- Contrast Color A: Green (1 ball)
- Contrast Color B: Orange (1 ball)
- Contrast Color C: Pink (1 ball)
Tools & Gauge
- Crochet Hook: 4.5 mm (U.S. size 7) or the size needed to obtain your gauge.
- Other Supplies: Tapestry needle for sewing, scissors, and stitch markers.
- Gauge: 14 single crochet (sc) and 16 rows = 4 inches.
Abbreviations (U.S. Terms)
- ch: chain
- sc: single crochet
- dc: double crochet
- sl st: slip stitch
- st(s): stitch(es)
- rnd: round
- RS: right side
- sp: space
- tog: together
Pro Tip on Color Changes: When changing colors, work to the last two loops on the hook of the final stitch of the previous color. Then, draw the new color through those remaining two loops to ensure a clean, seamless transition.
Step-by-Step Instructions
Creating the Base
The base is worked in rounds to create a sturdy bottom for your tote.
Starting with the Main Color (MC), ch 2.
Round 1: 6 sc in the 2nd ch from the hook. Join with a sl st to the first sc.
Round 2: Ch 3 (counts as dc). 2 dc in the same space as the last sl st. 3 dc in each sc around. Join with a sl st to the top of the ch 3. (Total: 18 dc).
Round 3: Ch 3 (counts as dc). 1 dc in the same space as the last sl st. *1 dc in the next dc, 2 dc in the next dc. Repeat from * around to the last dc. 1 dc in the last dc. Join with a sl st to the top of the ch 3. (Total: 27 dc).
Round 4: Ch 3 (counts as dc). 1 dc in the same space as the last sl st. *2 dc in the next dc. Repeat from * around. Join with a sl st to the top of the ch 3. (Total: 54 dc).
Round 5: Ch 3 (counts as dc). 1 dc in the same space as the last sl st. *1 dc in each of the next 3 dc, 2 dc in the next dc. Repeat from * to the last dc. 1 dc in the last dc. Join with a sl st to the top of the ch 3. (Total: 68 dc).
Round 6: Ch 3 (counts as dc). 1 dc in the same space as the last sl st. *1 dc in each of the next 4 dc, 2 dc in the next dc. Repeat from * to the last 2 dc. 1 dc in each of the last 2 dc. Join with a sl st to the top of the ch 3. (Total: 82 dc). Fasten off.
Working the Striped Body
The body of the bag is worked in rows. To achieve the vertical stripe effect, we will follow a specific color sequence. The bag should measure approximately 22 inches long from the top of the base to the top of the bag.
Starting with MC, ch 33.
Row 1 (RS): 1 dc in the 4th ch from the hook (this counts as 2 dc). 1 dc in each ch across. (Total: 31 sts). Join Color A. Turn.
Row 2: With Color A, ch 1. 1 sc in each dc across. Join MC. Turn.
Row 3: With MC, ch 3 (counts as dc). 1 dc in each sc across. Join Color A. Turn.
Row 4: With Color A, ch 1. 1 sc in each dc across. Join Color B. Turn.
Row 5: With Color B, ch 3 (counts as dc). 1 dc in each sc across. Join Color C. Turn.
Row 6: With Color C, ch 1. 1 sc in each dc across. Join Color B. Turn.
Row 7: With Color B, ch 3 (counts as dc). 1 dc in each sc across. Join Color C. Turn.
Row 8: With Color C, ch 1. 1 sc in each dc across. Join Color C. Turn.
Row 9: With Color C, ch 3 (counts as dc). 1 dc in each sc across. Join Color A. Turn.
Row 10: With Color A, ch 1. 1 sc in each dc across. Join MC. Turn.
Row 11: With MC, ch 3 (counts as dc). 1 dc in each sc across. Join Color A. Turn.
Row 12: With Color A, ch 1. 1 sc in each dc across. Join MC. Turn.
Row 13: With MC, ch 3 (counts as dc). 1 dc in each sc across. Join Color C. Turn.
Row 14: With Color C, ch 1. 1 sc in each dc across. Join Color B. Turn.
Row 15: With Color B, ch 3 (counts as dc). 1 dc in each sc across. Join Color B. Turn.
Row 16: With Color B, ch 1. 1 sc in each dc across. Join Color B. Turn.
Row 17: With Color B, ch 3 (counts as dc). 1 dc in each sc across. Join MC. Turn.
Repeat Pattern: Repeat Rows 2 through 17 to continue the stripe pattern until the piece measures approximately 22 inches from the beginning. End on a 16th row of the pattern. Fasten off. Sew the first and last rows together to form the center back seam.
Top Edging & Eyelet Detail
The eyelet edge adds a beautiful, airy finish to the top of your tote.
Round 1: With RS facing, join MC with a sl st to the center back seam. Work 72 sc evenly around the top edge. Join with a sl st to the first sc.
Round 2 (Eyelet Round): Ch 3 (counts as dc). 1 dc in the next sc. *Ch 1, skip next sc, 1 dc in each of the next 2 sc. Repeat from * to the last st. Ch 1, skip the last st. Join with a sl st to the top of the ch 3.
Round 3: Ch 3 (counts as dc). 1 dc in each st or ch-1 space around. Join with a sl st to the top of the ch 3.
Round 4: Ch 1. Working from left to right (instead of the usual right to left), work 1 reverse sc in each st around. Join with a sl st to the first sc. Fasten off.
Attaching the Body to the Base
Now it is time to join your hard work together!
With RS facing, join the Body to the Base by working 1 row of sc evenly around the join point using the MC. Join with a sl st to the first sc.
Next Round: Ch 1. Working from left to right, work 1 reverse sc in each st around. Join with a sl st to the first sc. Fasten off.
Creating the Straps
Make two straps for your bag.
Straps: With MC, ch 72. Row 1 (RS): 1 sc in 2nd ch from hook and 1 sc in each ch across. (Total: 71 sc). Turn.
Rows 2 and 3: Ch 1. 1 sc in each sc across. Turn.
Row 4: Ch 1. 1 sc in each sc across. Do not turn.
Row 5: Ch 1. Working from left to right, work 1 reverse sc in each st across. Fasten off.
Strap Edging: With RS facing, join MC with a sl st to the last remaining loop of the foundation chain. Ch 1. Working from left to right, work 1 reverse sc in each remaining loop across. Fasten off.
The Drawstring Cord
The drawstring provides that classic tote look and keeps your items secure.
With MC, make a chain 42 inches long. Turn the chain sideways and work a sl st into each “bump” along the side of the chain. Fasten off. Weave the drawstring through the eyelet round at the top of the bag so the ends meet at the center front. Knot the ends securely.
Hand-Crocheted Flower Appliques
Brighten up your bag with these easy-to-make flowers!
Instructions for a Single Flower
Base: Using Color 1, ch 2. Round 1: 6 sc in the 2nd ch from hook. Join with a sl st to the first sc. Round 2: Ch 1. 2 sc in each sc around. Join with a sl st to the first sc. (Total: 12 sc). Fasten off.
Petals:
First Petal: Join Color 2 with a sl st to the front loop only of any sc. *Ch 1, 2 sc in the same space as the sl st, 2 sc in the front loop only of the next sc. (Total: 4 sc for the petal). Turn. Work the next 3 rows with 1 sc in each sc of the petal. Turn. On the final row, Ch 1 and work two decreases (sc2tog) by drawing up a loop in each of the next 2 sts, then yarn over and draw through all 3 loops on the hook. Fasten off.
Subsequent Petals: Rejoin Color 2 with a sl st to the front loop of the next unworked sc of Round 2. Repeat the petal instructions until you have 6 petals total.
Flower Color Combinations:
- Flower A: Use MC for Color 1 and Contrast A for Color 2. (Make 1)
- Flower B: Use Contrast C for Color 1 and Contrast B for Color 2. (Make 1)
- Flower C: Use Contrast A for Color 1 and MC for Color 2. (Make 1)
- Flower D: Use Contrast B for Color 1 and Contrast C for Color 2. (Make 1)
Finishing
Now for the final assembly! Use a tapestry needle to sew the ends of the straps to the bag. Secure one end of each strap on either side of the back seam, tucked just under the top edging. Sew the other ends of the straps approximately 3 inches down from the base on either side of the back seam.
Finally, pin your four applique flowers randomly onto the bag to create a beautiful, scattered floral effect, and sew them firmly in place.
Tips for Success
- Tension Control: Since this is a bag, try to keep your tension consistent. If your stitches are too loose, the bag may sag too much when filled.
- Blocking: If your flowers or base look a little wonky, try wet blocking them. This will help them lay flat and look professional.
- Yarn Choice: If you want an even sturdier bag, you can use a slightly smaller hook to create a tighter fabric.
- Color Placement: Don’t be afraid to get creative with where you place your flowers! There is no “wrong” way to decorate a boho-style tote.