Cozy Cable Knit Beanie: A Step-by-Step DIY Pattern for Beginners
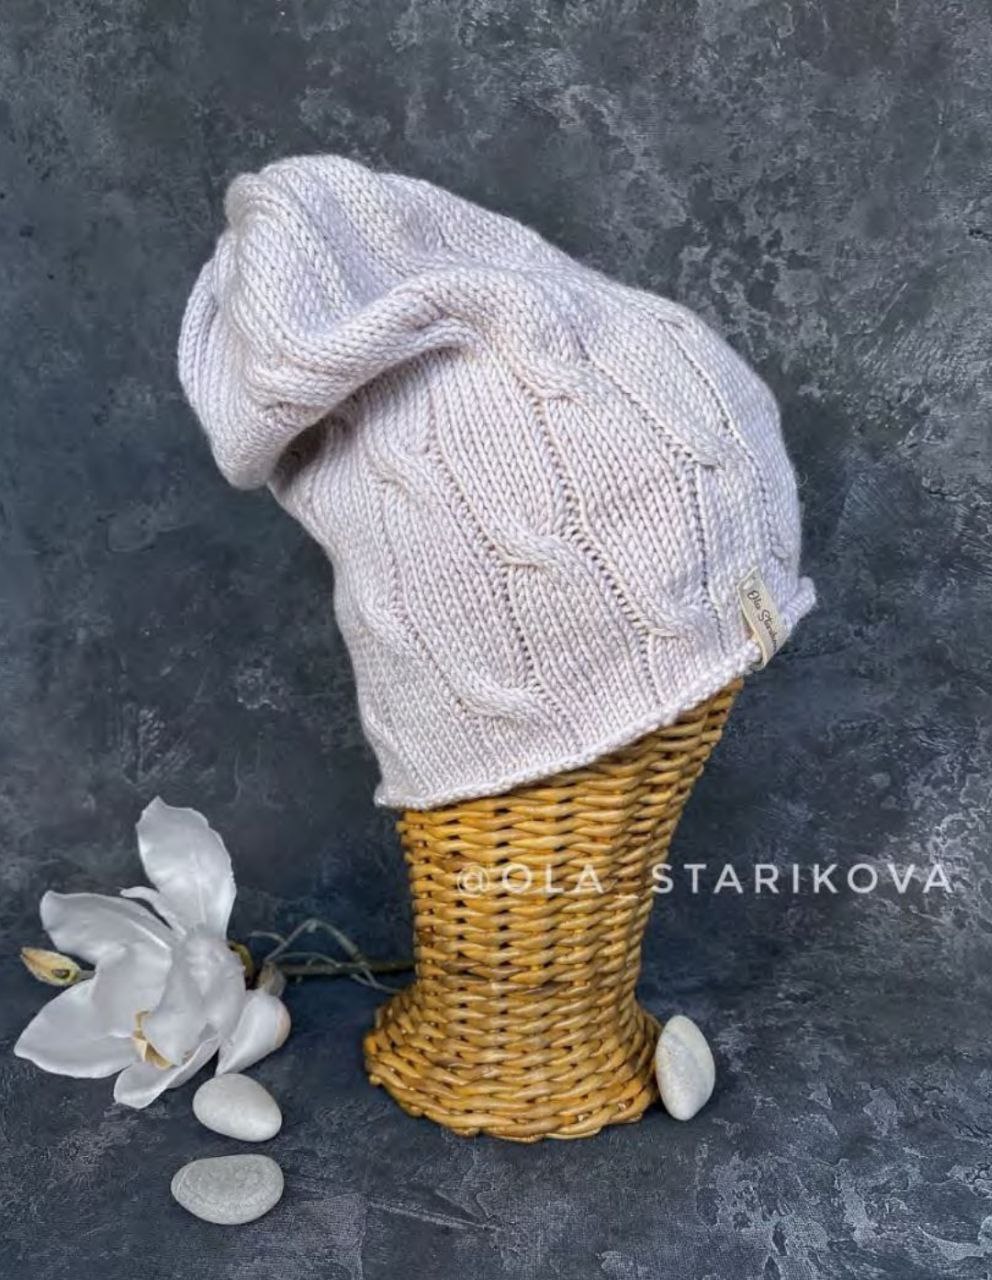
There is nothing quite like a handmade cable knit hat to keep you warm during the chilly winter months. If you are looking for a project that looks intricate and professional but is actually quite beginner-friendly, this “Zefir” cable beanie is the perfect choice. With its classic textures and flattering fit, this hat makes a wonderful gift or a cozy addition to your own winter wardrobe.
This tutorial will walk you through the entire process, from casting on to the final blocking. We will be using a combination of basic knit and purl stitches and a simple cable cross to create those beautiful braided columns. Let’s get started!
Materials & Abbreviations
To achieve the soft, luxurious look of this beanie, we recommend using a high-quality merino wool. However, any yarn with a similar weight and yardage will work beautifully.
Materials Needed
- Yarn: Approximately 275 yards of Super Soft Merino wool (or a similar DK/Worsted weight yarn).
- Needles:
- US 4 (3.5mm) circular needles, 16-inch cable.
- US 7 (4.5mm) circular needles, 16-inch cable.
- US 7 (4.5mm) circular needles, 24-inch cable (for the crown decreases).
- Accessories:
- Cable needle (or a double-pointed needle for holding stitches).
- Stitch markers.
- A 2mm crochet hook or a tapestry needle for finishing.
- Measuring tape and scissors.
Abbreviations (US Terms)
- K: Knit
- P: Purl
- K2tog: Knit two stitches together (decrease)
- C6F (Cable 6 Front): Slip 3 stitches onto the cable needle and hold them in front of the work. Knit the next 3 stitches from the left needle, then knit the 3 stitches from the cable needle.
- St(s): Stitch(es)
- Rep: Repeat
Step-by-Step Instructions
This pattern is designed for an average adult head circumference of 21.5 to 23 inches. The finished hat measures approximately 10.5 inches in length and 8.3 inches in width after blocking.
The Gauge
To ensure the hat fits perfectly, we recommend knitting a swatch. Using the US 7 (4.5mm) needles, you should have approximately 24 stitches and 30 rows per 4 inches (10cm) after blocking. If your gauge is too tight, move up a needle size; if it’s too loose, move down.
Part 1: The Brim
We start with smaller needles to create a snug, professional-looking brim that won’t stretch out over time.
Using the US 4 (3.5mm) circular needles, cast on 113 stitches. Join to work in the round, being careful not to twist your stitches. After joining, you will have 112 active stitches on your needles.
Place a stitch marker at the beginning of the round to keep track of your progress. Work the following sequence:
Round 1-10: *K6, P1*. Repeat from * to * until the end of the round.
After 10 rounds, your brim should measure approximately 1.2 inches (3cm).
Part 2: Transitioning to the Body
Now, switch to the US 7 (4.5mm) circular needles to create the more relaxed fabric of the hat’s body.
Next 2 Rounds: Continue the brim pattern (*K6, P1*) for 2 more rounds.
Part 3: Creating the Cable Pattern
The beauty of this hat lies in the staggered cables. We will alternate which columns are cabled to create a braided effect.
The First Cable Round
Round 11: *C6F, P1, K6, P1*. Repeat from * to * until the end of the round. (In this round, we cable every other column).
The Pattern Sequence
Rounds 12-22: *K6, P1*. Repeat from * to * until the end of the round. (This provides a “rest” period of 11 rows between cables). While working these rows, place a marker every 10th row to help you keep track.
Round 23 (The Staggered Cable): In this round, you will perform the C6F in the columns that were not cabled in Round 11. The sequence will be: *K6, P1, C6F, P1*. Repeat from * to * until the end of the round.
Rounds 24-34: *K6, P1*. Repeat from * to * until the end of the round.
Continuing the Body: Repeat the sequence from Round 13 through Round 36 another 2.5 times. By the time you finish the body, you should have worked approximately 71 rounds in total, and the hat should measure about 9.4 inches (24cm) from the cast-on edge (before blocking).
Part 4: Shaping the Crown
To close the top of the hat, we will move to the US 7 (4.5mm) 24-inch circular needles and use the Magic Loop method to handle the decreasing number of stitches.
Round 1 (Decrease): *K6 in the first column, K2tog in the second column*. Repeat this across the round. Only decrease in the columns that were not cabled in the previous section.
Round 2: Work the stitches as they appear (K6, P1 pattern).
Round 3: Repeat the decreases in the same columns as Round 1 (K2tog at the start of the column). Each column now has 4 stitches.
Round 4: Work the stitches as they appear.
Round 5: Decrease 1 stitch in each of those same columns. Each column now has 3 stitches.
Round 6: Work the stitches as they appear.
Round 7: Decrease 1 stitch at the beginning of every column.
Round 8: Work the stitches as they appear.
Round 9: Decrease 1 stitch on the right side of every column.
Round 10: Work the stitches as they appear.
Round 11: In every column that still has 4 stitches, perform K2tog twice. Work all other stitches as they appear.
Round 12: Work the stitches as they appear.
Finishing
Once you have completed the final round of decreases, it is time to close the top of the beanie.
- Cut your yarn, leaving a tail of about 12 inches.
- Using your 2mm crochet hook or a tapestry needle, weave the yarn through the remaining stitches on the needle.
- Pull the yarn tight to cinch the hole closed.
- Bring the yarn to the inside of the hat and weave it through 3 stitches to secure it.
- Tie a secure knot and weave the remaining tail into the fabric of the hat.
Tips for a Professional Result
Blocking is Key
To get that boutique-quality look, “Wet Blocking” (VTO) is essential. Gently hand wash your hat in cool water (about 86°F/30°C) using a mild wool detergent. Rinse with a bit of conditioner to soften the fibers. Do not wring the hat; instead, gently squeeze out the excess water. Lay it flat on a towel or a blocking mat and shape it to the final dimensions (approximately 10.2 inches in height). Let it air dry away from direct sunlight.
Sizing Adjustments
If you want to make this for a child (approximately 20-inch head circumference), simply subtract two full repeats (14 stitches) from the initial cast-on count. For larger heads, add one repeat (7 stitches).
Handling the Cables
If you find the cable crosses are pulling the fabric too tight, ensure you are not over-tightening your tension when slipping the stitches onto the cable needle. The “C6F” should feel fluid and smooth.