Free Crochet Baby Goat Amigurumi Pattern: Easy DIY Tutorial
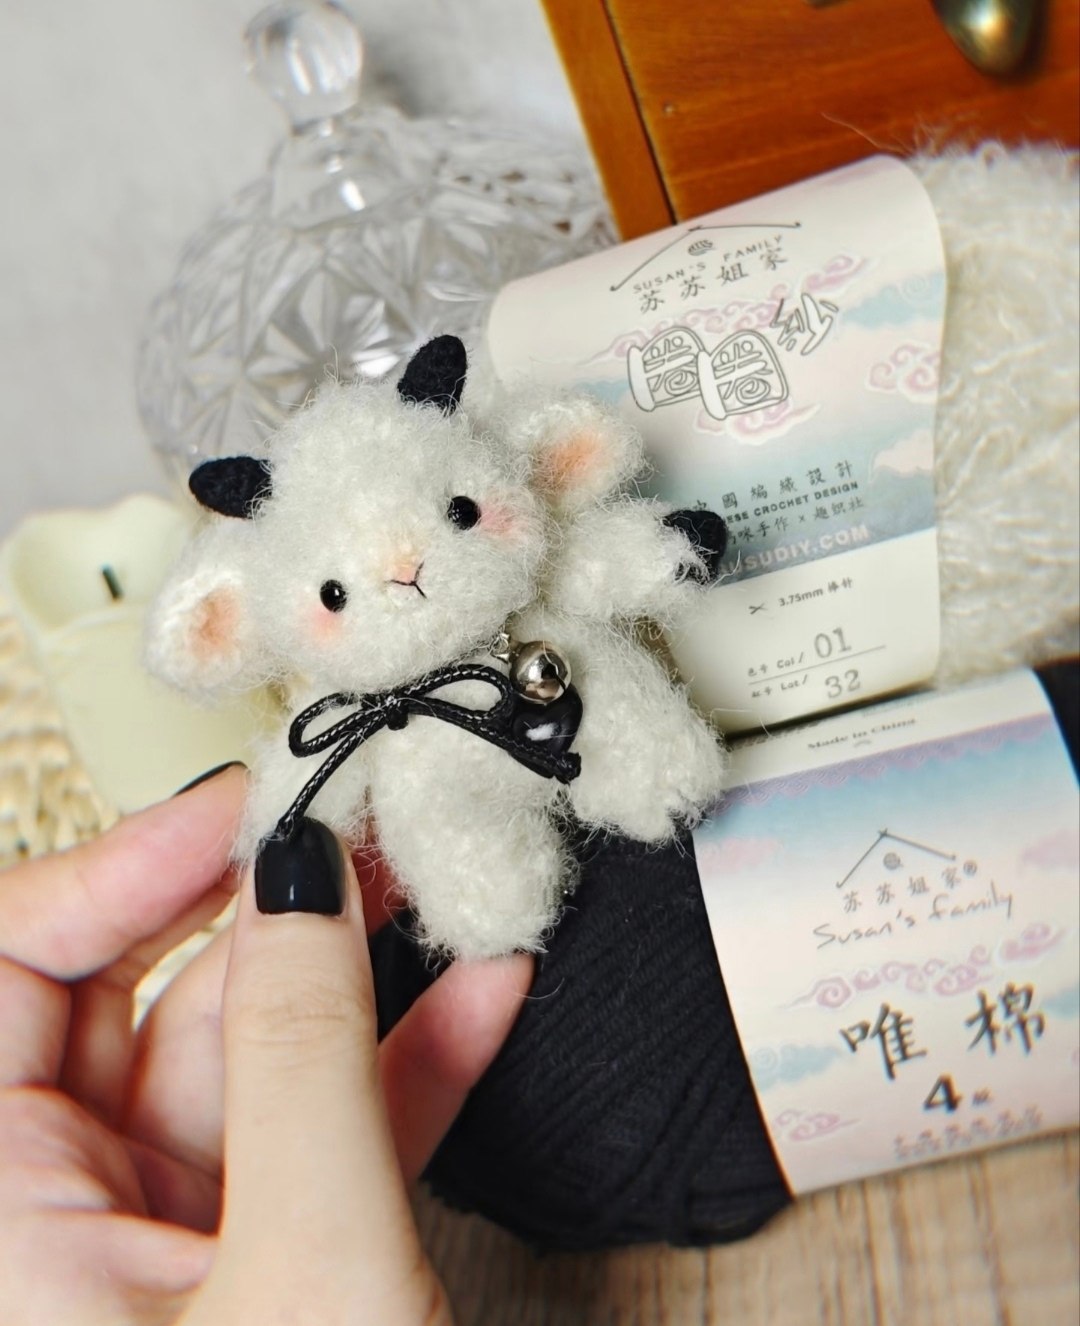
Are you looking for your next adorable crochet project? This incredibly cute, pocket-sized crochet baby goat (or little kid!) is the perfect weekend craft. With its fluffy, woolly body, sweet blushed cheeks, and tiny black horns, this amigurumi goat makes an amazing bag charm, keychain, or handmade gift for animal lovers.
In this beginner-friendly tutorial, we will walk you through how to crochet this little goat step-by-step. We highly recommend using a textured or fuzzy yarn to give your baby goat that authentic, soft farm animal look!
Materials & Abbreviations
Materials Needed
- Yarn:
- Main Color (White or Cream): Approx. 30–40 yards of medium weight (#4) fuzzy, bouclé, or brushed mohair yarn. (If you are a beginner, you can also use standard acrylic or cotton yarn!).
- Contrast Color (Black): Approx. 10 yards of sport weight (#2) or DK weight (#3) smooth black yarn for the hooves and horns.
- Crochet Hook: Size US C-2 (2.75 mm) or B-1 (2.25 mm) crochet hook (choose a size that keeps your stitches tight so stuffing doesn’t show through).
- Safety Eyes: One pair of 5 mm or 6 mm black safety eyes (or small black beads/glue-on eyes).
- Fiberfill Stuffing: A small handful of polyester stuffing.
- Embroidery Floss: Fine pink or brown thread to embroider the nose.
- Cosmetic Blush: A pink pastel or powder blush with a Q-tip to add rosy cheeks and color the inner ears.
- Tools: Tapestry needle, scissors, and a stitch marker.
- Optional Embellishments: A thin black ribbon and a tiny metal craft bell to make a sweet collar.
Abbreviations (US Terms)
- ch: chain
- sc: single crochet
- hdc: half double crochet
- dc: double crochet
- inc: increase (work 2 single crochets into the same stitch)
- dec: decrease (invisible decrease recommended)
- st(s): stitch(es)
- MR: Magic Ring
- [ ] x …: repeat instructions within brackets the specified number of times
Step-by-Step Instructions
The Head
Using your main white/cream fuzzy yarn:
Round 1: Work 6 sc into a MR. (6 sts)
Round 2: Work 1 inc in each stitch around. (12 sts)
Round 3: [1 sc, 1 inc] x 6 times. (18 sts)
Round 4: Work 18 sc around. (18 sts)
Round 5: 4 sc, [1 sc, 1 inc] x 2 times, 2 inc, [1 sc, 1 inc] x 2 times, 4 sc. (24 sts)
Rounds 6–8: Work 24 sc around. (24 sts for 3 rounds)
Round 9: [1 sc, 1 dec, 1 sc] x 6 times. (18 sts)
Note: If you are using safety eyes, insert them now between Rounds 5 and 6, leaving about 4 to 5 stitches of space between them. Stuff the head firmly with fiberfill.
Round 10: [1 sc, 1 dec] x 6 times. (12 sts)
Fasten off, leaving a long tail for sewing. Top up the stuffing if needed.
The Ears (Make 2)
Using your main white/cream fuzzy yarn:
Row 1: Ch 7. Starting in the second chain from your hook, work: 2 dc, 1 hdc, then work 3 sc into the very last chain stitch. Now, turn your work to crochet along the opposite/bottom side of your starting chain: work 1 hdc, 2 dc. (10 sts)
Row 2: Continue working around the perimeter: 3 sc, 3 inc, 3 sc. (12 sts)
Fasten off, leaving a long tail for sewing.
The Arms (Make 2)
Start with the black yarn to create the little hooves:
Round 1: Work 6 sc into a MR. (6 sts)
Round 2: Work 6 sc around. (6 sts)
Switch to your main white/cream fuzzy yarn:
Rounds 3–5: Work 6 sc around. (6 sts for 3 rounds)
Fasten off, leaving a long tail for sewing. You do not need to stuff the arms.
The Legs (Make 2)
Start with the black yarn:
Round 1: Work 6 sc into a MR. (6 sts)
Round 2: Work 6 sc around. (6 sts)
Switch to your main white/cream fuzzy yarn:
Round 3: [1 sc, 1 inc] x 3 times. (9 sts)
Rounds 4–6: Work 9 sc around. (9 sts for 3 rounds)
For the first leg, fasten off and cut the yarn. For the second leg, do not cut the yarn! We will connect the legs in the next step to continue directly into the body.
The Body
Continuing from the second leg:
Round 7: Ch 3, then join to any stitch on the first leg with a single crochet. Work 9 sc around the first leg, work 3 sc along one side of the ch-3 bridge, work 9 sc around the second leg, and work 3 sc along the other side of the ch-3 bridge. (24 sts)
Rounds 8–9: Work 24 sc around. (24 sts for 2 rounds)
Round 10: [1 sc, 1 dec, 1 sc] x 6 times. (18 sts)
Start stuffing the legs and body firmly with fiberfill.
Round 11: Work 18 sc around. (18 sts)
Round 12: [1 sc, 1 dec] x 6 times. (12 sts)
Fasten off and weave in your yarn ends. Add a little extra stuffing to the top of the body before closing.
The Horns (Make 2)
Using the black yarn:
Round 1: Work 4 sc into a MR. (4 sts)
Round 2: [1 sc, 1 inc] x 2 times. (6 sts)
Rounds 3–4: Work 6 sc around. (6 sts for 2 rounds)
Fasten off, leaving a tail for sewing.
Finishing & Assembly
Bringing Your Baby Goat to Life
Now that all your individual pieces are crocheted, it is time to assemble your adorable kid goat!
- Attach the Head: Sew the head securely to the body using the yarn tail from the head. Keep your stitches tight and even.
- Sew on the Horns: Position the tiny black horns on top of the head, centered between Rounds 2 and 4. Sew them in place.
- Sew on the Ears: Position the ears on either side of the head, slightly below the horns. Angle them slightly downward for that sweet, innocent baby animal look.
- Sew on the Arms: Attach the arms to the sides of the body, just below the neck line.
- Embroider the Face: Using pink or brown embroidery floss, embroider a small, delicate “Y” shape directly between the eyes to create the nose and mouth.
- Add Rosy Details: Dip a Q-tip into your pink cosmetic blush. Gently dab it onto the cheeks just below the eyes, and blend a small amount of pink onto the inner parts of the ears to make them pop!
- The Finishing Touch: Tie a thin black ribbon around the neck and slip a tiny craft bell onto it before tying a bow.
Tips for Working with Fuzzy Yarn
Working with textured, boucle, or fuzzy mohair yarn can sometimes be a challenge because the stitches can be hard to see. Here are a few quick tips to make the process easy:
- Feel your stitches: Use your fingers to feel for the loops/holes rather than relying only on your eyes.
- Use a running stitch marker: Place a piece of contrasting scrap yarn across your work at the end of every round so you never lose your place.
- Double strand: If you are struggling, try holding your fuzzy yarn together with a single strand of very thin, matching sewing thread or lace-weight cotton yarn. This defines the stitches without ruining the fluffy texture!
Your beautiful handmade crochet baby goat is complete! Enjoy your new little companion, or share this pattern with your crochet buddies.