How to Knit the Melody Baby Romper: A Step-by-Step Beginner’s Guide
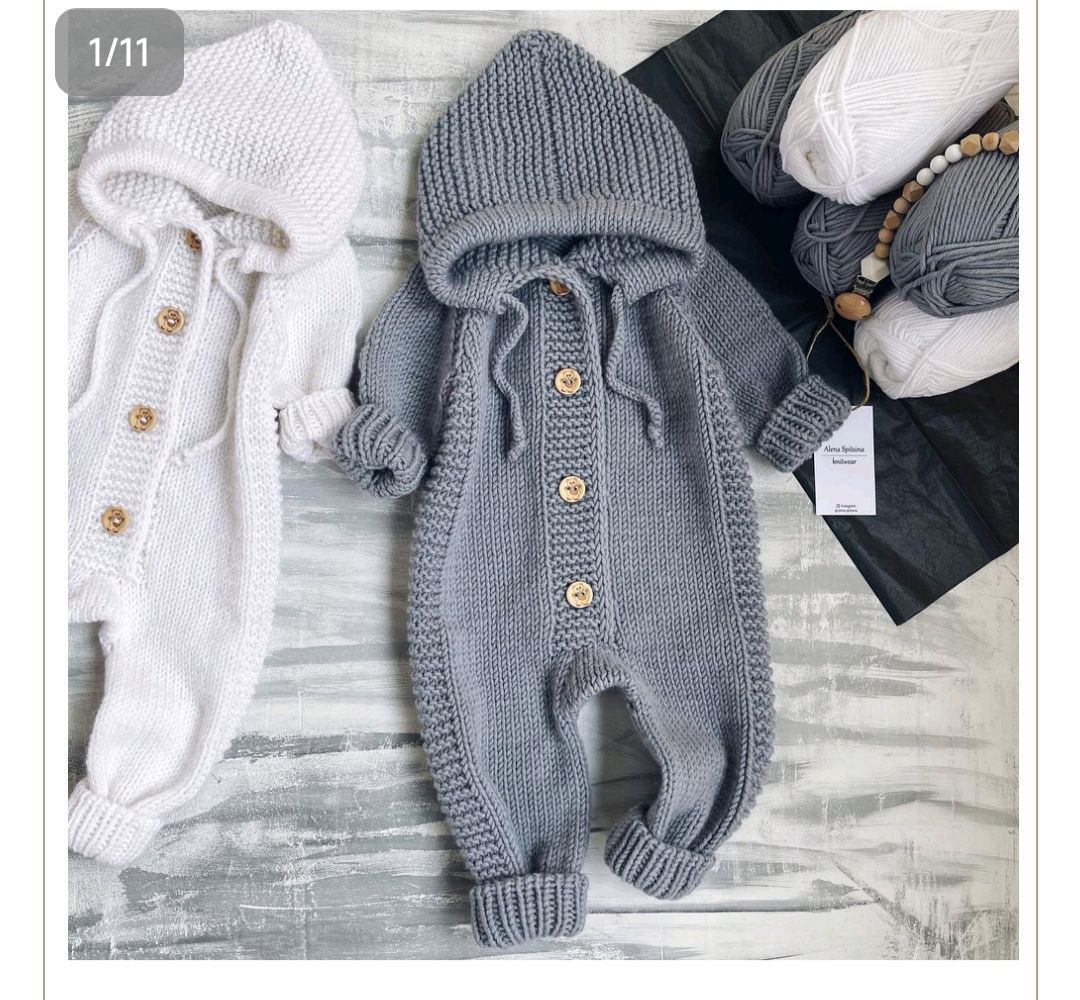
There is nothing quite as heartwarming as knitting a soft, cozy outfit for a newborn. If you are looking for your next project, the Melody Baby Romper is an absolute dream. This adorable, top-down raglan jumpsuit features a charming hood, a classic button placket, and a snug, comfortable fit that makes it perfect for everything from newborn photoshoots to everyday naptime.
Whether you are knitting for a baby shower gift or adding to your own little one’s wardrobe, this pattern is designed to be accessible for beginners who have a grasp of basic knitting techniques. The Melody Romper combines the timeless texture of stockinette stitch with the cozy structure of garter stitch, resulting in a high-quality garment that looks professional and feels incredibly soft.
Materials & Abbreviations
To ensure your romper turns out perfectly, it is vital to use the right materials and achieve the correct gauge. Because this is a garment meant for sensitive baby skin, we recommend using high-quality natural fibers like wool or cotton blends.
Yarn Requirements
You can use one of the following combinations to achieve the desired thickness:
- Option 1: Alize Lanagold Classic (or similar weight) – approximately 240 yards (100g) for smaller sizes, up to 960 yards for larger sizes.
- Option 2: Alize Baby Wool (or similar weight) worked with two strands held together – approximately 385 yards (50g) per skein. You will need between 6 and 10 skeins depending on the size.
Tools Needed
- Circular Needles: 60-inch to 40-inch length, in US size 4 (3.5mm), US size 5 (4mm), or US size 6 (4.5mm).
- Crochet Hook: For creating buttonholes and finishing edges.
- Tapestry Needle: For weaving in ends and sewing the gusset.
- Stitch Markers: Essential for tracking your raglan lines.
- Buttons: 4 to 6 buttons (depending on the size selected).
- Scissors.
Gauge
It is highly recommended to knit a swatch and wash it before starting. This ensures your sizing is accurate!
- Stockinette Stitch: 17-18 stitches and 24 rows = 4″ x 4″ (10 x 10 cm).
- Garter Stitch: 16 stitches and 30 rows = 4″ x 4″ (10 x 10 cm).
Size Guide (Conversions)
The pattern is worked in multiple sizes. Use the following guide to select your target age:
| Age | Height (inches) | Width (inches) | Sleeve Length (inches) | Leg Length (inches) |
|---|---|---|---|---|
| 0-3 Months | ~22-24.5″ | ~9.5″ | ~6″ | ~7″ |
| 3-6 Months | ~24.5-27″ | ~9.8″ | ~6.7″ | ~7.8″ |
| 6-9 Months | ~27-29″ | ~11.4″ | ~7.5″ | ~8.6″ |
| 9-12 Months | ~29-31.5″ | ~11.4″ | ~7.8″ | ~9.4″ |
| 12-18 Months | ~31.5-34″ | ~12.5″ | ~8.6″ | ~11″ |
| 18-24 Months | ~34-36″ | ~12.5″ | ~9.5″ | ~12.2″ |
Abbreviations
- K: Knit
- P: Purl
- M: Marker
- M1L: Make 1 Left (increase leaning left)
- M1R: Make 1 Right (increase leaning right)
- RS: Right Side
- WS: Wrong Side
- St(s): Stitch(es)
Step-by-Step Instructions
This romper is worked using the **Top-Down Raglan** method. This means you start at the neck and work your way down to the legs, allowing you to try it on the baby as you go!
The Neckline and Placket
Start by casting on the required number of stitches for your chosen size using a crochet hook to create a chain. For the 0-3 month size, cast on approximately 55 stitches. Once cast on, transfer these to your circular needles.
The first few rows involve setting up the button placket. This placket will consist of 8 stitches that are worked in garter stitch (knitting every row) to create a sturdy edge for your buttons. You will alternate between the placket, the raglan lines (which are also worked in garter stitch for definition), and the main body stitches.
Note on Buttonholes: For a traditional look, place buttonholes on the left placket for baby boys and on the right placket for baby girls. Use your crochet hook to create these holes at the specific row counts provided in the size chart (e.g., for 0-3 months, create holes at rows 15, 33, 51, and 69).
Shaping the Bodice (Raglan Increases)
Once your neckline is established, you will begin the raglan shaping. You will increase at four points: the two raglan lines and the two sides of the armholes. The raglan lines themselves should consist of two stitches worked in garter stitch to provide a beautiful, textured seam.
Follow the increase pattern for your specific size. You will be performing increases (M1L and M1R) at regular intervals. This section is worked in stockinette stitch (knit on the RS, purl on the WS). Continue working in the round until you have reached the required length for the bodice before separating the sleeves.
The Sleeves
After the bodice is shaped, you will separate the sleeves from the body. Transfer the sleeve stitches to a piece of scrap yarn or a second circular needle. Use the “Magic Loop” technique to work the sleeves in the round.
The sleeves are worked in stockinette stitch. To prevent the sleeves from being too wide, you will perform decreases (K2tog or SSK) at regular intervals as specified in the pattern. Once the sleeve reaches the desired length, transition to a 1×1 ribbing (knit 1, purl 1) for 10 rows, followed by two rows of tubular ribbing for a professional, store-bought finish. Bind off loosely with a tapestry needle.
The Legs
Now, return to the main body. You will continue working in the round. When you reach the bottom of the bodice, you will begin working the legs. The legs are worked in stockinette stitch, but you will maintain the garter stitch texture on the sides for consistency.
As you work down the legs, you will perform decreases to shape the tapered leg. Once the legs reach the appropriate length, switch to your smaller needles to work the 1×1 ribbing at the ankles, followed by the tubular ribbing technique. Bind off carefully.
The Hood
The final major component is the hood. The hood is worked upwards from the neckline using garter stitch. This provides a lovely, thick texture that keeps the baby’s head warm.
Begin by picking up stitches around the neckline. Work in garter stitch, following the decrease pattern to shape the hood so it contours nicely to the head. Once the hood is complete, you will create a drawstring (see “Finishing” below) to allow for an adjustable fit.
Finishing
The finishing touches are what truly bring the Melody Romper to life!
The Drawstring
You have two lovely options for the hood drawstring:
- Crochet Option: Use a crochet hook to make a chain of 70-80 cm, then work single crochet stitches along the chain to create a sturdy cord.
- Knitting Option: Using double-pointed needles, cast on 3 stitches and work in knit stitch, sliding the stitches to the end of the needle and knitting again without turning, until you reach the desired length.
Assembly and Details
- Sewing the Gusset: Use a tapestry needle and a mattress stitch (knit stitch) to join the legs together at the crotch area.
- Buttons: Hand-sew your chosen buttons onto the placket, ensuring they align perfectly with the buttonholes you created.
- Blocking: This is the most important step! Soak your finished romper in lukewarm water with a bit of gentle wool wash. Lay it flat on a towel and reshape it to the correct dimensions. Let it dry completely before use. This “sets” the stitches and makes the garment look incredibly polished.
Tips for Success
Don’t Skip the Swatch: It is tempting to jump straight into the project, but knitting a swatch ensures your sizing is correct. If your gauge is too tight, use a larger needle; if it’s too loose, go smaller.
Mind Your Tension: Especially when working the ribbing and the buttonholes, try to maintain a consistent tension so the edges don’t become too wavy or too tight.
Use Markers Liberally: Raglan increases can get confusing! Use stitch markers at every increase point to ensure you never lose track of your stitch count.
Enjoy the Process: Knitting is a meditative practice. Take your time, enjoy the rhythm of the stitches, and celebrate each finished section!