How to Crochet a Cute Amigurumi Teddy Bear: A Step-by-Step Tutorial
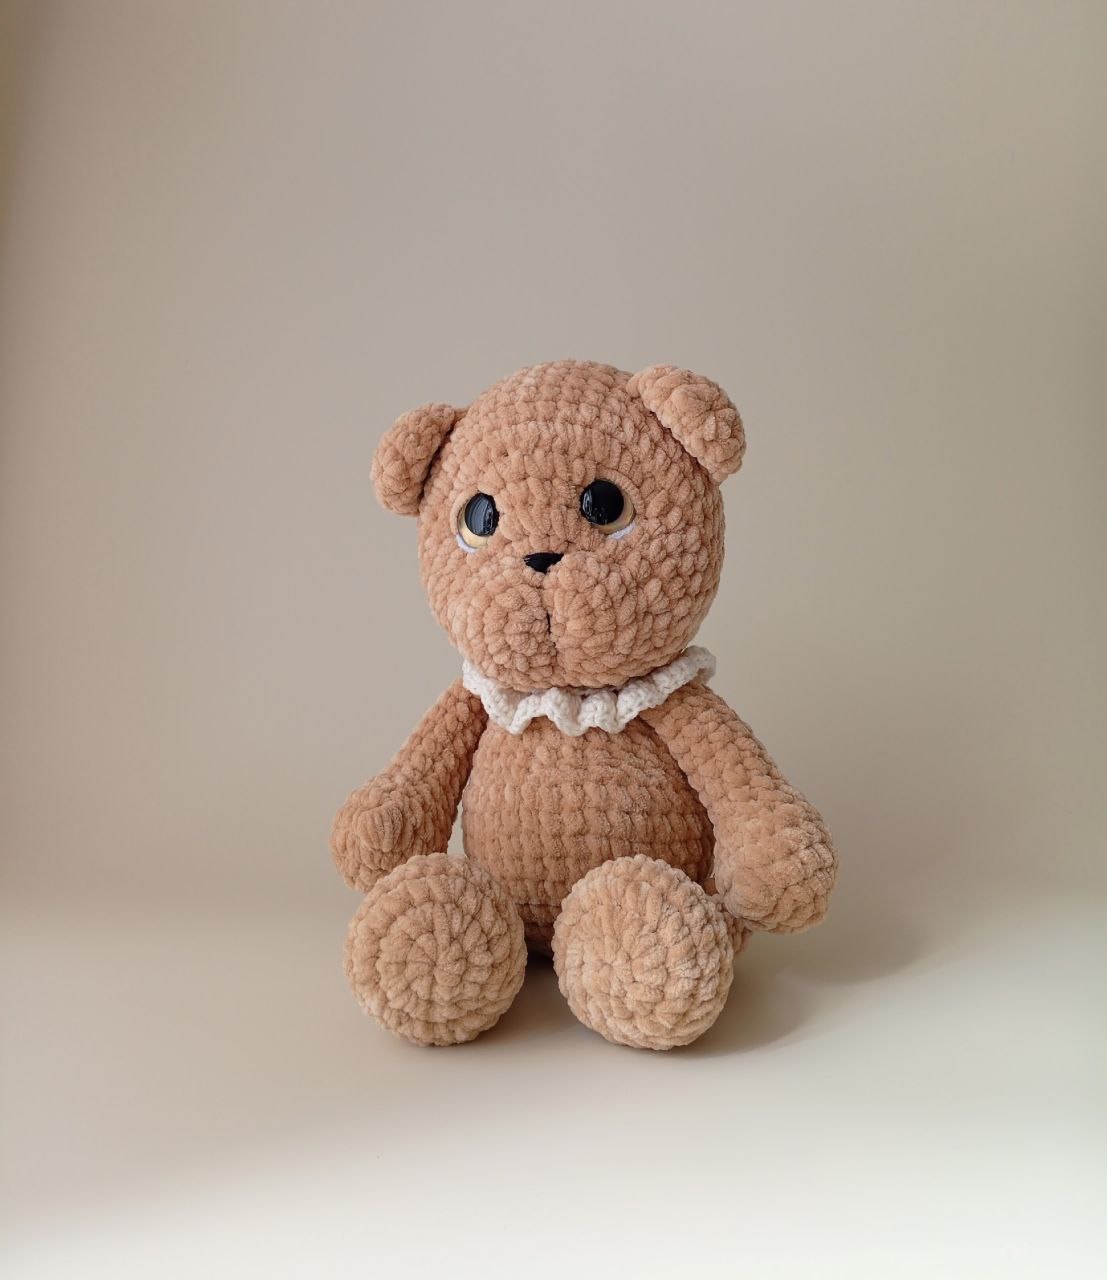
There is nothing quite as cozy as a handmade teddy bear. If you are looking for a project that results in a huggable, chunky, and adorable companion, you have come to the right place. This amigurumi teddy bear pattern is designed to be worked with soft, velvet-style chenille yarn, giving it that premium, “squishy” feel that makes amigurumi so popular.
This tutorial is perfect for intermediate beginners—those who are comfortable with basic stitches like the single crochet but want to try something a little more structural, like working limbs directly into the body or creating textured bobble stitches. Follow along closely, and you will have a lifelong friend ready for gifting or display in no time!
Materials & Abbreviations
Before you pick up your hook, ensure you have all the necessary supplies. Because this bear uses chunky yarn, using the correct hook size is essential to ensure your stuffing doesn’t peek through the stitches.
What You Will Need
- Yarn: Approximately 2 skeins of bulky/chunky chenille yarn (velvet-style yarn works best for this texture).
- Accent Yarn: A small amount of cotton yarn in a contrasting color (for the collar).
- Crochet Hook: 7/64 inch (4.5 mm) for the main body; 5/32 inch (4 mm) for the collar.
- Safety Eyes: 1 inch (25 mm) safety eyes.
- Stuffing: High-quality polyester fiberfill.
- Embroidery Floss: Black for the nose.
- Other: A tapestry needle, scissors, and stitch markers.
Abbreviations (US Terms)
- MR: Magic Ring
- Ch: Chain
- Sc: Single Crochet
- Inc: Increase (2 sc in one stitch)
- Dec: Decrease (sc 2 together)
- Dc: Double Crochet
- Sl st: Slip Stitch
- St(s): Stitch(es)
Step-by-Step Instructions
As you work, remember to use stitch markers. Working with chunky chenille yarn can sometimes make it difficult to see the “V” of the stitches, so marking your first stitch of every round is a lifesaver.
The Head
The head is worked in a continuous spiral. Do not join at the end of each round unless otherwise specified.
- Round 1: 6 sc in a Magic Ring (6)
- Round 2: Inc in each st around (12)
- Round 3: (1 sc, inc) repeat 6 times (18)
- Round 4: (2 sc, inc) repeat 6 times (24)
- Rounds 5-6: Sc in each st around (24)
- Round 7: 12 inc, 12 sc (36)
- Round 8: Sc in each st around (36)
- Round 9: 9 sc, 6 inc, 21 sc (42)
- Rounds 10-17: Sc in each st around (42)
- Round 18: 5 sc, (dec) repeat 6 times (36)
- Round 19: 4 sc, (dec) repeat 6 times (30)
- Round 20: 3 sc, (dec) repeat 6 times (24)
- Round 21: 2 sc, (dec) repeat 6 times (18)
- Round 22: 1 sc, (dec) repeat 6 times (12)
- Round 23: (dec) repeat 6 times (6)
Fasten off, leaving a long tail for sewing. When placing the safety eyes, position them between rounds 7 and 8. The distance between the eyes should be approximately 6 stitches. For better alignment, use the 6th increase of Round 9 as your center reference point.
The Body
The body is slightly more complex as we will be integrating the legs directly into the rounds to create a seamless look.
- Round 1: 6 sc in a Magic Ring (6)
- Round 2: Inc in each st around (12)
- Round 3: (1 sc, inc) repeat 6 times (18)
- Round 4: (2 sc, inc) repeat 6 times (24)
- Round 5: (3 sc, inc) repeat 6 times (30)
- Round 6: (4 sc, inc) repeat 6 times (36)
- Round 7: Sc in each st around (36)
- Round 8: 6 sc (working the first leg), 12 sc, 6 sc (working the second leg), 12 sc (36)
- Rounds 9-12: Sc in each st around (36)
- Round 13: (1 sc, dec) repeat 6 times; 18 sc (30)
- Rounds 14-15: Sc in each st around (30)
- Round 16: (1 sc, dec) repeat 6 times; 12 sc (24)
- Round 17: Sc in each st around (24)
- Round 18: 4 sc (working the first arm), 6 sc, 4 sc (working the second arm), 10 sc (24)
- Round 19: (dec, 1 sc) repeat 6 times; 6 sc (18)
- Round 20: 18 sc (18)
Stuff the body firmly. Leave a long tail for sewing the head to the body.
The Arms (Top Paws)
Make two of these.
- Round 1: 6 sc in a Magic Ring (6)
- Round 2: Inc in each st around (12)
- Round 3: (1 sc, inc) repeat 6 times (18)
- Round 4: 5 sc, 5 dc in the next single stitch (this creates the flare), 12 sc (18)
- Round 5: Sc in each st around (18)
- Round 6: 3 sc, bobble stitch, 3 sc (12)
- Round 7: 2 sc, (dec) repeat 3 times (9)
- Rounds 8-14: Sc in each st around (9)
Fold the piece in half (joining the two flat sides) and work 4 sc through both layers to close. Fasten off.
The Feet (Bottom Paws)
Make two of these.
- Round 1: 8 sc in a Magic Ring (8)
- Round 2: Inc in each st around (16)
- Round 3: (1 sc, inc) repeat 8 times (24)
- Rounds 4-5: Sc in each st around (24)
- Round 6: 6 sc, bobble stitch, 6 sc (18)
- Round 7: 3 sc, bobble stitch, 3 sc (12)
- Rounds 8-16: Sc in each st around (12)
Fold the piece in half and work 6 sc through both layers to close. Fasten off.
The Ears
Make two of these.
- Round 1: 7 sc in a Magic Ring (7)
- Round 2: Inc in each st around (14)
- Rounds 3-4: Sc in each st around (14)
Fold the ear in half and work 7 sc through both layers to close. Leave a long tail for sewing.
Finishing
Now comes the magic part—assembly! This is where your bear really comes to life.
Assembly Steps
- Attach the Head: Use the tail from the body to sew the head onto the neck area. Ensure it is centered and firm.
- Attach the Ears: Sew the ears to the top of the head. Position them slightly to the sides for a natural look.
- Attach Limbs: Sew the arms to the sides of the body and the feet to the bottom.
- Shape the Muzzle: To give the bear its cute facial expression, take a needle and some stuffing/thread and pull it slightly toward the center of the face where the nose will be. This “indentation” creates the snout.
- Embroider the Nose: Use your black embroidery floss to sew a small nose right at the tip of the shaped muzzle.
Optional: The Ruffle Collar
To add a touch of elegance, you can crochet a little collar.
- Foundation: Chain 25.
- Round 1: From the second chain from the hook, work 24 dc.
- Round 2: Ch 1, (5 dc in one stitch, 1 sc) repeat throughout the entire round to create a ruffled effect.
- Round 3: Ch 1, (5 dc, 1 sc) repeat to finish the edge.
- Details: Create small ties on either side of the collar to fasten it around the bear’s neck.
Tips for Success
Crocheting with chunky chenille yarn is wonderful, but it comes with its own set of challenges. Here are a few professional tips to help you succeed:
- Watch Your Tension: Because the yarn is so thick, it is easy to accidentally tighten your stitches too much, making the project stiff. Try to keep a relaxed but consistent tension.
- Stuffing is Key: When stuffing amigurumi, go slowly. Use small chunks of fiberfill at a time to avoid lumps. Make sure to stuff the limbs and the head firmly so they hold their shape.
- Invisible Decreases: For a smoother look, especially in the head and body, try using the “invisible decrease” method (inserting the hook into the front loops only of the next two stitches).
- Lighting Matters: Since chenille yarn can be “fuzzy,” it can be hard to see your stitches. Work in a well-lit area to ensure you don’t miss any increases or decreases.
Happy crocheting! You’ve just created a beautiful, handmade companion that will be cherished for years.