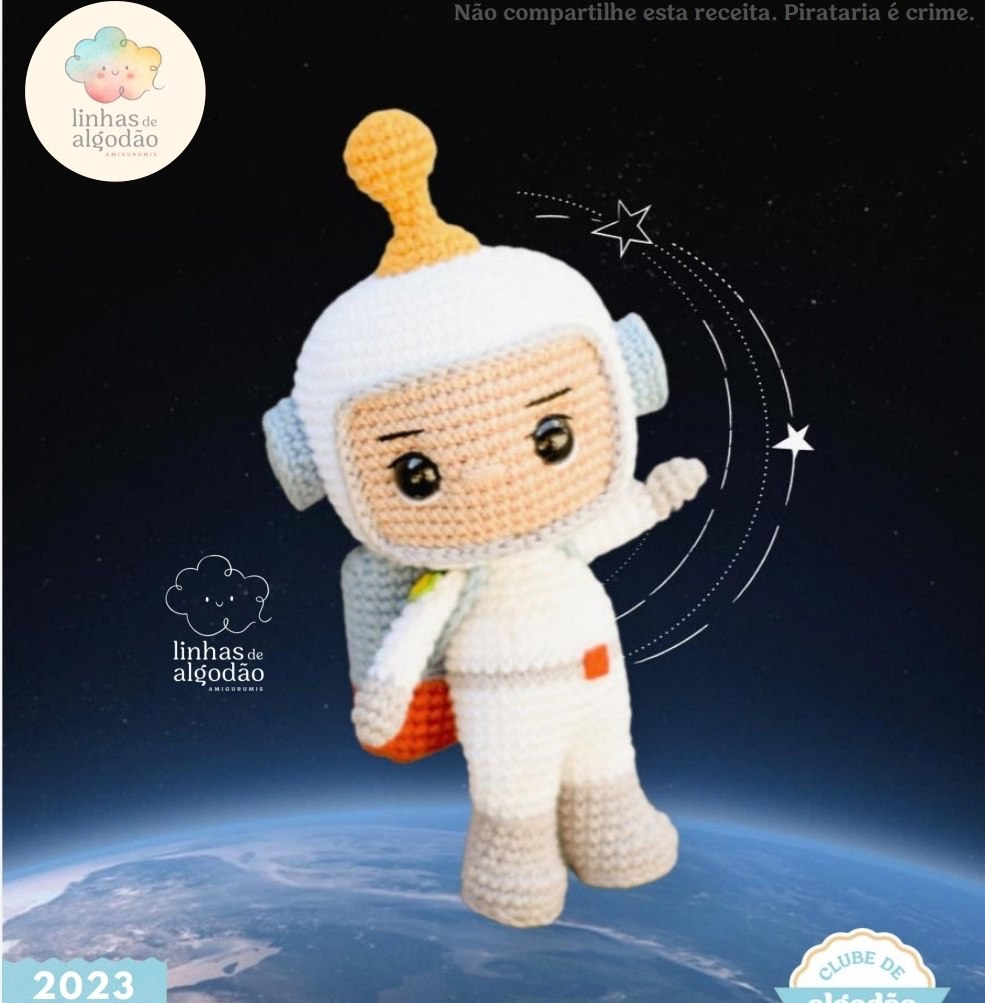
Crochet Astronaut Amigurumi Pattern: Make Your Own Cute Space Explorer
Are you ready to blast off into a new crochet project? If you love all things space, celestial, and adorable, then this Crochet Astronaut Amigurumi pattern is for you! This little space traveler, featuring a cozy suit and even a tiny backpack, is the perfect companion for a nursery, a bookshelf, or as a unique gift for the space lover in your life.
This pattern is designed to be beginner-friendly, guiding you through the creation of a charming character with simple stitches. By the time you finish, you’ll have a little astronaut approximately 8 inches tall, ready to explore the galaxy of your imagination. Grab your favorite cotton yarn, find a cozy spot, and let’s start our countdown to creativity!
Materials & Abbreviations
Before we begin, make sure you have all your supplies ready. Using a consistent yarn weight and hook size will help ensure your amigurumi looks polished and holds its shape well.
Materials Needed
- Yarn: 100% Cotton Amigurumi Yarn (approximately 278 yards / 125g per skein). You will need the following colors:
- White
- Beige
- Gray
- Blue
- Mustard (or a dark yellow)
- Red
- Crochet Hook: 2.2 mm
- Safety Eyes: 13 mm
- Stuffing: Polyester fiberfill
- Felt: Small scraps of White and Red felt
- Tools: Sewing needle, pins, scissors, and a bit of blush for those cute cheeks!
Common Abbreviations (US Terms)
- MR: Magic Ring
- ch: Chain
- sl st: Slip stitch
- sc: Single crochet
- inc: Increase (2 sc in one stitch)
- dec: Decrease (sc two stitches together)
- BLO: Back loop only
Step-by-Step Instructions
Follow these steps carefully. Remember to keep your tension even and use stitch markers to keep track of your rounds.
The Head
Worked in White yarn.
1. MR, 6 sc (6)
2. 6 inc (12)
3. (inc, sc) x6 (18)
4. (inc, sc) x9 (27)
5. (sc, inc, sc) x9 (36)
6. (inc, 3 sc) x9 (45)
7. (2 sc, inc, 2 sc) x9 (54)
8. (inc, 5 sc) x9 (63)
9-11. 63 sc (63)
Now we begin the colorwork for the face plate. At the transition between color changes, work one round of sc in Gray yarn to create a border.
12. 27 sc White, 18 sc Beige, 18 sc White (63)
13-21. 26 sc White, 20 sc Beige, 17 sc White (63)
22. 27 sc White, 18 sc Beige, 18 sc White (63)
Switch back to White yarn for the helmet.
23. 63 sc (63)
Note: Insert the 13mm safety eyes between rounds 16 and 17. Make sure they are spaced 12 stitches apart. After inserting, perform “eye pulling” (sc around the eyes and pull the yarn slightly to create a recessed, lifelike look).
24. (dec, 5 sc) x9 (54)
25. (2 sc, dec, 2 sc) x9 (45)
26. (dec, 3 sc) x9 (36)
27. (sc, dec, sc) x9 (27)
28. (dec, sc) x9 (18)
Stuff the head firmly. Continue crocheting to close the shape:
29. (dec, 4 sc) x3 (15)
30-35. 15 sc (15)
36. 7 dec (6)
Fasten off and weave in ends. Use beige thread to embroider a small nose, and add eyelashes and eyebrows as desired.
Antenna
Worked in Mustard yarn.
1. MR, 6 sc (6)
2. 6 inc (12)
3. (inc, 3 sc) x3 (15)
4-05. 15 sc (15)
6. (dec, 3 sc) x3 (12)
Stuff the antenna lightly.
7. 6 dec (6)
8-09. 6 sc (6)
10. 6 inc (12)
11. (inc, sc) x6 (18)
12. 18 sc (18)
Fasten off, leaving a long tail for sewing. Sew the antenna to the head between rounds 3 and 4.
Side Details (Make 2)
Worked in Blue yarn.
1. MR, 6 sc (6)
2. 6 inc (12)
3. 12 sc in BLO (12)
4. 12 sc (12)
Fasten off, leaving a long tail. Stuff lightly. Sew these to the sides of the head between rounds 12 and 19, ensuring they are about 4 stitches away from the gray border row.
Legs (Make 2)
Worked in Gray yarn.
1. MR, 6 sc (6)
2. 6 inc (12)
3. (inc, sc) x6 (18)
4. (inc, 8 sc) x2 (20) in BLO
5-06. 20 sc (20)
7. 5 sc, 5 dec, 5 sc (15) in BLO
8-10. 15 sc (15)
Switch to White yarn.
11-13. 15 sc (15)
Stuff the legs. For the second leg, do not cut the yarn. Instead, crochet 3 sc to the middle of the inner side of the first leg to join them. Continue following the first leg’s pattern from the middle of the inner side to ensure they are connected for the body.
Body
Connecting the legs.
14. (inc, 9 sc) x3 (33)
15-19. 33 sc (33)
Switch to Gray yarn.
20. 33 sc (33)
Switch to White yarn.
21-24. 33 sc (33)
25. (dec, 9 sc) x3 (30)
26. (dec, 8 sc) x3 (27)
27. (dec, sc) x9 (18)
28. (dec, sc) x6 (12)
29-32. 12 sc (12)
Stuff the body firmly. Fasten off. Sew the head onto the neck area.
Arms (Make 2)
Worked in Gray yarn.
1. MR, 6 sc (6)
2. (inc, 2 sc) x2 (8)
3-05. 8 sc (8)
Switch to White yarn.
06-11. 8 sc (8)
12. (dec, 2 sc) x2 (6)
Fasten off, leaving a long tail. Sew the arms to the body between rounds 25 and 26.
Backpack
Worked in Blue yarn.
1. Ch 13. Starting from 2nd ch from hook: 11 sc, 3 sc in the last ch. Working on the other side of the chain: 10 sc, inc (26).
2. 3 sc in the first st, 10 sc, 3 sc in next st, sc, 3 sc in next st, 10 sc, 3 sc in next st, sc (34).
3. 34 sc in BLO (34)
4-11. 34 sc (34)
Switch to Red yarn.
12-16. 34 sc (34)
17. (dec from 3 sc, 10 sc, dec from 3 sc, sc, dec from 3 sc, 10 sc, dec from 3 sc, sc) (26)
18. dec, 7 sc, dec, 7 sc, 2 dec (20)
Fasten off, leaving a long tail. Stuff the backpack. Sew the opening closed. Cut a small square out of White felt and glue/sew it to the front of the backpack.
Backpack Straps (Make 2)
Worked in Blue yarn.
1. Ch 16. Starting from 2nd ch from hook: 15 sc (15).
Fasten off, leaving a long tail, and sew the straps to the backpack.
Finishing
Once all your pieces are crocheted, it is time for the final assembly! Use your sewing needle to attach the arms, legs, head, and backpack. To give your astronaut that extra “pop,” use a little bit of pink blush on the cheeks just below the eyes. Finally, don’t forget to cut a small red felt square and attach it to the belt area of the white suit to complete the look.
Tips for Success
- Tension is Key: When working with amigurumi, try to keep your stitches tight. This prevents the stuffing from peeking through the holes.
- Color Changes: When changing colors, pull the new color through the last two loops of the previous stitch to ensure a clean transition.
- Stuffing: Don’t be afraid to stuff the head and body firmly. A well-stuffed amigurumi holds its shape much better for display.
- Safety First: If you are making this for a very young child, consider embroidering the eyes with black yarn instead of using plastic safety eyes to avoid any choking hazards.