Crochet Amigurumi Coffee Doll: A Detailed Step-by-Step Tutorial
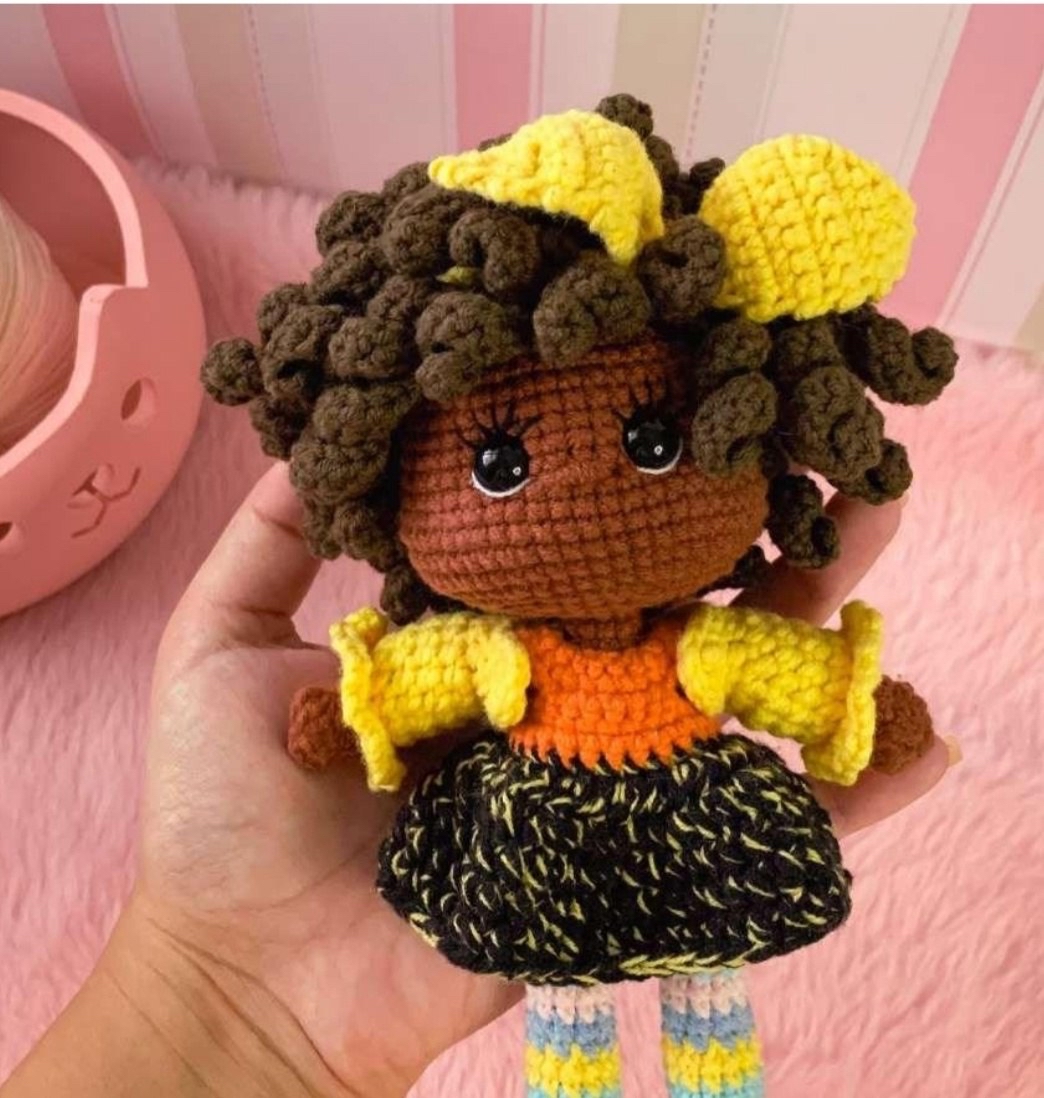
Welcome, fellow crochet enthusiasts! If you are looking for your next adorable amigurumi project, you have come to the right place. Today, we are diving into the creation of this charming “Coffee Doll.” With her curly hair, stylish little outfit, and cozy aesthetic, she is the perfect companion for your coffee nook or a wonderful handmade gift for a friend.
This tutorial is designed to be beginner-friendly, walking you through every loop, increase, and decrease. Whether you are a seasoned pro or just picking up a hook for the first time, this detailed guide will help you bring this little character to life. Grab your favorite cozy yarn, and let’s get started!
Materials & Abbreviations
Before we begin, let’s make sure you have everything you need on your crafting table. Using the right materials is key to achieving that professional, tight amigurumi look.
Materials Needed
- Yarn: Medium weight yarn (Cotton or a cotton blend works best for definition). You will need the following colors:
- Light Brown (for the skin/head)
- Dark Brown (for the hair)
- Yellow (for the cardigan, shoes, and bow)
- Orange (for the top of the dress)
- Black (for the skirt)
- Light Blue, Dark Blue, and Pink (for the striped leggings)
- Hooks: 2.2mm and 2.5mm crochet hooks.
- Eyes: 9mm safety eyes.
- Stuffing: High-quality polyester fiberfill.
- Extras: 2 small yellow buttons, a sewing needle, pins, scissors, and glue.
- Support: A small plastic or wooden stick (to keep the doll’s neck sturdy).
Abbreviations (US Terms)
To keep things simple, we will use standard US crochet terminology. Please ensure you are following US terms to avoid confusion with UK terminology.
- MR: Magic Ring
- ch: Chain
- sl st: Slip stitch
- sc: Single crochet
- hdc: Half double crochet
- dc: Double crochet
- tr: Treble crochet
- dtr: Double treble crochet
- inc: Increase (2 stitches in one)
- dec: Decrease (2 stitches together)
- BLO: Back loop only
- FLO: Front loop only
- Puff Stitch: 4 dc in one stitch with a shared top loop
Step-by-Step Instructions
The Head
Using light brown yarn, we will start the head. Keep your tension tight to ensure the stuffing doesn’t peek through!
- 1: 7 sc in MR (7)
- 2: 7 inc (14)
- 3-11: 14 sc (9 rows)
- 12: 14 hdc
- 13: BLO (2 sc, inc) x4, 2 sc (18)
- 14: (sc, inc, sc) x6 (24)
- 15: (3 sc, inc) x6 (30)
- 16: (2 sc, inc, 2 sc) x6 (36)
- 17: (5 sc, inc) x6 (42)
- 18: (3 sc, inc, 3 sc) x6 (48)
- 19: 12 sc, (sc, inc) x3, 11 sc, (sc, inc) x3, 13 sc (54)
- 20-21: 54 sc (2 rows)
- 22: 12 sc, (sc, dec) x3, 11 sc, (sc, dec) x3, 13 sc (48)
- 23-29: 48 sc (7 rows)
Eye Placement: Between rounds 24 and 25, place the eyes 6 stitches apart. I recommend embroidering small eyelashes before inserting the safety eyes for a more expressive look. Once the eyes are in, stuff the head firmly, paying extra attention to the cheek area to give her that cute, rounded face.
- 30: (3 sc, dec, 3 sc) x6 (42)
- 31: (5 sc, dec) x6 (36)
- 32: (2 sc, dec, 2 sc) x6 (30)
- 33: (3 sc, dec) x6 (24)
- 34: (sc, dec, sc) x6 (18)
- 35: (sc, dec) x6 (12)
- 36: dec
Fasten off and pull the opening tight.
The Arms
Make 2 pieces using light brown yarn.
- 1: 6 sc in MR (6)
- 2: (2 sc, inc) x2 (8)
- 3: 8 sc
- 4: FLO, 7 sc (8)
- 5-9: 8 sc (5 rows)
- 10: dec, 6 sc (7)
- 11: 7 sc
- 12: 3 sc, dec, 2 sc (6)
- 13-14: 6 sc (2 rows)
Fold the piece in half and sc through both sides to close. Fasten off, leaving a long tail for sewing.
The Legs & Body
We will start with the legs using pink yarn. This is a continuous piece that will transition into the body.
- 1: Ch 5. Starting from 2nd ch from hook: inc, 2 sc, 3 sc in the last ch. On the other side of the chain: 3 sc (10)
- 2: 2 inc, 2 sc, 3 inc, 2 sc, inc (16)
- 3: BLO, 16 sc
- 4: 6 sc, 1 st (stair/bump), 4 sc (13)
- 5: 7 sc, dec, 4 sc (12)
- 6: 12 sc
Change to light blue yarn for rounds 7-8. Change to yellow for 9-10. Change to dark blue for 11. In round 11: 6 sc, dec, 4 sc (11). Round 12: 11 sc. Change to pink for 13-14. Change to light blue for 15. Round 16: sc, dec, 8 sc (10). Change to yellow for 17-18. Change to dark blue for 19-20. Note: On the second leg, do not cut the yarn; continue working to join the legs for the body.
Joining the Body: For the second leg, work an additional 4 sc so the end of the row sits in the middle of the inner side. Round 21: 3 sl st, 10 sc along the first leg, 3 sc across the chain, 10 sc along the second leg, 3 sc across the chain (26).
- 22: 26 sc
- 23: 4 sc, dec, 11 sc, dec, 7 sc (24)
- 24: (10 sc, dec) x2 (22)
- 25: 4 sc, dec, 8 sc, dec, 6 sc (20)
Change to light brown yarn.
- 26: BLO, 20 puff stitches
- 27: BLO, 20 sc
- 28: 20 sc
- 29: (8 sc, dec) x2 (18)
- 30: 3 sc, dec, 7 sc, dec, 4 sc (16)
Attaching the Arms
In the next round, we will attach the arms to the body.
- 31: sc, 3 sc through both the arm and body stitches, 2 sc, dec, 2 sc, 3 sc through the second arm and body stitches, sc, dec (14)
Pro Tip: Insert your plastic or wooden support stick into the neck area now to ensure the doll stays upright.
- 32: 2 sc, dec, 5 sc, dec, 3 sc (12)
- 33-41: 12 sc (9 rows)
- 42: 6 dec
Fasten off and close the hole.
The Hair
Using dark brown yarn, we first create the hair base.
- 1: 6 sc in MR (6)
- 2: 6 inc (12)
- 3: BLO (sc, inc) x6 (18)
- 4: (sc, inc, sc) x6 (24)
- 5: (3 sc, inc) x6 (30)
- 6: (2 sc, inc, 2 sc) x6 (36)
- 7: BLO (5 sc, inc) x6 (42)
- 8: (3 sc, inc, 3 sc) x6 (48)
- 9: 48 sc
Creating the Curls: You will now work long strands of curly hair. Each strand is worked into the base to create volume.
- Strands 1-5: Ch 15, starting from 2nd ch from hook: 15 hdc, skip the 9th row stitch, sl st.
- Strand 6: Ch 21, starting from 2nd ch from hook: 20 hdc, skip the 9th row stitch, sl st.
- Strands 7-23 (17 strands): Ch 26, starting from 2nd ch from hook: 25 hdc, skip the 9th row stitch, sl st.
- Strand 24: Ch 21, starting from 2nd ch from hook: 20 hdc, skip the 9th row stitch, sl st.
Attach these curls to the head using pins before sewing or gluing them into place for a full, voluminous look.
The Outfit
The outfit consists of a dress, a cardigan, and shoes.
The Dress
Using orange yarn, start with a foundation chain of 15. Starting from the 2nd ch from hook: 14 sc, ch, turn.
- 1: (sc, inc) x7, ch, turn (21)
- 2: (sc, inc) x7, ch, turn (28)
- 3: 2 sc, inc, 4 ch, skip 8 sts, inc, 4 sc, inc, 4 ch, skip 8 sts, inc, 2 sc, ch, turn
- 4: 4 sc, 4 sc along the chain, 8 sc, 4 sc along the chain, 4 sc, ch, turn (24)
- 5: 24 sc, ch, turn
Change to black yarn. If you want extra detail, you can use a thinner yellow thread as well. Use a slightly larger hook (0.25mm larger) for the black section if needed.
- 6: 24 sc, ch, turn
- 7: BLO (hdc, inc from hdc) x12, ch, turn (36)
- 8: (2 hdc, inc from hdc) x12 (48)
Join with a sl st to the first stitch. For rounds 9-13, work 48 hdc in each round. You can make the dress longer by adding more rounds if desired.
The Cardigan & Shoes
Cardigan: Using yellow yarn, ch 26. Starting from 2nd ch: inc, 23 sc, 3 sc in the last ch. On the other side of the chain: sc, 6 ch, skip 6 sts, 9 sc, 6 ch, skip 6 sts, sc, inc, ch, turn.
- 2: 3 sc, 6 sc along the chain, 3 sc, dec, 4 sc, 6 sc along the chain, 3 sc (26)
- Join with a sl st along the bottom.
Sleeves: Attach yellow yarn to the armholes. Round 1: hdc in corner, 6 hdc along the chain, hdc in corner, 6 hdc along the chain, sl st, ch. Rounds 2-5: 14 hdc. Round 6: (hdc, 2 ch) x14.
Shoes: Using yellow yarn, ch 7. From 2nd ch: inc, 4 sc, 3 sc in the last ch. On the other side: 5 sc (14). Round 2: (sc, inc) x7 (21). Round 3: 21 hdc in back loops. Rounds 4-5: 21 hdc. Round 6: 9 sc, 1 st (bump), 6 sc (18). Round 7: 18 sl st. Insert a small plastic sole for shape.
Finishing & Accessories
To complete the look, we will make a headband and a bow.
Headband & Bow
Headband: Ch 58. From 9th ch from hook: 50 sc. Sew a button to the opposite side of the loop to secure it.
Bow: Use yellow yarn. Start with 2 ch, from 2nd ch: sc, ch, turn. Work increases to create the shape, working several rows of 8 sc, then decreasing towards the center to create the pinched look. Fasten off and secure the center with a sl st.
Tips for Success
- Tension Control: For amigurumi, aim for a tight tension. This prevents the stuffing from showing through the holes between stitches.
- Stuffing: Don’t be afraid to over-stuff! A well-stuffed doll holds its shape much better, especially the head and the cheeks.
- Safety First: When using safety eyes, ensure they are snapped tightly before handing the doll to anyone. For children, embroidering eyes is often a safer alternative.
- Assembly: Use plenty of pins to hold the hair, dress, and cardigan in place before you start sewing. This ensures everything is symmetrical and looks professional.
Congratulations! You have successfully completed the Coffee Doll. This little character is ready to bring some joy to your home. Happy crocheting!