Adorable Amigurumi Bunny Crochet Pattern: DIY Cute Bunny with Glasses
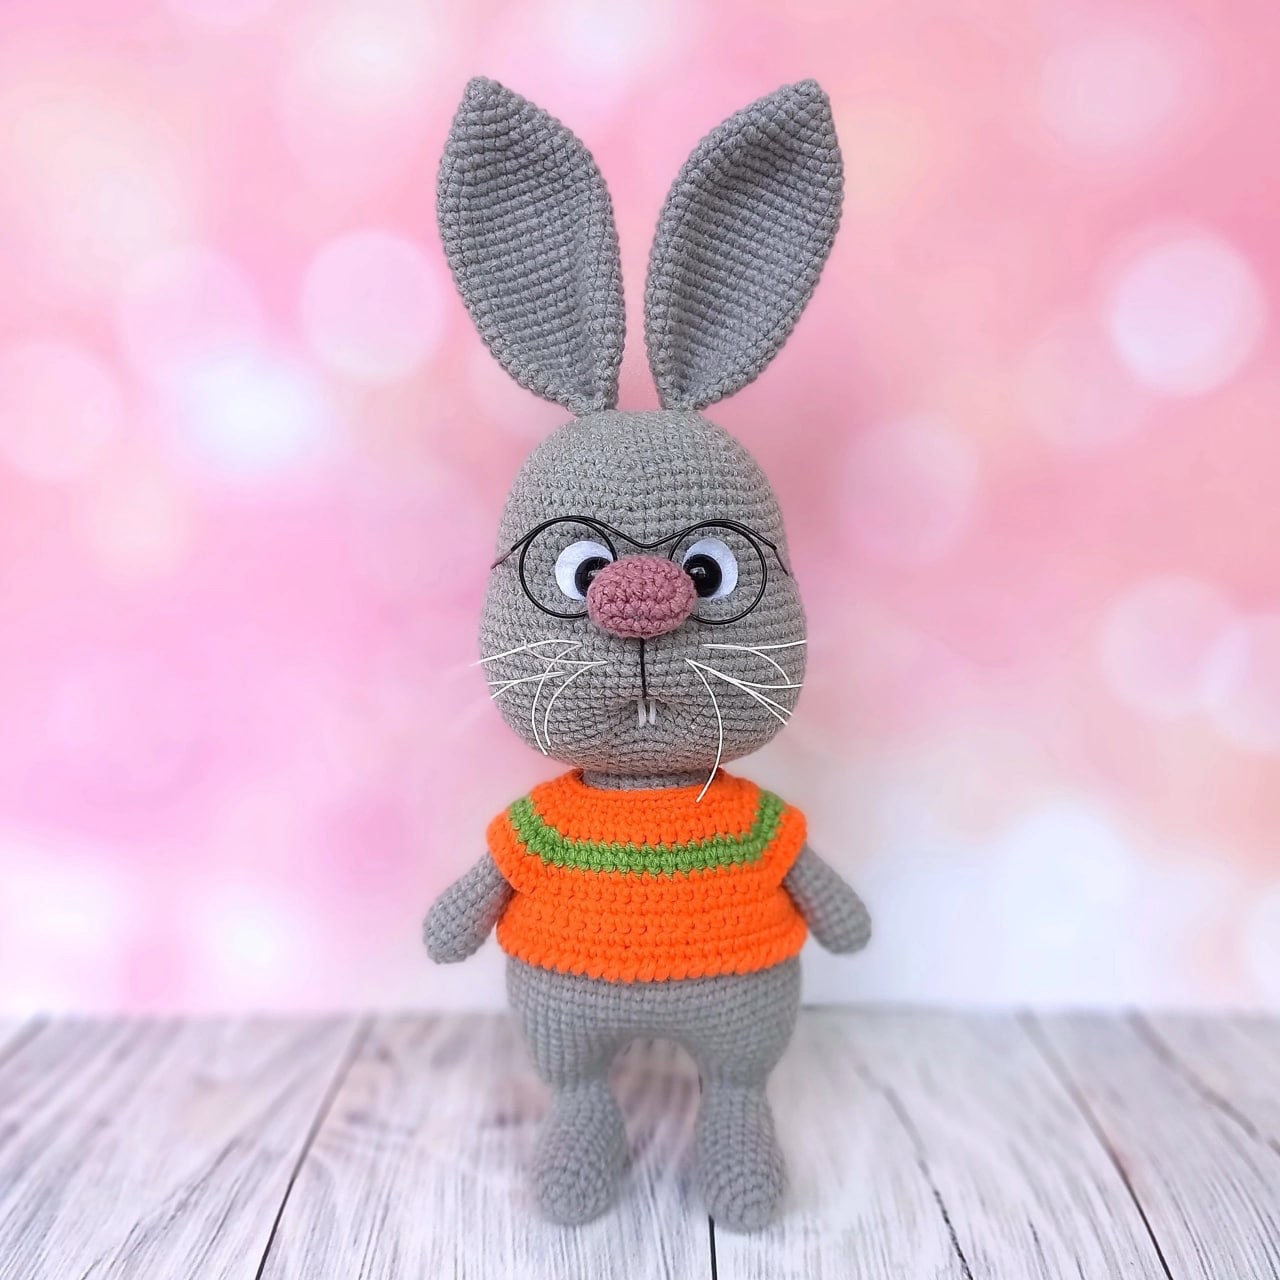
Are you looking for a heartwarming project to brighten up a nursery or create a unique gift for a loved one? This adorable, chubby-nosed amigurumi bunny is the perfect project! With its charming oversized nose, quirky glasses, and tiny colorful shirt, this little bunny is bound to steal hearts. Whether you are looking to decorate a baby’s room or add a whimsical character to your crochet collection, this detailed tutorial will guide you through every step of the process.
This pattern is designed to result in a finished bunny approximately 10.6 inches tall. It is a wonderful intermediate-level project that combines standard amigurumi techniques with some fun assembly details that bring the character to life.
Materials and Abbreviations
Before you pick up your hook, ensure you have all the necessary supplies ready. Using high-quality yarn and the right tools will make the assembly process much smoother.
Materials Needed
- Yarn: Cotton or cotton-blend yarn (such as YarnArt Jeans) in your choice of colors. You will need:
- Main Color (Grey): For the head, body, ears, arms, and legs.
- Nose Color (Pink): For the nose.
- Shirt Colors (Orange and Green): For the little outfit.
- Embroidery Thread: Black (thin) for the mouth and whiskers, and White for the tiny teeth.
- Crochet Hook: A size appropriate for your chosen yarn (usually 2.0mm to 2.5mm for amigurumi).
- Safety Eyes: 0.4-inch (10mm) safety eyes, or beads/half-pearls if you prefer to sew them.
- Felt: Small white felt circles (approx. 0.6 inches or 15mm in diameter) to create the eye whites.
- Stuffing: High-quality polyester fiberfill.
- Accessories: A pair of small doll glasses (approx. 2.25-2.4 inches wide).
- Tools: A tapestry needle for sewing, scissors, stitch markers, and pins. A strong thread is needed for the “eye-pulling” technique to create the expressive look.
Abbreviations (US Terms)
- MR: Magic Ring
- ch: Chain
- sc: Single crochet
- inc: Increase (2 sc in one stitch)
- dec: Decrease (sc 2 together)
- sl st: Slip stitch
- st(s): Stitch(es)
Note: All instructions are worked in continuous spirals unless otherwise stated. Always use a stitch marker to keep track of the start of your rounds.
Step-by-Step Instructions
The Nose
The nose is a central feature of this bunny. We will crochet it separately and then integrate it into the head.
Ch 5. Starting in the second chain from the hook, work the following:
- Round 1: inc, 2 sc, 4 sc in one stitch, 2 sc, inc = 12 sts
- Round 2: 2 inc, 2 sc, 4 inc, 2 sc, 2 inc = 20 sts
- Rounds 3-4: 20 sc
- Round 5: 10 dec = 10 sts
Fasten off, leaving a long tail. Lightly stuff the nose before joining it to the head.
The Head
The head is worked in rounds and includes the integration of the nose in the middle rounds.
- Round 1: 6 sc in MR = 6 sts
- Round 2: 6 inc = 12 sts
- Round 3: (1 sc, inc) x 6 = 18 sts
- Round 4: (2 sc, inc) x 6 = 24 sts
- Round 5: (3 sc, inc) x 6 = 30 sts
- Round 6: (4 sc, inc) x 6 = 36 sts
- Round 7: (5 sc, inc) x 6 = 42 sts
- Round 8: (6 sc, inc) x 6 = 48 sts
- Round 9: (7 sc, inc) x 6 = 54 sts
- Round 10: (8 sc, inc) x 6 = 60 sts
- Rounds 11-12: 60 sc
- Round 13: (9 sc, inc) x 6 = 66 sts
- Rounds 14-18: 66 sc
Integrating the Nose and Eyes
Round 19: 19 sc, (1 sc, inc) x 6, 5 sc (work these stitches through the stitches of the nose piece), (inc, 1 sc) x 6, 18 sc = 78 sts. Note: This round joins the nose to the face.
Round 20: 37 sc, 5 sc through the remaining nose stitches, 36 sc = 78 sts.
Rounds 21-30: 78 sc.
Eye Placement: Between Rounds 17 and 18, place your eyes approximately 6-8 stitches apart, centering them relative to the nose.
Finishing the Head Shape
After the eyes are placed, we will decrease to shape the head.
- Round 31: (11 sc, dec) x 6 = 72 sts
- Round 32: (7 sc, dec) x 8 = 64 sts
- Round 33: (6 sc, dec) x 8 = 56 sts
- Round 34: (5 sc, dec) x 8 = 48 sts
- Round 35: (4 sc, dec) x 8 = 40 sts
- Round 36: (3 sc, dec) x 8 = 32 sts
- Round 37: (2 sc, dec) x 8 = 24 sts
Stuff the head firmly. Fasten off and hide the yarn tail inside.
The Ears
Make two ears. Do not stuff them.
- Round 1: 6 sc in MR = 6 sts
- Round 2: (1 sc, inc) x 3 = 9 sts
- Round 3: (2 sc, inc) x 3 = 12 sts
- Round 4: (3 sc, inc) x 3 = 15 sts
- Round 5: (4 sc, inc) x 3 = 18 sts
- Round 6: (2 sc, inc) x 6 = 24 sts
- Round 7: 24 sc
- Round 8: (3 sc, inc) x 6 = 30 sts
- Rounds 9-23: 30 sc
- Round 24: (3 sc, dec) x 6 = 24 sts
- Round 25: 24 sc
- Round 26: (2 sc, dec) x 6 = 18 sts
- Round 27: 18 sc
Fold the ear in half and sc through both sides for 9 stitches. Leave a long tail for sewing.
The Tail
- Round 1: 6 sc in MR = 6 sts
- Round 2: 6 inc = 12 sts
- Round 3: (1 sc, inc) x 6 = 18 sts
- Rounds 4-5: 18 sc
- Round 6: (1 sc, dec) x 6 = 12 sts
Fasten off, leaving a tail. Lightly stuff the tail.
The Lower Legs
Make two legs. These include a “heel” section worked in rows.
- Round 1: 6 sc in MR = 6 sts
- Round 2: 6 inc = 12 sts
- Round 3: (1 sc, inc) x 6 = 18 sts
- Rounds 4-9: 18 sc
The Heel:
Round 10: Ch 1, turn, skip 1 sc, 9 sc, dec.
Round 11: Ch 1, turn, skip 1 sc, 7 sc, dec.
Round 12: Ch 1, turn, skip 1 sc, 5 sc, dec.
Round 13: Ch 1, turn, skip 1 sc, 3 sc, dec.
Continue working 4 sc along the edge to reach the marker. Then, complete the round by working 18 sc (including the edge stitches of the heel).
Round 14: 18 sc
Round 15: 18 sc
Round 16: (1 sc, dec) x 6 = 12 sts
Rounds 17-18: 12 sc
Round 19: (1 sc, inc) x 6 = 18 sts
Round 20: 18 sc
Round 21: (2 sc, inc) x 6 = 24 sts
Round 22: 24 sc
Fasten off the first leg. For the second, do not fasten off; you will join it to the first.
The Body
Join the two legs by working 3 ch between them. Position them symmetrically.
- Round 1: 24 sc along the first leg, 3 sc in the ch, 24 sc along the second leg, 3 sc in the ch = 54 sts.
- Round 2: (8 sc, inc) x 6 = 60 sts
- Round 3: 60 sc
- Round 4: (9 sc, inc) x 6 = 66 sts
- Rounds 5-7: 66 sc
Integrating the Tail:
Round 8: 61 sc, then 6 sc worked together with the tail (incorporating the tail into the round) = 66 sts. Place the tail at the back center.
Round 9: 61 sc, 6 sc through the remaining tail stitches = 66 sts.
Stuff the feet and tail after Round 10.
- Rounds 10-11: 66 sc
- Round 12: (9 sc, dec) x 6 = 60 sts
- Round 13: 60 sc
- Round 14: (8 sc, dec) x 6 = 54 sts
- Round 15: 54 sc
- Round 16: (7 sc, dec) x 6 = 48 sts
- Round 17: 48 sc
- Round 18: (6 sc, dec) x 6 = 42 sts
- Round 19: 42 sc
- Round 20: (5 sc, dec) x 6 = 36 sts
- Rounds 21-23: 36 sc
Attaching the Upper Arms
Round 24: 8 sc, 6 sc worked together with the first arm, 12 sc, 6 sc worked together with the second arm, 4 sc = 36 sts.
Rounds 25-28: Continue working to finish the body shape. Stuff the body firmly, but leave about 0.4 inches (1cm) of space at the top to make attaching the head easier.
The Upper Arms
- Round 1: 6 sc in MR = 6 sts
- Round 2: 6 inc = 12 sts
- Rounds 3-17: 12 sc
Fold the arms in half and sc through both sides for 6 stitches. Leave a long tail for sewing.
The Little Shirt
The shirt is worked in rows (not rounds). Use your chosen colors.
Ch 37. Starting in the 2nd ch from hook, work in the opposite direction:
- Row 1: 6 sc, 3 sc in 1 st, 4 sc, 3 sc in 1 st, 12 sc, 3 sc in 1 st, 4 sc, 3 sc in 1 st, 6 sc = 44 sts. ch, turn.
- Row 2: 44 sc, ch, turn.
- Row 3: 7 sc, 3 sc in 1 st, 6 sc, 3 sc in 1 st, 14 sc, 3 sc in 1 st, 6 sc, 3 sc in 1 st, 7 sc = 52 sts. ch, turn.
- Row 4: 52 sc, ch, turn.
- Row 5: 8 sc, 3 sc in 1 st, 8 sc, 3 sc in 1 st, 16 sc, 3 sc in 1 st, 8 sc, 3 sc in 1 st, 8 sc = 60 sts. ch, turn.
- Row 6: 60 sc, ch, turn.
- Row 7 (Armholes): 9 sc, 6 ch, skip 12 sts, 18 sc, 6 ch, skip 12 sts, 9 sc = 48 sts. ch, turn.
- Row 8: 8 sc, inc, 6 sc in the ch-spaces, inc, 16 sc, inc, 6 sc in the ch-spaces, inc, 8 sc = 52 sts. ch, turn.
- Row 9: 52 sc, ch, turn.
Finish with a decorative edging around the neck, armholes, and bottom.
Finishing
Assembling the Face
The secret to this bunny’s expression is the “eye-pulling” technique. First, prepare the eyes. Take your white felt circles, fold them, and make small perpendicular slits. This creates a cross-shape. Insert the safety eyes through these slits and secure them. This will make the eyes look slightly sunken and adorable.
Next, use a long piece of thread to create the eye sockets and mouth. Mark six points on the face with pins (the center point should be directly below the nose).
1. Insert the needle at point 1, leave a 10-inch tail, and exit at point 2.
2. Go from point 3 to point 6.
3. Pull the thread to tighten the “eye” area, ensuring the thread sits under the felt.
4. Continue the path from point 6 to 5, then 4, and back to 1. Tighten and knot securely inside the head. You can use a tiny bit of clear glue to secure the entry/exit points.
Final Details
- Ears: Fold in half and sew to the head between rounds 3 and 4.
- Nose/Mouth: Use thin black thread to embroider a line from the nose to the mouth. Use white thread to add tiny teeth.
- Glasses: Gently bend the arms of your doll glasses and secure them to the bridge of the nose.
Tips for Success
- Stuffing: Don’t be afraid to stuff the head and body firmly! This helps the bunny hold its shape and prevents the “lumpy” look. For the neck, add extra stuffing when attaching the head to ensure it stands well.
- Color Changes: For the shirt, you can experiment with variegated or textured yarns to give it a more “homemade” cozy feel.
- Tension: Amigurumi requires tight, even tension to ensure the stuffing doesn’t show through the stitches.
- Symmetry: When attaching the arms and legs, use plenty of pins to ensure everything is perfectly centered before you start sewing.