Crochet Lion Pattern: A Cute and Easy Amigurumi Tutorial
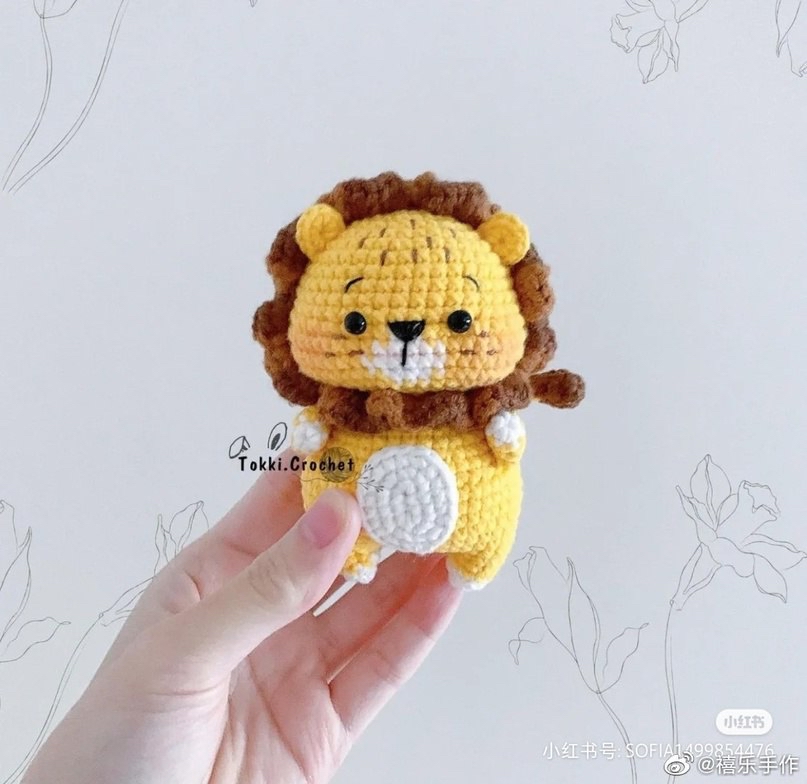
Are you looking for your next adorable crochet project? This tiny, wide-eyed lion is the perfect addition to your amigurumi collection. With its fluffy mane and sweet expression, this little lion is not only a joy to make but also makes a wonderful gift for children or a charming decoration for a nursery. Whether you are a beginner looking to practice your stitches or an experienced crocheter wanting a quick weekend project, this step-by-step guide will walk you through every single detail to create your very own miniature king of the jungle.
Introduction
Amigurumi, the Japanese art of knitting or crocheting small, stuffed yarn creatures, is a wonderful way to express creativity. This lion pattern focuses on clean shapes and simple color changes, making it accessible for those still mastering the art of working in the round. We will be working with soft textures to create a lion that is as cuddly as it is cute. The project involves basic stitches like the single crochet and half double crochet, so if you know those, you are already halfway there!
Materials & Abbreviations
To ensure your lion turns out looking professional, I recommend using smooth, non-splitting yarn. While you can use various weights, a medium weight (worsted) yarn works beautifully for this size.
Materials Needed
- Yarn: Medium weight (worsted) yarn in Yellow, White, Brown, and Light Brown.
- Crochet Hook: A hook size appropriate for your yarn (usually 3.25mm to 4.0mm) to ensure tight stitches so the stuffing doesn’t show.
- Eyes: Small black safety eyes (approx. 6mm to 8mm) or black embroidery thread.
- Stuffing: Polyester fiberfill.
- Tools: A tapestry needle for sewing, scissors, and stitch markers.
- Embroidery Thread: Black thread for the face and brown thread for forehead details.
Abbreviations (US Terms)
- mr: magic ring
- ch: chain
- sc: single crochet
- hdc: half double crochet
- sl st: slip stitch
- inc: increase (2 stitches in the same stitch)
- dec: decrease (join 2 stitches into one)
- st(s): stitch(es)
- blo: back loops only
- ( ): repeat the sequence within the parentheses
Step-by-Step Instructions
Follow these instructions carefully. Remember to use a stitch marker to keep track of the beginning of each round.
The Head
We will start with yellow yarn and switch to white to create the snout area.
Round 1: 8 sc in mr (8)
Round 2: 8 inc (16)
Round 3: (1 sc, 1 inc) * 8 (24)
Round 4: (3 sc, 1 inc) * 6 (30)
Round 5: (2 sc, 1 inc, 2 sc) * 6 (36)
Round 6: 36 sc (36)
Round 7: (5 sc, 1 inc) * 6 (42)
Rounds 8-12: 42 sc for 5 rounds (42)
Round 13: 11 sc, 6 inc, 3 sc, 2 sc, 3 sc, 6 inc, 11 sc (54)
Round 14: 25 sc, 6 sc, 24 sc (54)
Round 15: 24 sc, 6 sc, 24 sc (54)
Round 16: 26 sc, 3 sc, 25 sc (54)
Round 17: 11 sc, 6 dec, 8 sc, 6 dec, 11 sc (42)
Round 18: (5 sc, 1 dec) * 6 (36)
Round 19: (4 sc, 1 dec) * 6 (30)
Fasten off, leaving a long tail for sewing.
The Mane
The mane uses two shades of brown to give it depth. Start with dark brown.
Foundation: Chain 40 and join with a sl st to form a ring.
Ruffle Pattern: (3 hdc in brown, 3 hdc in light brown), repeat this sequence 10 times. Note: If your chain length varies, ensure you alternate colors equally.
Fasten off, leaving a long tail for sewing.
The Body & Legs
This part is unique because we will crochet the legs and then join them to create the body in one continuous piece.
Right Leg
Start with white yarn.
Round 1: 6 sc in mr (6)
Round 2: (1 sc, 1 inc) * 3 (9)
Switch to yellow yarn.
Round 3: 9 sc (9)
Fasten off.
Left Leg
Follow the instructions for the Right Leg, but do NOT fasten off. We will use the remaining yarn to continue to the body.
Connecting the Legs & Creating the Body
Join: Chain 6 to bridge the gap between the two legs.
Round 4: 9 sc around the right leg, 6 sc in the chain, 9 sc around the left leg, and 6 sc on the opposite side of the chain (30)
Round 5: (4 sc, 1 inc) * 6 (36)
Round 6: 1 sc, 1 inc, 24 sc, (1 inc, 1 sc) * 3, (1 sc, 1 inc) * 2 (42)
Rounds 7-8: 42 sc for 2 rounds (42)
Round 9: (3 sc, 1 inc, 3 sc) * 6 (48)
Rounds 10-12: 48 sc for 3 rounds (48)
Round 13: (3 sc, 1 dec, 3 sc) * 6 (42)
Round 14: 42 sc (42)
Round 15: (5 sc, 1 dec) * 6 (36)
Round 16: 36 sc (36)
Round 17: (4 sc, 1 dec) * 6 (30)
Rounds 18-19: 30 sc for 2 rounds (30)
Fasten off, leaving a long tail for sewing. Stuff the body firmly.
The Arms (Make 2)
Start with white yarn.
Round 1: 6 sc in mr (6)
Switch to yellow yarn.
Round 2: (2 sc, 1 inc) * 2 (8)
Round 3: 8 sc (8)
Round 4: (3 sc, 1 inc) * 2 (10)
Fasten off, leaving a long tail for sewing.
The Tail
Start with brown yarn.
Round 1: 5 sc in mr (5)
Round 2: 5 inc (10)
Round 3: 5 dec (5)
Switch to yellow yarn.
Round 4: 5 sc in blo (5)
Rounds 5-23: 5 sc for 19 rounds (5)
Fasten off, leaving a long tail for sewing.
The Ears (Make 2)
Use yellow yarn.
Round 1: 9 sc in mr (9)
Fasten off, leaving a long tail for sewing.
The Belly
Use white yarn.
Round 1: Chain 4. In the 2nd chain from the hook, work: 1 inc, 1 sc, 4 sc, 1 sc, 1 inc (10)
Round 2: 2 inc, 1 sc, 4 inc, 1 sc, 2 inc (18)
Round 3: 1 sc, 1 inc, 5 sc, 1 inc, 2 sc, 1 inc, 5 sc, 1 inc, 1 sc (22)
Fasten off, leaving a long tail for sewing.
Finishing
Now comes the fun part—bringing your lion to life! Assembly requires a bit of patience, but the result is worth it.
Face Details
- Eyes: Insert your safety eyes between rounds 12 and 13 of the head, making sure they are spaced 6 stitches apart.
- Embroidery: Using black thread, embroider the nose, mouth, and eyebrows. For an extra touch of character, use brown thread to embroider small stripes on the lion’s forehead.
Assembly
- Ears: Sew the ears to the top of the head.
- Mane: Carefully sew the mane around the entire head. Try to space the “ruffles” evenly.
- Arms: Sew the arms to the sides of the body between rounds 14 and 16.
- Tail: Sew the tail to the back of the body.
- Belly: Sew the white belly patch to the front of the body.
Tips
To make your amigurumi look its best, keep these professional tips in mind:
- Tension is Key: Try to keep your stitches consistent. If you crochet too loosely, the stuffing will peek through the holes.
- Use Stitch Markers: In amigurumi, you are constantly working in rounds. It is very easy to lose your place without a marker.
- Stuffing Technique: When stuffing the head and body, push the fiberfill into the corners to ensure there are no lumps. Stuff firmly but don’t overstuff to the point where the stitches stretch.
- Color Changes: To get a clean color change, always pull the new color through the final loop of the previous stitch.