Adorable Crochet Bunny Pattern: DIY Millicent the Bunny Tutorial
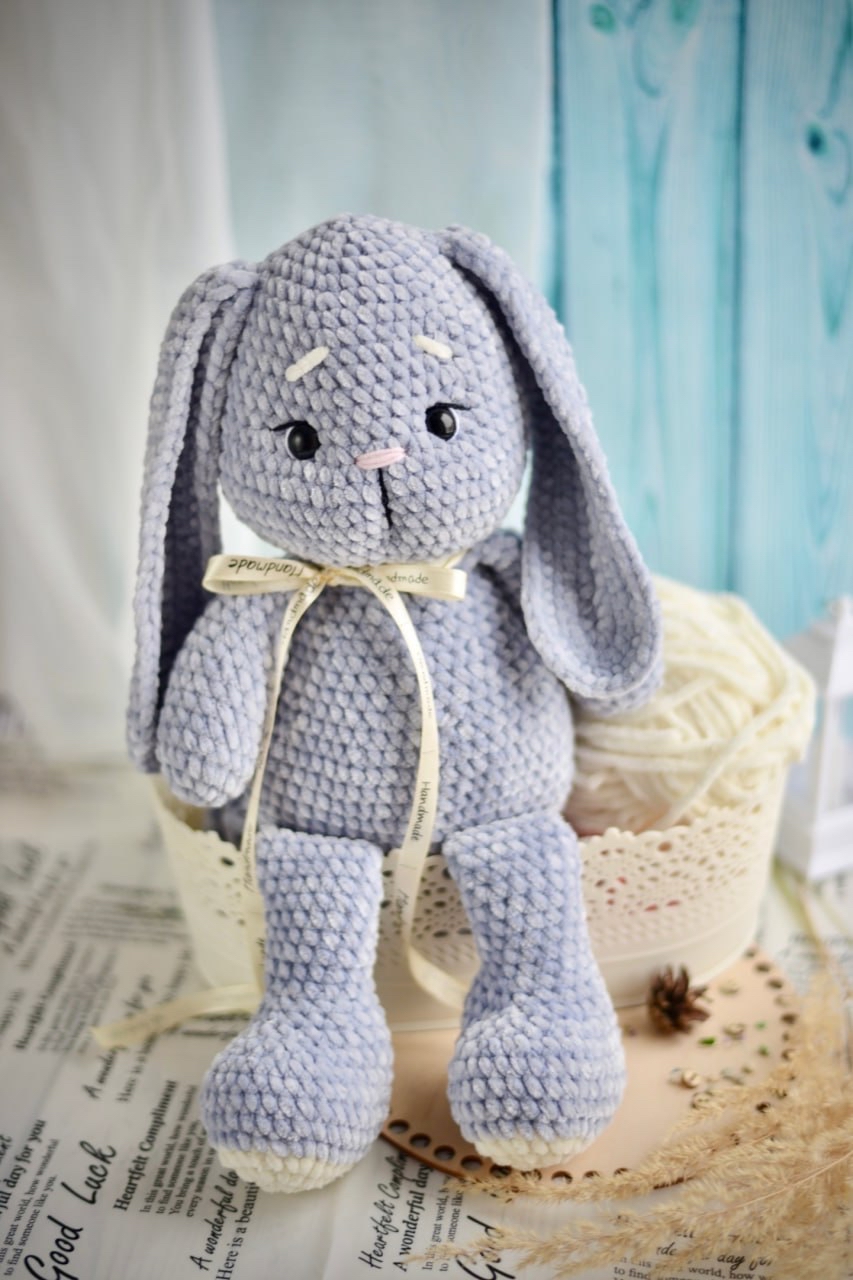
Are you looking for a heartwarming crochet project that is perfect for gifting or nursery decor? This adorable crochet bunny, featuring floppy ears and a colorful striped dress, is a delightful project that will capture the heart of anyone who sees it. Whether you are making this for a baby shower, a birthday, or just to add some sweetness to your crochet collection, this bunny is sure to become a cherished companion.
In this comprehensive tutorial, I will guide you through every step of creating this charming character. This pattern is designed for those with basic crochet skills, making it an excellent intermediate project for beginners looking to practice amigurumi techniques like working in the round, increasing/decreasing, and shaping limbs. By the end of this guide, you will have a finished bunny approximately 8.7 inches tall!
Materials & Abbreviations
To ensure your bunny turns out just like the one in the photos, I recommend using a cotton/acrylic blend yarn. This provides the perfect balance of softness and stitch definition.
Yarn Requirements
- Grey (Main Color): For the head, body, ears, arms, and tail.
- Cream/Milk: For the legs and the base/top of the dress.
- Light Pink: For the nose and the middle stripe of the dress.
- Light Blue: For the middle stripe of the dress.
- White: For the eye whites.
- Black: For the eyelashes and eyebrows.
Tools & Notions
- Crochet Hook: Size 2.0mm or 2.5mm (depending on your tension).
- Safety Eyes: 10mm.
- Stuffing: High-quality fiberfill or similar polyester stuffing.
- Needle: A tapestry needle for sewing and embroidery.
- Scissors: For clean yarn cuts.
- Pins: To hold pieces in place during assembly.
- Button: One small button for the dress.
- Embroidery Thread: Black thread for facial details.
Abbreviations (US Terms)
- MR: Magic Ring
- ch: Chain
- sc: Single Crochet
- sl st: Slip Stitch
- hdc: Half Double Crochet
- dc: Double Crochet
- inc: Increase (2 sc in one stitch)
- dec: Decrease (sc 2 together worked through front loops only)
Step-by-Step Instructions
The Floppy Ears (Make 2)
Start with your Grey yarn. We will be working in rows for the ears.
Chain 28. Starting from the third chain from the hook, work the following:
- Row 1: 25 hdc, 5 hdc in the very last stitch, 25 hdc along the opposite side of the chain, 2 ch, turn (55)
- Row 2: 25 hdc, 5 inc (hdc in each of the 5 stitches), 25 hdc along the opposite side, 2 ch, turn (60)
- Row 3: 25 hdc, (1 hdc, 1 inc) repeat 5 times, 25 hdc along the opposite side (65)
Once finished, fold the ear in half at the base. Work 3 sc and 1 sl st through both layers of the base to close it. Fasten off, leaving a long tail for sewing.
The Head
Using Grey yarn, work in continuous rounds. Stuff the head firmly as you progress.
- Rnd 1: 6 sc in MR (6)
- Rnd 2: 6 inc (12)
- Rnd 3: (1 sc, 1 inc) repeat 6 times (18)
- Rnd 4: 1 sc, 1 inc, (2 sc, 1 inc) repeat 5 times, 1 sc (24)
- Rnd 5: (3 sc, 1 inc) repeat 6 times (30)
- Rnd 6: 2 sc, 1 inc, (4 sc, 1 inc) repeat 5 times, 2 sc (36)
- Rnd 7: 36 sc (36)
- Rnd 8: (5 sc, 1 inc) repeat 6 times (42)
- Rnd 9-10: 42 sc for 2 rounds (42)
- Rnd 11: 3 sc, 1 inc, (6 sc, 1 inc) repeat 5 times, 3 sc (48)
- Rnd 12-13: 48 sc for 2 rounds (48)
Eye Placement: Before continuing, insert your 10mm safety eyes between rounds 13 and 14. To ensure perfect symmetry, place them 8 sc apart. A helpful tip: in round 13, mark the 24th stitch with a pin, then count 4 stitches left and 4 stitches right to find your exact eye positions.
- Rnd 14: 18 sc, (1 inc, 1 sc) repeat 6 times, 18 sc (54)
- Rnd 15: 54 sc (54)
- Rnd 16: 4 sc, 1 inc, (8 sc, 1 inc) repeat 5 times, 4 sc (60)
- Rnd 17-19: 60 sc for 3 rounds (60)
- Rnd 20: 2 sc, 1 dec, (4 sc, 1 dec) repeat 9 times, 2 sc (50)
- Rnd 21: (3 sc, 1 dec) repeat 10 times (40)
- Rnd 22: 1 sc, 1 dec, (2 sc, 1 dec) repeat 9 times, 1 sc (30)
- Rnd 23: (3 sc, 1 dec) repeat 6 times (24)
- Rnd 24: 1 sc, 1 dec, (2 sc, 1 dec) repeat 5 times, 1 sc (18)
- Rnd 25: (1 sc, 1 dec) repeat 6 times (12)
- Rnd 26: 6 dec (6)
Fasten off and weave in your ends.
The Nose
Using Light Pink yarn, chain 4. From the second chain from the hook:
- Row 1: 1 inc, 1 sc, 4 sc in one stitch, 1 sc, 1 inc (10)
Fasten off, leaving a long tail for sewing.
The Legs (Make 2)
Using Cream yarn. Stuff the legs about 2/3 full.
- Rnd 1: 6 sc in MR (6)
- Rnd 2: 6 inc (12)
- Rnd 3: (1 sc, 1 inc) repeat 6 times (18)
- Rnd 4: 1 sc, 1 inc, 5 sc, (1 sc, 1 inc) repeat 3 times, 5 sc, (1 sc, 1 inc) repeat 2 times (28)
- Rnd 5: 2 sc, 1 inc, 5 sc, (2 sc, 1 inc) repeat 3 times, 5 sc, (2 sc, 1 inc) repeat 2 times (34)
- Rnd 6-9: 34 sc for 4 rounds (34)
- Rnd 10: 11 sc, 6 dec, 11 sc (28)
- Rnd 11: 10 sc, 4 dec, 10 sc (24)
- Rnd 12: (dec, 2 sc) repeat 6 times (18)
- Rnd 13: (4 sc, 1 dec) repeat 3 times (15)
- Rnd 14-23: 15 sc for 10 rounds (15)
Work a few extra sc at the end of the last round to shift the opening to the side of the leg. Fold in half and work 6 sc and 1 sl st through both sides. Fasten off.
The Body
Using Grey yarn. Stuff firmly.
Chain 16. Starting from the second chain from the hook:
- Rnd 1: 14 sc, 3 sc in one stitch, 13 sc on the other side of the chain, 1 inc (32)
- Rnd 2: 1 inc, 13 sc, 3 inc, 15 sc, 2 inc (38)
- Rnd 3: 1 sc, 1 inc, 13 sc, (1 sc, 1 inc) repeat 3 times, 13 sc, (1 sc, 1 inc) repeat 2 times (44)
- Rnd 4: 2 sc, 1 inc, 15 sc, (2 sc, 1 inc) repeat 3 times, 15 sc, (2 sc, 1 inc) repeat 2 times (50)
Attaching Legs: Before continuing, find the center of the front of your body. The legs should be placed with 4 sc of space between them at the front. We will attach them in Round 5.
- Rnd 5: 2 sc (body), 7 sc (over leg and body), 4 sc (body), 7 sc (over leg and body), 30 sc (body) (50)
- Rnd 6: (24 sc, 1 inc) repeat 2 times (52)
- Rnd 7: 6 sc, 1 inc, (12 sc, 1 inc) repeat 3 times, 6 sc (56)
- Rnd 8: (13 sc, 1 inc) repeat 4 times (60)
- Rnd 9-11: 60 sc for 3 rounds (60)
- Rnd 12: 2 sc, 1 dec, (4 sc, 1 dec) repeat 9 times, 2 sc (50)
- Rnd 13: 50 sc (50)
- Rnd 14: (3 sc, 1 dec) repeat 10 times (40)
- Rnd 15-17: 40 sc for 3 rounds (40)
- Rnd 18: 1 sc, 1 dec, (2 sc, 1 dec) repeat 9 times, 1 sc (30)
- Rnd 19-21: 30 sc for 3 rounds (30)
- Rnd 22: (3 sc, 1 dec) repeat 6 times (24)
Fasten off, leaving a long tail.
The Arms (Make 2)
Using Grey yarn. Stuff about 2/3 full.
- Rnd 1: 6 sc in MR (6)
- Rnd 2: 6 inc (12)
- Rnd 3: (1 sc, 1 inc) repeat 6 times (18)
- Rnd 4-8: 18 sc for 5 rounds (18)
- Rnd 9: (4 sc, 1 dec) repeat 3 times (15)
- Rnd 10-12: 15 sc for 3 rounds (15)
- Rnd 13: (3 sc, 1 dec) repeat 3 times (12)
- Rnd 14-16: 12 sc for 3 rounds (12)
Fold in half and work 5 sc and 1 sl st through both sides. Fasten off.
The Tail
Using Grey yarn.
- Rnd 1: 8 sc in MR (8)
- Rnd 2: 8 inc (16)
- Rnd 3-4: 16 sc for 2 rounds (16)
Do not stuff. Fasten off, leaving a long tail.
The Striped Dress
The dress is worked in rows using a raglan-style increase. Keep a long tail from your starting chain to create a button loop later. Note: You should fit the dress to your bunny as you go!
Chain 42. From the third chain from the hook:
- Row 1: 6 dc, raglan, 7 dc, raglan, 10 dc, raglan, 7 dc, raglan, 6 dc, 1 ch, turn (48)
- Row 2: 48 sc (48)
Forming Sleeves: In the next row, skip 9 stitches to create the armholes.
- Row 3: 8 dc, 9 ch, 14 dc, 9 ch, 8 dc (48)
- Row 4: 48 sc (48)
Color Changes:
- Change to Light Blue: Row 5: (dc, 1 dc inc) repeat 24 times (72).
- Continue in Light Blue: Rows 6-7: 72 dc for 2 rounds (72).
- Change to Light Pink: Rows 8-10: 72 dc for 3 rounds (72).
- Change to Cream: Row 11: 72 sc (72).
- Row 12: (1 ch, sl st) repeat 72 times (72).
Sew the button on the front and use the remaining yarn tail to crochet a small loop for the button closure.
Finishing
Now comes the fun part—bringing your bunny to life!
Assembly
- Eyes: Use a thin thread to create “eye indentation.” Insert the needle into the center of the eye from the bottom, bring it up through the middle, then back down through the same hole. Pull tight to create a deep, soulful look. Knot and hide the thread.
- Embroider Details: Using white thread, embroider small white highlights in the eyes. Using black thread, embroider thin eyelashes and light eyebrows between rounds 9 and 11.
- Nose: Sew the pink nose between rounds 13 and 16. For an extra cute touch, make a tiny stitch of 3 sc downwards just under the nose to create adorable “cheeks.”
- Ears: Sew the ears between rounds 5 and 6 of the head.
- Head & Body: Sew the head to the body. Add a little extra stuffing to the body during this process to ensure a firm shape.
- Limbs: Sew the arms between rounds 19 and 20 of the body. Sew the tail between rounds 3 and 8 of the body. Position the tail carefully to help the bunny sit upright!
Tips for Success
- Tension is Key: For amigurumi, aim for tight tension so that your stuffing doesn’t peek through the stitches.
- Symmetry Matters: When placing eyes, ears, or legs, use plenty of pins. It is much easier to adjust a pin than to unpick stitches!
- The “Cheek” Trick: That little indent under the nose makes a huge difference in making the bunny look “alive” and sweet. Don’t skip it!
- Sizing: If you use a thicker yarn, your bunny will be larger. Always check the fit of the dress against the body as you work.