Magical Wizard Cat Crochet Pattern: A Step-by-Step Amigurumi Guide
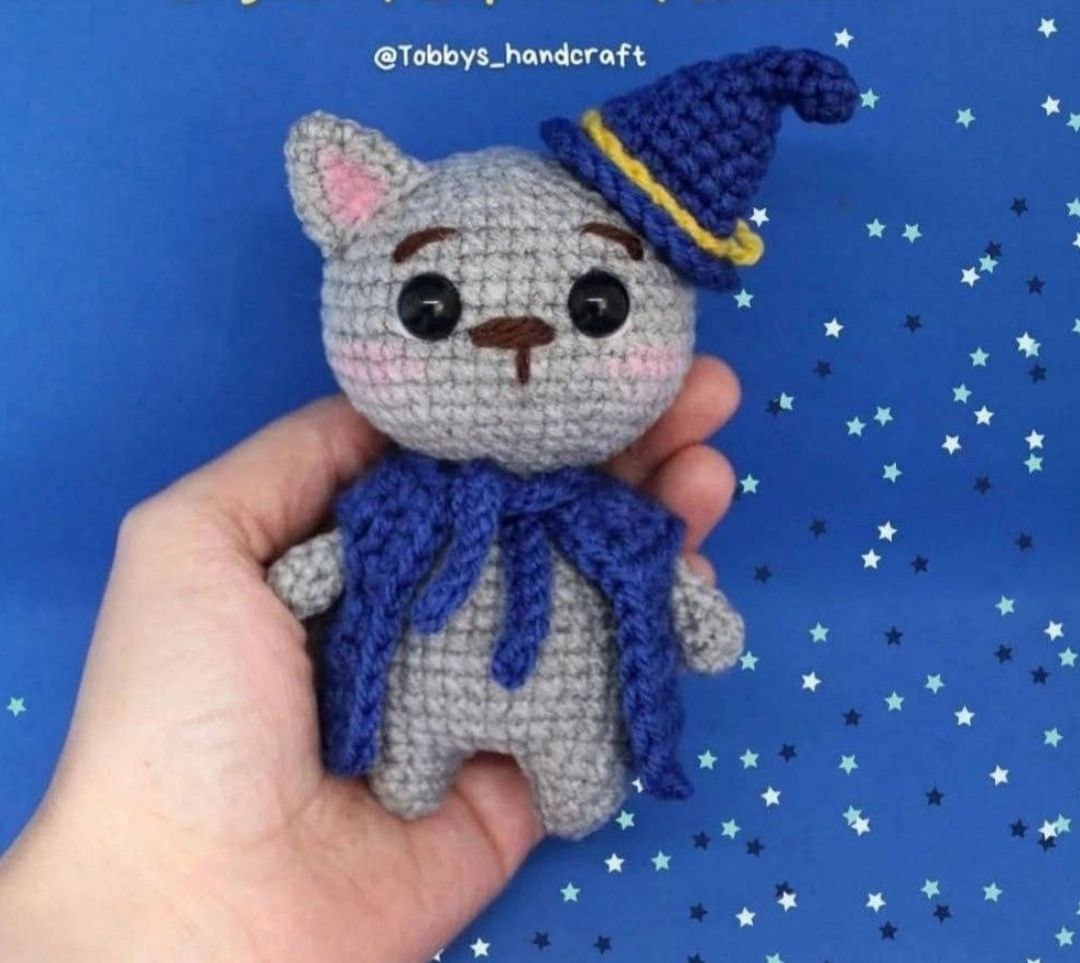
Are you looking for your next adorable amigurumi project? This magical wizard cat is the perfect blend of whimsical and cozy! Whether you are looking to create a unique Halloween decoration, a mystical gift for a friend, or a charming addition to your nursery decor, this little grey kitty in his starry hat and flowing blue cape is sure to cast a spell on everyone who sees him. This pattern is designed to be beginner-friendly, guiding you through the process of creating a tiny, personality-filled character that measures approximately 4.5 inches tall.
Crocheting amigurumi is a wonderful way to practice your tension and shaping skills. This project involves working in the round, mastering increases and decreases, and assembling multiple parts into a cohesive whole. Grab your favorite hooks and a cozy cup of tea, and let’s get started on this enchanting adventure!
Materials & Abbreviations
To ensure your wizard cat turns out just as magical as the photos, I recommend using high-quality materials. Since this is a small project, using a slightly smaller hook than usual will help keep your stitches tight, ensuring the stuffing doesn’t peek through.
What You Will Need
- Yarn: DK weight (Light Worsted) yarn in Grey, Blue, and Yellow.
- Crochet Hooks: 3mm and 4mm hooks.
- Safety Eyes: Appropriate size for your finished project (standard amigurumi eyes).
- Stuffing: Fiberfill stuffing to make your kitty plump and huggable.
- Tapestry Needle: For weaving in ends and sewing parts together.
- Stitch Marker: Crucial for keeping track of your rounds in amigurumi.
- Fabric: A small scrap of fabric (optional, for extra detail or cape lining).
Abbreviations (US Crochet Terms)
Please note that all instructions are written using US terminology. If you are used to UK terms, be sure to adjust accordingly!
- MR: Magic Ring
- ch: Chain
- st: Stitch
- sc: Single Crochet
- hdc: Half Double Crochet
- dc: Double Crochet
- sl st: Slip Stitch
- inc: Increase (2 stitches in the same stitch)
- dec: Decrease (sc 2 stitches together)
- flo: Front Loop Only
- blo: Back Loop Only
- rnd: Round
- r: Row
Step-by-Step Instructions
The Arms (Make 2)
Use grey yarn.
Start by creating a magic ring and working 6 sc into the ring (6). For rounds 2 through 8, work 6 sc in each stitch (6). Once you reach the end of round 8, fasten off, leaving a long tail for sewing.
The Legs & Body
Use grey yarn.
We will start by making the legs and then immediately join them to create the body. This creates a seamless transition from the bottom of the cat upward.
Part 1: The Legs
Leg 1:
Rnd 1: Start with a magic ring and work 6 sc into the ring (6).
Rnd 2: [1 sc, 1 inc] repeat 3 times (9).
Rnd 3: [2 sc, 1 inc] repeat 3 times (12).
Rnd 4: Work 12 sc (12).
Do not fasten off the second leg!
Leg 2:
Repeat the same steps for Leg 2. At the end of Rnd 4 of the second leg, do not fasten off. Instead, you will join the legs together to begin the body.
Part 2: The Body & Head
Rnd 5: Join the legs by working 3 ch between them. Work 12 sc into the first leg, 3 sc into the chains, 12 sc into the second leg, and 3 sc into the remaining chains (30).
Rnds 6-13: Work 30 sc in each round (30).
Note: As you progress, begin stuffing the legs and the body firmly with fiberfill.
Rnd 14: [3 sc, 1 dec] repeat 6 times (24).
Rnd 15: Work 24 sc (24).
Rnd 16: [2 sc, 1 dec] repeat 6 times (18).
Rnd 17: (Joining the arms) We will work the arms directly into the body round. Work 3 sc, then 3 sc (this combines the body and the arm), then 6 sc, then 3 sc (body and arm), and finally 3 sc (18).
Rnd 18: [1 sc, 1 dec] repeat 6 times (12).
Rnds 19-20: Work 12 sc (12).
Rnd 21: [1 sc, 1 inc] repeat 9 times (18).
Rnd 22: [2 sc, 1 inc] repeat 6 times (24).
Rnd 23: [3 sc, 1 inc] repeat 6 times (30).
Rnd 24: [4 sc, 1 inc] repeat 6 times (36).
Rnd 25: [5 sc, 1 inc] repeat 6 times (42).
Rnd 26: [6 sc, 1 inc] repeat 6 times (48).
Rnds 27-33: Work 48 sc in each round (48).
Important: Insert your safety eyes between rounds 29 and 30. Make sure they are level and secure.
Rnd 34: [6 sc, 1 dec] repeat 6 times (42).
Rnd 35: [5 sc, 1 dec] repeat 6 times (36).
Rnd 36: [4 sc, 1 dec] repeat 6 times (30).
Rnd 37: [3 sc, 1 dec] repeat 6 times (24).
Rnd 38: [2 sc, 1 dec] repeat 6 times (18).
Rnd 39: [1 sc, 1 dec] repeat 6 times (12).
Rnd 40: [6 dec] (6). Fasten off and weave in the end.
The Ears (Make 2)
Use grey yarn.
Rnd 1: Start with a magic ring and work 4 sc into the ring (4).
Rnd 2: Work 4 sc (4).
Rnd 3: [4 inc] (8).
Rnd 4: [1 sc, 1 inc] repeat 4 times (12).
Rnds 5-6: Work 12 sc (12). Fasten off, leaving a tail for sewing.
The Wizard Hat
Use Blue and Yellow yarn.
Rnd 1: Start with a magic ring and work 4 sc into the ring (4).
Rnds 2-3: Work 4 sc (4).
Rnd 4: [1 sc, 1 inc] repeat 3 times (6).
Rnd 5: Work 6 sc (6).
Rnd 6: [1 sc, 1 inc] repeat 3 times (9).
Rnd 7: Work 9 sc (9).
Rnd 8: [2 sc, 1 inc] repeat 3 times (12).
Rnd 9: Work 12 sc (12).
Rnd 10: [3 sc, 1 inc] repeat 3 times (15). Switch to Yellow yarn.
Rnd 11: Work 15 sc (15). Switch to Blue yarn.
Rnd 12: Work 15 sc in the Front Loops Only (FLO) (15).
Rnd 13: 4 sc, then 3 increases to reach 18 stitches (18).
Rnd 14: [5 sc, 1 inc] repeat 3 times (21). Fasten off.
The Wizard Cape
Use Blue yarn.
Rnd 1: Chain 16. From the 3rd chain from the hook: work 14 sc, 2 ch, and turn.
Rnd 2: 1 sc, 1 dec, 2 ch, turn (21).
Rnd 3: 21 sc, 2 ch, turn (21).
Rnd 4: 2 sc, 4 ch, skip 4 sts, 9 sc, 4 ch, skip 4 sts, 2 sc (21), 2 ch, turn.
Rnds 5-8: Work 21 sc (21). Fasten off.
Finishing
Now comes the magic! Assembly is what brings your character to life.
1. Ears: Use your tapestry needle to sew the ears onto the top of the head. Try to keep them symmetrical for a balanced look.
2. Hat: Position the hat slightly tilted on the cat’s head to give it that classic “wizard” personality. Sew it securely in place.
3. Cape: Place the cape around the neck area. To create the straps, insert your hook into the first stitch of the first row of the cape and work 10 chains. Repeat this on the other side of the cape. Sew the cape to the body if necessary for stability.
4. Facial Details: If you want to add more expression, you can use a small amount of black embroidery thread to create a nose or tiny whiskers. You can also use pink blush or a bit of pink yarn to add cute cheeks!
Tips for Success
Creating amigurumi can be a little tricky at first, so here are some professional tips to help you achieve a polished result:
- Use Stitch Markers: In amigurumi, you are almost always working in a continuous spiral. Without a stitch marker, it is incredibly easy to lose your place and end up with extra or missing stitches.
- Tension is Key: Try to keep your stitches consistent. If you find your stitches are too loose, try using a smaller crochet hook. A tight tension ensures your stuffing remains hidden inside.
- Stuffing Technique: When stuffing, don’t just shove it in! Work the stuffing into the corners and ends of the limbs to avoid lumps. It is much easier to add more stuffing as you go than to try and fix a lumpy limb later.
- The Magic Ring: If you struggle with the magic ring, don’t worry! You can always start with a chain of 2 and work your first round of stitches into the first chain.
- Invisible Decreases: For a smoother look, especially when decreasing, try using the “invisible decrease” method (inserting the hook into the front loops only of the next two stitches). This prevents visible gaps in your work.