How to Crochet a Cute Amigurumi Sunflower in a Pot: A Beginner-Friendly Pattern
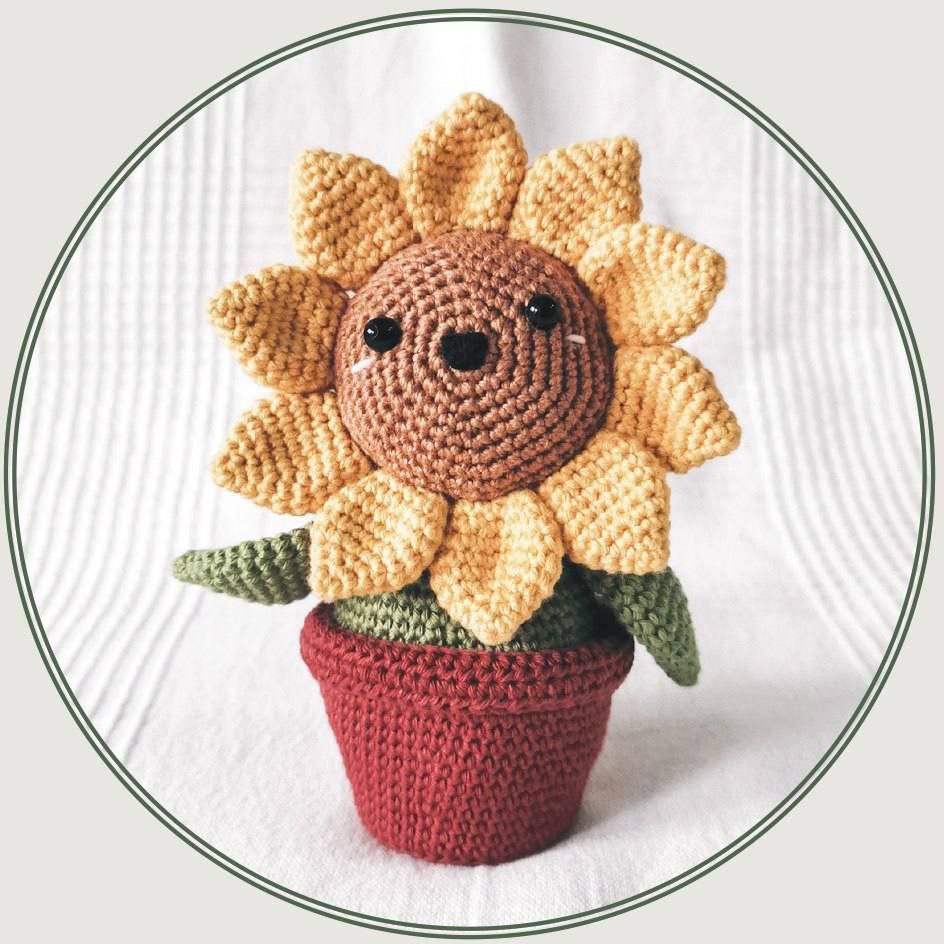
Looking for a way to bring a little permanent sunshine into your home or a bright gift for a friend? This adorable Amigurumi Sunflower in a Pot is the perfect project! Whether you want to decorate your desk, create a cheerful nursery accent, or practice your crochet skills, this little flower is sure to make you smile. This pattern is designed with beginners in mind, making it an easy and rewarding project that results in a professional-looking, whimsical plant friend.
Once finished, your sunflower will stand approximately 6.5 inches tall, making it the ideal size for shelf decor. Grab your crochet hook and some cozy yarn, and let’s get growing!
Materials & Abbreviations
To ensure your sunflower turns out just like the photos, I recommend using high-quality cotton yarn. Cotton provides great stitch definition, which is essential for the clean look of amigurumi.
Materials Needed
- Crochet Hook: 2.5 mm (or a size that produces tight, even stitches)
- Yarn (Medium/8-ply Cotton): You will need less than one ball of each of the following colors:
- Terracotta (for the pot)
- Green (for the stem, leaves, and head accent)
- Mustard Yellow (for the petals)
- Light Brown (for the face and legs)
- Pink (for the rosy cheeks)
- Safety Eyes: 7 mm
- Felt/Felt Fabric: Black and White (for the mouth and eye details)
- Cardboard: Thick cardboard (for the pot base)
- Stuffing: Polyester fiberfill/toy stuffing
- Extras: Fabric glue, stitch markers, embroidery needle, and yarn for sewing.
Abbreviations (US Terms)
- MR: Magic Ring
- sc: Single Crochet
- inc: Increase (2 sc in the same stitch)
- dec: Decrease (sc 2 together)
- hdc: Half Double Crochet
- dc: Double Crochet
- sl st: Slip Stitch
- ch: Chain
- BLO: Back Loop Only
- FLO: Front Loop Only
- hdc dec: Half Double Crochet Decrease
Note: All instructions are worked in continuous rounds unless otherwise stated.
Step-by-Step Instructions
The Sunflower Head
Start with your Light Brown yarn. Work in continuous rounds.
- Round 1: 6 sc in MR [6]
- Round 2: 6 inc [12]
- Round 3: (1 sc, inc) x 6 [18]
- Round 4: (2 sc, inc) x 6 [24]
- Round 5: (3 sc, inc) x 6 [30]
- Round 6: (4 sc, inc) x 6 [36]
- Round 7: (5 sc, inc) x 6 [42]
- Round 8: (6 sc, inc) x 6 [48]
- Rounds 9-11: 48 sc [48]
Change yarn to Green.
- Rounds 12-19: 48 sc [48]
- Round 20: (6 sc, dec) x 6 [42]
- Round 21: (5 sc, dec) x 6 [36]
- Round 22: (4 sc, dec) x 6 [30]
Stop here to insert the safety eyes between Rounds 4 and 5. Position them approximately 10 single crochet stitches apart. Begin stuffing the head firmly with fiberfill.
- Round 23: (3 sc, dec) x 6 [24]
- Round 24: (2 sc, dec) x 6 [18]
- Round 25: (1 sc, dec) x 6 [12]
- Round 26: 6 dec [6]
Fasten off, leaving a long tail for sewing. Using your needle, weave the yarn through the front loops of the last round and pull tight to close the hole.
The Petals (Make 10)
Use Mustard Yellow yarn. Do not stuff the petals.
- Round 1: 4 sc in MR [4]
- Round 2: (1 sc, inc) x 2 [6]
- Round 3: (1 sc, inc) x 3 [9]
- Round 4: (2 sc, inc) x 3 [12]
- Round 5: (1 sc, inc) x 6 [18]
- Rounds 6-8: 18 sc [18]
- Round 9: (1 sc, dec) x 6 [12]
- Round 10: 12 sc, sl st [12]
Fasten off and leave a long tail for sewing to the head.
The Legs (Make 2)
Use Light Brown yarn.
- Round 1: 6 sc in MR [6]
- Round 2: (1 sc, inc) x 3 [9]
- Round 3: (2 sc, inc) x 3 [12]
- Round 4: 12 sc [12]
- Round 5: (3 sc, inc) x 3 [15]
Fasten off the first leg. For the second leg, do not fasten off! Instead, we will join the legs to begin the body.
The Body
Change yarn to Green. After finishing Round 5 on the second leg, join the two legs together.
- Connecting the legs: Chain 3. Join to the first leg with a sc.
- Round 6: 15 sc around the first leg, 3 sc in the chain, 15 sc around the second leg, 3 sc in the chain [36]
- Round 7: (5 sc, inc) x 6 [42]
- Rounds 8-9: 42 sc [42]
- Round 10: (6 sc, inc) x 6 [48]
- Rounds 11-15: 48 sc [48]
- Round 16: (6 sc, dec) x 6 [42]
- Rounds 17-18: 42 sc [42]
- Round 19: (5 sc, dec) x 6 [36]
- Round 20: 36 sc [36]
- Round 21: (4 sc, dec) x 6 [30]
- Round 22: 30 sc [30]
Begin stuffing the body firmly.
- Round 23: (3 sc, dec) x 6, sl st [24]
Fasten off, leaving a long tail for sewing.
The Leaves (Make 2)
Use Green yarn.
- Round 1: 4 sc in MR [4]
- Round 2: (1 sc, inc) x 2 [6]
- Round 3: (1 sc, inc) x 3 [9]
- Round 4: (2 sc, inc) x 3 [12]
- Round 5: (1 sc, inc) x 6 [18]
- Round 6: 18 sc [18]
- Round 7: (2 sc, inc) x 6 [24]
- Rounds 8-11: 24 sc [24]
- Round 12: (2 sc, dec) x 6 [18]
- Round 13: 18 sc [18]
- Round 14: (1 sc, dec) x 6 [12]
- Round 15: 12 sc [12]
- Round 16: (1 sc, dec) x 4 [8]
Do not stuff the leaves. Fold the bottom of the leaf in half and crochet 4 sc through both layers to close the opening. Fasten off, leaving a long tail for sewing.
The Pot
Use Terracotta yarn. Note: When working with the chain stitch (ch) at the start of a round, do not count the chain as a stitch.
- Round 1: 6 sc in MR [6]
- Round 2: 6 inc [12]
- Round 3: (1 sc, inc) x 6 [18]
- Round 4: (1 sc, inc, 1 sc) x 6 [24]
- Round 5: (3 sc, inc) x 6 [30]
- Round 6: (2 sc, inc, 2 sc) x 6 [36]
- Round 7: (5 sc, inc) x 6, sl st [42]
- Round 8: Work in BLO, ch 1, 42 sc, sl st [42]
- Rounds 9-10: ch 1, 42 sc, sl st [42]
- Round 11: ch 1, (6 sc, inc) x 6, sl st [48]
- Rounds 12-14: ch 1, 48 sc, sl st [48]
- Round 15: ch 1, (7 sc, inc) x 6, sl st [54]
- Rounds 16-21: ch 1, 54 sc, sl st [54]
- Round 22: Work in FLO, ch 1, 54 hdc, sl st [54]
- Round 23: ch 1, 54 hdc, sl st [54]
Fasten off and leave a long tail for sewing the bottom shut.
Finishing
Assembly & Face Details
Now comes the fun part—bringing your sunflower to life!
- Attach Petals: Using a sewing needle, sew the 10 petals to the head between Rounds 11 and 12 (where the color change occurred). Use sewing pins to hold them in place before stitching to ensure they are even.
- Attach Body: Sew the body to the head between Rounds 12 and 20. You may want to tilt the head slightly for a cute, whimsical look.
- Attach Leaves: Sew the leaves to the body between Rounds 21 and 22.
- Create the Face:
- Use your pink yarn to embroider two small lines under the eyes for rosy cheeks.
- Cut a small U-shape out of black felt and use fabric glue to attach it to the center of the head for the mouth.
- Prepare the Pot Base: Cut two circles (approximately 1.75 inches in diameter) out of thick cardboard and felt. Place the cardboard circle at the bottom of the pot, followed by the felt circle. This provides stability for your sunflower.
- Final Step: Place your finished sunflower inside its terracotta pot.
Tips for Success
- Tension is Key: For amigurumi, you want your stitches to be tight so that the stuffing doesn’t show through. If your stitches feel loose, try using a smaller hook.
- Use Stitch Markers: Because you are working in continuous rounds, it is very easy to lose your place. Always use a marker to identify the start of your round.
- The “Invisible” Decrease: For a cleaner look, use the invisible decrease method (inserting the hook into the front loops only of the next two stitches) to avoid gaps in your work.
- Stuffing Strategy: When stuffing the head and body, push the stuffing into the corners and edges to ensure a smooth, round shape without lumps.