Crochet Sunflower Amigurumi Pattern: A Sunny DIY Tutorial
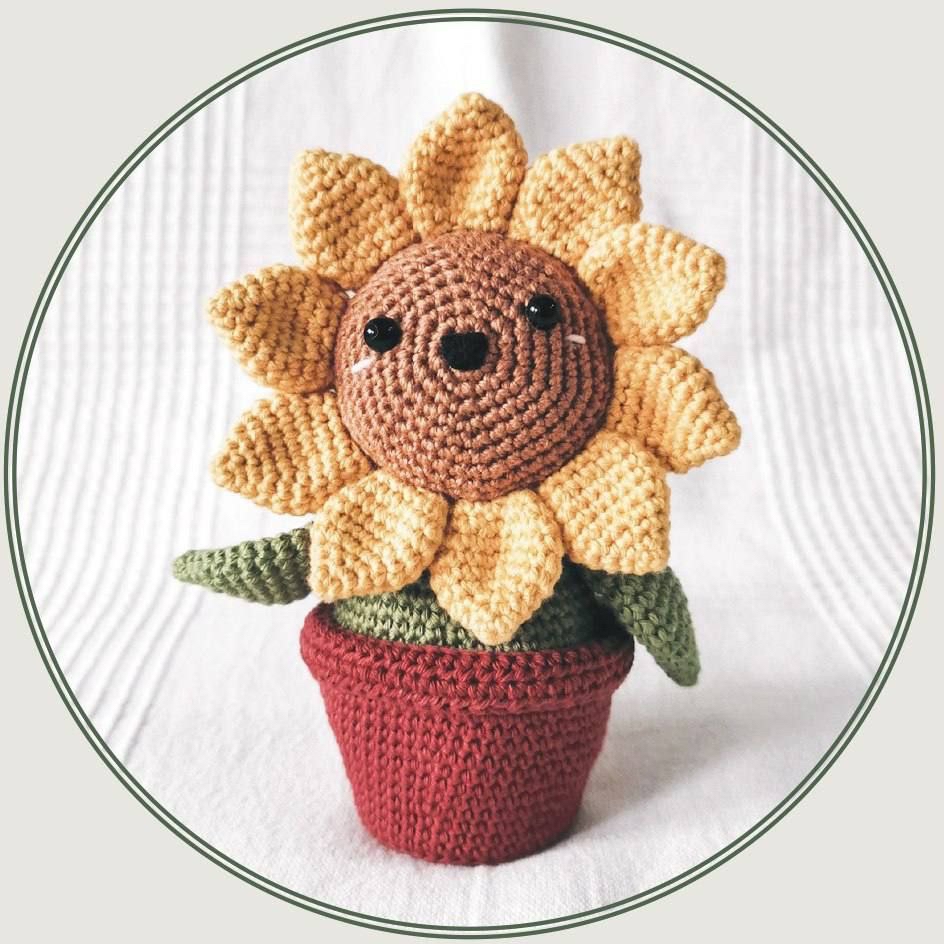
Bring a touch of eternal sunshine into your home with this adorable crochet sunflower amigurumi! Whether you are looking to brighten up a desk, create a unique gift for a plant lover, or simply want a fun new project to work on, this little sunflower in a pot is the perfect companion. This project is designed to be beginner-friendly, making it a wonderful way to practice your amigurumi skills while creating something truly charming.
This little plant stands approximately 6.5 inches tall, making it the ideal size for shelf decor. In this tutorial, we will walk through every single step—from crafting the tiny terracotta pot to stitching together the cheerful flower head. Grab your hook and let’s get growing!
Materials & Abbreviations
Before we dive into the stitches, let’s make sure you have everything you need on your crafting table. For the best results, use a tight tension to ensure your stuffing doesn’t peek through the stitches.
Required Materials
- Crochet Hook: 2.5 mm
- Yarn: Medium weight (8-ply) cotton yarn in the following colors:
- Terracotta (for the pot)
- Green (for the stem, leaves, and head base)
- Mustard Yellow (for the petals)
- Light Brown (for the face and legs)
- Pink (for the cute cheek details)
- Safety Eyes: 7 mm
- Felt: Small scraps of black and white felt
- Stiffener: Thick cardboard
- Stuffing: Polyfill or standard toy stuffing
- Extras: Fabric glue, stitch markers, a tapestry needle, and embroidery thread.
US Crochet Abbreviations
This pattern uses standard US terminology. Please ensure you are using US terms rather than UK terms to avoid confusion with stitch heights!
- MR: Magic Ring
- sc: Single crochet
- inc: Increase (2 sc in one stitch)
- dec: Decrease (sc 2 together)
- sl st: Slip stitch
- ch: Chain
- hdc: Half double crochet
- dc: Double crochet
- FLO: Front loop only
- BLO: Back loop only
- hdc dec: Half double crochet decrease
Step-by-Step Instructions
The Sunflower Head
The head of our sunflower consists of a brown center for the face and a green base that transitions into the stem. We will start with light brown yarn.
Working in the round with Light Brown yarn:
- Round 1: 6 sc in a MR [6]
- Round 2: 6 inc [12]
- Round 3: (1 sc, inc) x 6 [18]
- Round 4: (2 sc, inc) x 6 [24]
- Round 5: (3 sc, inc) x 6 [30]
- Round 6: (4 sc, inc) x 6 [36]
- Round 7: (5 sc, inc) x 6 [42]
- Round 8: (6 sc, inc) x 6 [48]
- Rounds 9-11: 48 sc [48]
Change yarn to Green:
- Rounds 12-19: 48 sc [48]
- Round 20: (6 sc, dec) x 6 [42]
- Round 21: (5 sc, dec) x 6 [36]
- Round 22: (4 sc, dec) x 6 [30]
Note: Before continuing to round 23, insert your 7 mm safety eyes between rounds 4 and 5. Make sure they are spaced exactly 10 stitches apart. Begin stuffing the head firmly with polyfill.
- Round 23: (3 sc, dec) x 6 [24]
- Round 24: (2 sc, dec) x 6 [18]
- Round 25: (1 sc, dec) x 6 [12]
- Round 26: 6 dec [6]
Fasten off, leaving a long tail. Using your tapestry needle, weave the tail through the front loops of the last round and pull tight to close the hole completely.
The Sunny Petals
You will need to make 10 petals in total. These should be worked flat and not stuffed.
Working in the round with Mustard Yellow yarn:
- Round 1: 4 sc in a MR [4]
- Round 2: (1 sc, inc) x 2 [6]
- Round 3: (1 sc, inc) x 3 [9]
- Round 4: (2 sc, inc) x 3 [12]
- Round 5: (1 sc, inc) x 6 [18]
- Rounds 6-8: 18 sc [18]
- Round 9: (1 sc, dec) x 6 [12]
- Round 10: 12 sl st [12]
Fasten off, leaving a long tail for sewing to the head later. Do not stuff the petals.
The Legs and Body
The sunflower’s “body” is actually the stem and base that sits in the pot. We start by making two small legs in light brown.
Legs (Make 2) in Light Brown yarn:
- Round 1: 6 sc in a MR [6]
- Round 2: (1 sc, inc) x 3 [9]
- Round 3: (2 sc, inc) x 3 [12]
- Round 4: 12 sc [12]
- Round 5: (3 sc, inc) x 3 [15]
Fasten off the first leg. For the second leg, repeat rounds 1-5, but do not fasten off. Instead, we will join the legs together to start the body.
The Body (Switch to Green yarn):
After completing the second leg, chain 3. Join this chain to the first leg with a sc. This creates the base of the stem.
- Round 6: 15 sc around the first leg, 3 sc in the chains, 15 sc around the second leg, 3 sc in the remaining chains [36]
- Round 7: (5 sc, inc) x 6 [42]
- Rounds 8-9: 42 sc [42]
- Round 10: (6 sc, inc) x 6 [48]
- Rounds 11-15: 48 sc [48]
- Round 16: (6 sc, dec) x 6 [42]
- Rounds 17-18: 42 sc [42]
- Round 19: (5 sc, dec) x 6 [36]
- Round 20: 36 sc [36]
- Round 21: (4 sc, dec) x 6 [30]
- Round 22: 30 sc [30]
Note: Begin stuffing the body firmly at this stage.
- Round 23: (3 sc, dec) x 6, then 1 sl st [24]
Fasten off, leaving a long tail for sewing.
The Leaves
Make 2 leaves in green yarn.
- Round 1: 4 sc in a MR [4]
- Round 2: (1 sc, inc) x 2 [6]
- Round 3: (1 sc, inc) x 3 [9]
- Round 4: (2 sc, inc) x 3 [12]
- Round 5: (1 sc, inc) x 6 [18]
- Round 6: 18 sc [18]
- Round 7: (2 sc, inc) x 6 [24]
- Rounds 8-11: 24 sc [24]
- Round 12: (2 sc, dec) x 6 [18]
- Round 13: 18 sc [18]
- Round 14: (1 sc, dec) x 6 [12]
- Round 15: 12 sc [12]
- Round 16: (1 sc, dec) x 4 [8]
To shape: Do not stuff the leaves. Fold the bottom half of the leaf in half and crochet 4 sc through both layers to close the opening. Fasten off, leaving a tail for sewing.
The Terracotta Pot
The pot provides the stability needed for your sunflower to stand upright. We will use terracotta yarn.
Working in the round with Terracotta yarn:
- Round 1: 6 sc in a MR [6]
- Round 2: 6 inc [12]
- Round 3: (1 sc, inc) x 6 [18]
- Round 4: (1 sc, inc, 1 sc) x 6 [24]
- Round 5: (3 sc, inc) x 6 [30]
- Round 6: (2 sc, inc, 2 sc) x 6 [36]
- Round 7: (5 sc, inc) x 6, then 1 sl st [42]
- Round 8: Work in BLO: 1 ch, 42 sc, 1 sl st [42]
- Rounds 9-10: 1 ch, 42 sc, 1 sl st [42]
- Round 11: 1 ch, (6 sc, inc) x 6, 1 sl st [48]
- Rounds 12-14: 1 ch, 48 sc, 1 sl st [48]
- Round 15: 1 ch, (7 sc, inc) x 6, 1 sl st [54]
- Rounds 16-21: 1 ch, 54 sc, 1 sl st [54]
- Round 22: Work in FLO: 1 ch, 54 hdc, 1 sl st [54]
- Round 23: 1 ch, 54 hdc, 1 sl st [54]
Fasten off, leaving a long tail for sewing.
Finishing
Preparing the Base
To ensure your sunflower sits perfectly in the pot, we need to create a sturdy base. Cut two circles—one from thick cardboard and one from white felt—each approximately 1.75 inches in diameter. Place the cardboard circle into the bottom of the pot first, then place the felt circle on top of it.
Assembly
- Attach Petals: Use sewing pins to position the 10 petals around the head. They should be attached between rounds 11 and 12 (where the color changed from brown to green). Once satisfied, sew them securely in place.
- Attach Body: Sew the green body/stem to the head between rounds 12 and 20. Tilt the head slightly for a cute, “personality-filled” look.
- Attach Leaves: Sew the leaves to the body between rounds 21 and 22.
- The Face: Use pink yarn to embroider two small lines under the eyes for cute cheeks. Using black felt, cut out a small U-shaped mouth and use fabric glue to attach it to the center of the face.
- Final Step: Place your completed sunflower into the decorated terracotta pot!
Tips
- Tension is Key: When working with amigurumi, keep your stitches tight. This prevents the white stuffing from showing through, especially in lighter colored yarns.
- Use Stitch Markers: Since amigurumi is worked in continuous rounds, it is very easy to lose your place. Always use a marker to identify the start of your round.
- Eye Placement: The expression of your sunflower depends heavily on the eye placement. If you feel the face looks “off,” try moving the eyes a few stitches closer or further apart before finalizing.
- The Pot Rim: When working the rim of the pot, pay close attention to the BLO (Back Loop Only) and FLO (Front Loop Only) instructions. This is what creates that professional-looking turned-out edge.