Adorable Amigurumi Cow Crochet Pattern: A Step-by-Step DIY Tutorial
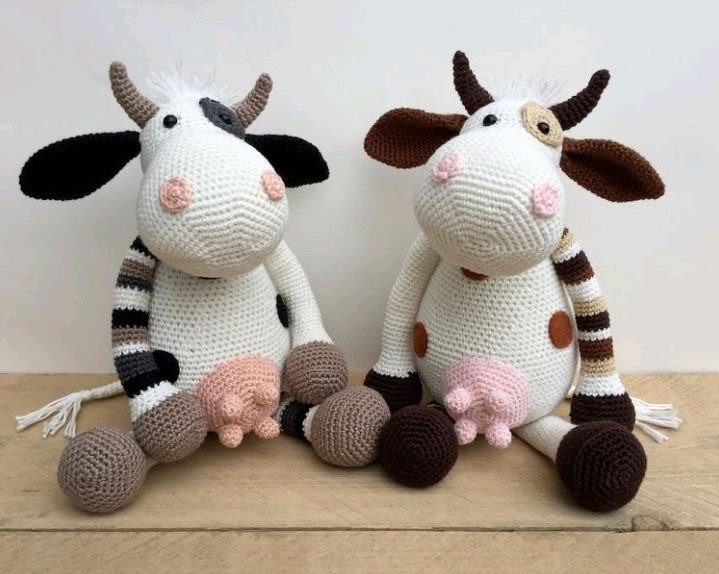
If you are looking for the perfect, cuddly project to add to your crochet collection, look no further! This adorable amigurumi cow is a whimsical, charming piece that is perfect for nursery decor, a unique gift for a child, or even a quirky addition to your own bookshelf. With its chunky body, tiny horns, and sweet expression, this little bovine is sure to steal hearts.
This tutorial is designed to be beginner-friendly, guiding you through every stitch to create a high-quality plushie. Whether you want to keep it classic with white and black spots or get creative with colorful stripes on the legs, this pattern is incredibly versatile. Grab your favorite crochet hook and let’s get started on making your very own crochet cow!
Materials & Abbreviations
To ensure your cow turns out looking professional, it is important to use the right materials. For this project, we recommend using a medium-weight cotton or acrylic yarn to give the cow a nice, firm structure that holds its shape when stuffed.
What You Will Need:
- White Yarn: Approximately 350-400 yards (used for the body, head, tail, and legs).
- Brown Yarn: Approximately 75 yards (used for the horns and leg accents).
- Pink Yarn: Approximately 40 yards (used for the nostrils and udder).
- Black Yarn: Approximately 40 yards (used for the ears).
- Textured/Eyelash Yarn: A small amount for the hair and tail tassel.
- Crochet Hook: A size suitable for your yarn (typically 3.25mm to 4.0mm).
- Safety Eyes: 8mm size.
- Stuffing: Poly-fill or similar fiberfill.
- Stitch Marker: To keep track of your rounds.
- Tapestry Needle: For sewing pieces together.
US Crochet Abbreviations:
- MR: Magic Ring
- sc: Single crochet
- inc: Increase (2 sc in one stitch)
- dec: Decrease (sc 2 together)
- hdc: Half double crochet
- dc: Double crochet
- sl st: Slip stitch
- ch: Chain
Step-by-Step Instructions
The Body
We will work in a continuous spiral using white yarn.
- R1: 6 sc in MR (6)
- R2: 6 inc (12)
- R3: (1 sc, inc) x 6 (18)
- R4: (2 sc, inc) x 6 (24)
- R5: (3 sc, inc) x 6 (30)
- R6: (4 sc, inc) x 6 (36)
- R7: (5 sc, inc) x 6 (42)
- R8: (6 sc, inc) x 6 (48)
- R9: (7 sc, inc) x 6 (54)
- R10: (8 sc, inc) x 6 (60)
- R11: (9 sc, inc) x 6 (66)
- R12: (10 sc, inc) x 6 (72)
- R13: (11 sc, inc) x 6 (78)
- R14: (12 sc, inc) x 6 (84)
- R15-29: 84 sc
- R30: (12 sc, dec) x 6 (78)
- R31: (11 sc, dec) x 6 (72)
- R32: 72 sc
- R33: (10 sc, dec) x 6 (66)
- R34: 66 sc
- R35: (9 sc, dec) x 6 (60)
- R36-37: 60 sc
- R38: (8 sc, dec) x 6 (54)
- R39-40: 54 sc
- R41: (7 sc, dec) x 6 (48)
- R42-43: 48 sc
- R44: (6 sc, dec) x 6 (42)
- R45-46: 42 sc
- R47: (5 sc, dec) x 6 (36)
- R48-49: 36 sc
- R50: (4 sc, dec) x 6 (30)
- R51-52: 30 sc
- R53: (3 sc, dec) x 6 (24)
- R54-56: 24 sc
Fasten off, leaving a long tail for sewing. Stuff the body firmly.
The Head
We begin the head by crocheting the snout first.
- Start with 9 ch. Working into the 2nd ch from the hook:
- R1: 7 sc, 3 sc in the last ch, 6 sc, inc (18)
- R2: (2 sc, inc) x 6 (24)
- R3: (3 sc, inc) x 6 (30)
- R4: (4 sc, inc) x 6 (36)
- R5: (5 sc, inc) x 6 (42)
- R6: (6 sc, inc) x 6 (48)
- R7: (7 sc, inc) x 6 (54)
- R8: (8 sc, inc) x 6 (60)
- R9-13: 60 sc
- R14: (18 sc, dec) x 6 (57)
- R15-17: 57 sc
- R18: (17 sc, dec) x 6 (54)
- R19-20: 54 sc
- R21: (7 sc, dec) x 6 (48)
- R22: 48 sc
- R23: (6 sc, dec) x 6 (42)
- R24: 42 sc
- R25: (5 sc, dec) x 6 (36)
- R26-27: 36 sc
- R28: (5 sc, inc) x 6 (42)
- R29: (6 sc, inc) x 6 (48)
- R30-36: 48 sc
- R37: (6 sc, dec) x 6 (42)
- R38: 42 sc
- R39: (5 sc, dec) x 6 (36)
- R40: 36 sc
- R41: (4 sc, dec) x 6 (30)
- R42: (3 sc, dec) x 6 (24). Stuff the head firmly.
- R43: (2 sc, dec) x 6 (18)
- R44: (1 sc, dec) x 6 (12)
- R45: 6 dec (6)
Fasten off, leaving a long tail for sewing. Remember to place the safety eyes between rounds 29 and 30, approximately 4 sc apart.
Facial Details
The Spots
Make two spots using a light tan or beige color.
- R1: 6 sc in MR (6)
- R2: 6 inc (12)
- R3: (1 sc, inc) x 6 (18)
- R4: (1 sc, 1 hdc, inc, inc from the hdc, 1 hdc, 1 sc, 1 sl st) repeat to end of round.
The Nostrils
Make two nostrils using pink yarn.
- R1: 6 sc in MR (6)
- R2: 6 inc (12)
Sew these to the snout, approximately 10 sc apart.
Ears and Horns
The Ears (Make 2)
- R1: 6 sc in MR (6)
- R2: (1 sc, inc) x 3 (9)
- R3: (2 sc, inc) x 3 (12)
- R4: (3 sc, inc) x 3 (15)
- R5: (4 sc, inc) x 3 (18)
- R6: (5 sc, inc) x 3 (21)
- R7: (6 sc, inc) x 3 (24)
- R8: (7 sc, inc) x 3 (27)
- R9-11: 27 sc
- R12: (7 sc, dec) x 3 (24)
- R13-14: 24 sc
- R15: (6 sc, dec) x 3 (21)
- R16-17: 24 sc
- R18: (5 sc, dec) x 3 (18)
- R19-21: 18 sc
Fold the ears in half and work 9 sc through both layers. Fold again as shown in your reference photos, secure with a few stitches, and sew to the sides of the head between rounds 32 and 36.
The Horns (Make 2)
- R1: 4 sc in MR (4)
- R2: (1 sc, inc) x 2 (6)
- R3: 6 sc
- R4: (1 sc, inc) x 3 (9)
- R5-7: 9 sc
- R8: (2 sc, inc) x 3 (12)
- R9-11: 12 sc
Stuff the horns lightly and sew them to the top of the head, curving them slightly for a natural look.
The Hair
Using your textured or “eyelash” yarn:
- R1: 6 sc in MR (6)
- R2: 6 inc (12)
- R3: (1 sc, inc) x 6 (18)
- R4: (2 sc, inc) x 6 (24)
Sew this between the horns on the top of the head.
The Udder and Nipples
The Udder
- R1: 6 sc in MR (6)
- R2: 6 inc (12)
- R3: (1 sc, inc) x 6 (18)
- R4: (2 sc, inc) x 6 (24)
- R5: (3 sc, inc) x 6 (30)
- R6: (4 sc, inc) x 6 (36)
- R7: (5 sc, inc) x 6 (42)
- R8: (13 sc, inc) x 3 (45)
- R9-10: 45 sc
The Nipples (Make 4)
- R1: 6 sc in MR (6)
- R2: (1 sc, inc) x 3 (9)
- R3-4: 9 sc
Stuff the nipples lightly and sew them onto the udder as shown in the assembly guide. Stuff the udder and sew it to the body between rounds 12 and 28.
The Arms and Legs
For both the arms and legs, you can experiment with different colored stripes to give your cow personality!
The Arms (Make 2)
- R1: 6 sc in MR (6)
- R2: 6 inc (12)
- R3: (1 sc, inc) x 6 (18)
- R4: (2 sc, inc) x 6 (24)
- R5: (3 sc, inc) x 6 (30)
- R6: (9 sc, inc) x 3 (33)
- R7: 33 sc in back loops only (33)
- R8-9: 33 sc
- R10: (9 sc, dec) x 3 (30)
- R11: 30 sc
- R12: (3 sc, dec) x 6 (24)
- R13: 24 sc
- R14: (2 sc, dec) x 6 (18)
- R15-16: 18 sc
- R17: (4 sc, dec) x 3 (15)
- R18-49: 15 sc (32 rounds)
Stuff the arms and fold them in half, working 7 sc through both layers. Sew the arms to the sides of the body between rounds 50 and 51.
The Legs (Make 2)
- R1: 6 sc in MR (6)
- R2: 6 inc (12)
- R3: (1 sc, inc) x 6 (18)
- R4: (2 sc, inc) x 6 (24)
- R5: (3 sc, inc) x 6 (30)
- R6: (4 sc, inc) x 6 (36)
- R7: (11 sc, inc) x 3 (39)
- R8: 39 sc in back loops only (39)
- R9-10: 39 sc
- R11: (11 sc, dec) x 3 (36)
- R12: 36 sc
- R13: (4 sc, dec) x 6 (30)
- R14: 30 sc
- R15: (3 sc, dec) x 6 (24)
- R16: 24 sc
- R17: (6 sc, dec) x 3 (21)
- R18-19: 21 sc
- R20: (5 sc, dec) x 3 (18)
- R21-34: 18 sc (14 rounds)
Fold the legs in half and work 9 sc through both layers. Sew the legs to the bottom of the body.
The Tail
- R1: 6 sc in MR (6)
- R2: (1 sc, inc) x 3 (9)
- R3-20: 9 sc (18 rounds)
Fold the tail in half and work 4 sc through both layers. To create the tassel, cut 8 strands of yarn (about 4 inches each) and attach them to the end of the tail.
Finishing
Assembly is the most important part to ensure your cow looks its best! Start by sewing the head to the body. It is helpful to stuff the neck area extra firmly to provide stability. One of the decorative spots should be sewn around one of the eyes to give it that extra bit of character. Finally, attach the tail to the bottom of the body.
Tips for Success
- Tension is Key: When working amigurumi, try to keep your tension tight. This prevents the stuffing from peeking through the stitches.
- Use a Stitch Marker: Since most of these pieces are worked in a continuous spiral, it is very easy to lose your place. Always use a marker at the start of every round.
- Color Changes: When making the striped arms and legs, change colors mid-round. Use the last pull-through of the previous color to complete the stitch in the new color for a seamless transition.
- Eye Placement: Double-check your eye placement before you start stuffing the head. The spacing between the eyes defines the cow’s personality!