Adorable Crochet Reindeer Amigurumi Pattern: A Step-by-Step Tutorial
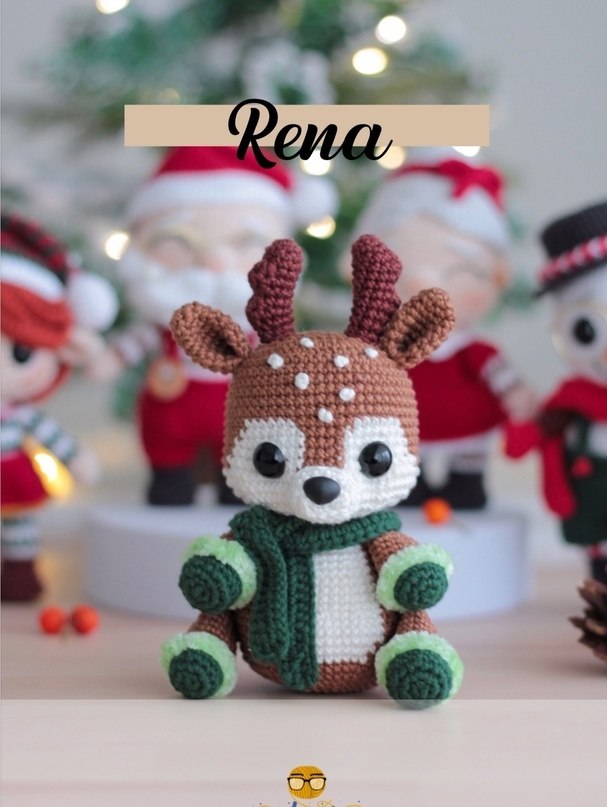
Welcome to the cozy world of holiday crafting! There is nothing quite like a handmade companion to bring the spirit of Christmas into your home. Today, we are going to create a darling little reindeer amigurumi. With his tiny antlers, a cozy green scarf, and a sweet expression, this little guy is perfect as a Christmas tree ornament, a stocking stuffer, or a heartwarming gift for a loved one.
This project is designed for intermediate crocheters, but if you know your basic stitches and how to read a pattern, you will find this a delightful challenge. Let’s grab our hooks and some warm brown yarn, and get started!
Materials & Abbreviations
To create your little reindeer, you will need the following materials. While the original design uses specific cotton and velvet yarns, feel free to use any brand in the suggested colors that works for you.
Materials Needed
- Crochet Hook: 2.0 mm (G/6 or similar)
- Yarn:
- Medium-weight cotton yarn in Brown, Chestnut, Off-White, and Dark Green.
- A small amount of plush/velvet yarn in Green (for the paw details).
- Safety Eyes: 12 mm
- Safety Nose: 1 cm (approx. 3/8 inch)
- Stuffing: High-quality polyester fiberfill
- Tools: Tapestry needle, stitch markers, pins, and a strong clear glue (like a gel super glue) for securing small details.
Abbreviations (US Terms)
- MR: Magic Ring
- sc: Single crochet
- inc: Increase (2 sc in one stitch)
- dec: Decrease (sc 2 together)
- hdc: Half double crochet
- sl st: Slip stitch
- BLO: Back loop only
- ch: Chain
- [ ]: Total stitch count at the end of the round
Step-by-Step Instructions
The Head
Start with brown yarn. We will be working in continuous rounds.
R1: 8 sc in MR [8]
R2: 8 inc [16]
R3: (1 sc, inc) x 8 [24]
R4: 1 sc, inc, (2 sc, inc) x 7, 1 sc [32]
R5: (3 sc, inc) x 8 [40]
R6: 2 sc, inc, (4 sc, inc) x 7, 2 sc [48]
R7: (5 sc, inc) x 8 [56]
R8-13: 56 sc (6 rounds total)
Now we will create the white face area by switching colors mid-round. When the pattern says “White,” change to off-white yarn; otherwise, continue with brown.
R14: 19 brown, 6 white, 6 brown, 6 white, 19 brown [56]
R15: 18 brown, 8 white, 4 brown, 8 white, 18 brown [56]
R16-17: 17 brown, 9 white, 4 brown, 9 white, 17 brown [56]
R18: (3 brown, inc) x 4, (3 white, inc) x 2, 2 brown, 1 brown, inc, 1 brown, 1 white, inc, (3 white, inc) x 2, (3 brown, inc) x 4 [70]
R19: 70 sc in white [70]
R20-21: 70 sc in white [70]
R22: (3 sc, dec) x 14 [56]
R23: 56 sc [56]
R24: 1 sc, dec, (2 sc, dec) x 13, 1 sc [42]
R25: 1 sc, dec (repeat across) [28]
R26: 1 sc, dec, (2 sc, dec) x 6, 1 sc [21]
R27: 1 sc, dec (repeat across) [14]
R28: 7 dec [7]
Fasten off and weave in the ends. Stuff the head firmly.
The Ears (Make 2)
Use brown yarn.
R1: 6 sc in MR [6]
R2: (1 sc, inc) x 3 [9]
R3: 9 sc [9]
R4: (2 sc, inc) x 3 [12]
R5: (3 sc, inc) x 3 [15]
R6: 2 sc, inc, (4 sc, inc) x 2, 2 sc [18]
R7-8: 18 sc [18]
Fold the piece in half and sc across the opening to flatten the ear. Leave a long tail for sewing.
The Muzzle
Use off-white yarn. Start with a chain of 5.
R1: 3 sc, 3 sc in the last chain, 2 sc, inc [10]
R2: inc, 2 sc, 3 inc, 2 sc, 2 inc [16]
R3-4: 16 sc [16]
Fasten off, leaving a tail for sewing. Insert the safety nose between rounds 2 and 3.
The Antlers (Make 2)
Use brown yarn.
R1: 6 sc in MR [6]
R2: (1 sc, inc) x 3 [9]
R3: 9 sc [9]
R4: 3 hdc in one stitch, 8 sc [11]
R5: 3 hdc, 8 sc [11]
R6: 2 dec, 8 sc [9]
R7: 3 hdc in one stitch, 8 sc [11]
R8: 3 hdc, 8 sc [11]
R9: 2 dec, 8 sc [9]
R10-11: 9 sc [9]
Fasten off and leave a tail for sewing.
The Body
Start with brown yarn.
R1: 8 sc in MR [8]
R2: 8 inc [16]
R3: (1 sc, inc) x 8 [24]
R4: 1 sc, inc, (2 sc, inc) x 7, 1 sc [32]
R5: (3 sc, inc) x 8 [40]
R6: 2 sc, inc, (4 sc, inc) x 7, 2 sc [48]
R7: (5 sc, inc) x 8 [56]
R8: 56 sc [56]
R9: 3 sc, inc, (6 sc, inc) x 7, 3 sc [64]
Now, introduce the off-white yarn for the belly area.
R10: 26 brown, 12 white, 26 brown [64]
R11: 25 brown, 14 white, 25 brown [64]
R12-14: 24 brown, 16 white, 24 brown [64]
R15: (4 sc, dec) x 4, (2 white, dec) x 4, (4 sc, dec) x 4 [52]
R16-20: 20 brown, 12 white, 20 brown [52]
R21: (3 sc, dec) x 4, (2 white, dec) x 3, (3 sc, dec) x 4 [41]
R22-23: 16 brown, 9 white, 16 brown [41]
R24: (2 sc, dec) x 4, (1 white, dec) x 3, (2 sc, dec) x 4 [31]
R25-26: 12 brown, 6 white, 12 brown [30]
Fasten off and stuff the body firmly.
Front Paws (Make 2)
Start with green yarn.
R1: 6 sc in MR [6]
R2: 6 inc [12]
R3: (3 sc, inc) x 3 [15]
R4-5: 15 sc [15]
R6: 15 sc in BLO [15]
Switch to brown yarn.
R7-13: 15 sc [15]
Lightly stuff. Fold the piece flat and sc across the bottom to close. To add the plush detail, use the green velvet yarn to work 15 slip stitches into the BLO of round 6.
Back Legs (Make 2)
Start with green yarn.
R1: 6 sc in MR [6]
R2: 6 inc [12]
R3: (1 sc, inc) x 6 [18]
R4-6: 18 sc [18]
R7: 18 sc in BLO [18]
Switch to brown yarn.
R8-14: 18 sc [18]
Lightly stuff. Fold flat and sc across the bottom to close. Use the green velvet yarn to work 18 slip stitches into the BLO of round 7.
The Scarf
Use green yarn. Chain 81. Work 2 rows of 80 sc. Fasten off.
Finishing & Assembly
Now comes the magic part: putting your reindeer together!
- Eyes: Place the safety eyes between rounds 17 and 18 of the head, spaced 8 sc apart.
- Muzzle: Sew the muzzle to the face between rounds 19 and 22.
- Ears: Sew the ears between rounds 7 and 8 of the head.
- Antlers: Attach the antlers between rounds 4 and 5 of the head.
- Body & Head: Sew the head securely to the body.
- Limbs: Sew the front paws between rounds 25 and 26 of the body. Sew the back legs between rounds 10 and 15 of the body.
- Details: Use a tapestry needle and white yarn to create small French knots on the reindeer’s forehead to represent spots.
- Accessories: Tie the green scarf around the neck for a festive finish!
Tips for a Perfect Reindeer
To ensure your amigurumi looks professional and holds its shape, keep these tips in mind:
- Tension is Key: Keep your stitches tight so that the stuffing doesn’t peek through. If you see gaps, try going down a hook size.
- Invisible Decreases: For a smoother look, use the “invisible decrease” method (working into the front loops only of the two stitches being decreased).
- Stuffing: Stuff your pieces firmly, but not so much that the fabric stretches and becomes distorted. Use a chopstick or a knitting needle to push stuffing into small areas like the antlers.
- Symmetry: Use pins to position the ears, eyes, and antlers before sewing. This ensures your reindeer isn’t leaning to one side!