Easy Crochet Halloween Ghost Amigurumi Pattern: Free Step-by-Step Tutorial
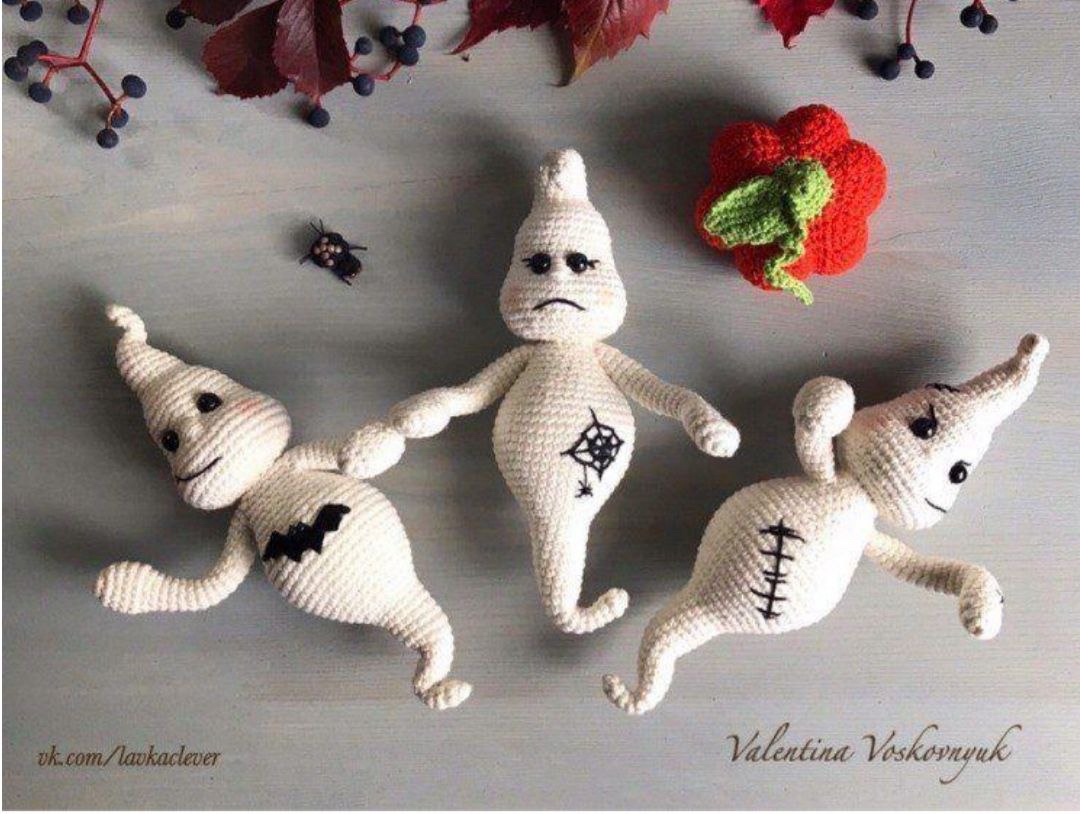
Get ready to add a charmingly spooky touch to your Halloween decor with this adorable crochet ghost amigurumi! Featuring a swirling ghostly tail, poseable wired arms, and playful stitched scar details, this plush ghost project is perfect for decorating mantels, Halloween tier trays, or gifting to fellow handmade lovers.
This project is written in standard US crochet terms and uses basic amigurumi techniques like the magic ring, single crochet increases, and decreases. Whether you are an adventurous beginner or an experienced crocheter looking for a quick seasonal make, this comprehensive tutorial will guide you through every step of the process.
Materials & Abbreviations
Supplies Needed
- Yarn: Sport weight or Fine (Category 2) cotton/acrylic blend yarn in Off-White or Cream (approx. 120 yards)
- Crochet Hook: Size 2.00 mm (US Steel Hook Size 0/1 or Size B-1)
- Safety Eyes: 8 mm (approx. 0.31 inches) black safety eyes or black half-beads
- Embroidery Floss: Black embroidery floss or black yarn tail for facial facial details and stitching
- Stuffing: Polyester fiberfill stuffing
- Wire: 16-gauge or 18-gauge flexible craft wire (approx. 10 inches for the tail/body and 8 inches for the arms)
- Tape: Electrical or insulating tape to secure wire ends
- Tools: Tapestry needle, scissors, wire cutters, and pliers
Crochet Abbreviations (US Terms)
- ch: chain
- sc: single crochet
- inc: increase (work 2 single crochets into the same stitch)
- dec: decrease (single crochet 2 stitches together)
- sl st: slip stitch
- st(s): stitch(es)
- rnd(s): round(s)
- MR: magic ring
- […]: total stitch count at the end of the round
- (…): repeat instructions inside the parentheses as indicated
Step-by-Step Instructions
Arms (Make 2)
The arms are worked from the hands up toward the shoulders in continuous rounds. Do not stuff the arms with fiberfill; the internal wire frame will keep their shape.
- Rnd 1: Work 6 sc into a MR [6]
- Rnd 2: Work 1 inc in each st around [12]
- Rnd 3: (3 sc, inc) repeat 3 times [15]
- Rnds 4–6: Sc in each st around (3 rounds total) [15]
- Rnd 7: (1 sc, dec) repeat 5 times [10]
- Rnds 8–22: Sc in each st around (15 rounds total) [10]
Fasten off and set both arms aside for joining later.
Tail and Body
The tail begins with a narrow point that gradually expands into the main torso. You will insert a supportive wire frame along the way to give the tail its signature whimsical curl.
- Rnd 1: Work 6 sc into a MR [6]
- Rnds 2–5: Sc in each st around (4 rounds total) [6]
- Rnd 6: (1 sc, inc) repeat 3 times [9]
- Rnds 7–8: Sc in each st around (2 rounds total) [9]
- Rnd 9: (2 sc, inc) repeat 3 times [12]
- Rnds 10–12: Sc in each st around (3 rounds total) [12]
- Rnd 13: (3 sc, inc) repeat 3 times [15]
- Rnds 14–15: Sc in each st around (2 rounds total) [15]
- Rnd 16: (4 sc, inc) repeat 3 times [18]
- Rnds 17–19: Sc in each st around (3 rounds total) [18]
Inserting the Tail Wire: Cut a piece of craft wire roughly 10 inches long. Bend both ends into tiny loops using pliers and cover the loops tightly with insulating tape to prevent sharp ends from poking through your yarn. Insert the wire down into the narrow tip of the tail. Lightly stuff around the wire with fiberfill stuffing, maintaining the flexible wire center.
- Rnd 20: (2 sc, inc) repeat 6 times [24]
- Rnd 21: Sc in each st around [24]
- Rnd 22: (3 sc, inc) repeat 6 times [30]
- Rnd 23: Sc in each st around [30]
- Rnd 24: (4 sc, inc) repeat 6 times [36]
- Rnd 25: Sc in each st around [36]
- Rnd 26: (5 sc, inc) repeat 6 times [42]
- Rnd 27: Sc in each st around [42]
- Rnd 28: (6 sc, inc) repeat 6 times [48]
- Rnds 29–32: Sc in each st around (4 rounds total) [48]
- Rnd 33: (6 sc, dec) repeat 6 times [42]
- Rnd 34: Sc in each st around [42]
- Rnd 35: (5 sc, dec) repeat 6 times [36]
- Rnd 36: Sc in each st around [36]
- Rnd 37: (4 sc, dec) repeat 6 times [30]
- Rnd 38: Sc in each st around [30]
- Rnd 39: (3 sc, dec) repeat 6 times [24]
Joining the Arms (Rnd 40): In this round, you will attach the arms directly to the body as you crochet.
- Rnd 40: Work 7 sc across the body. Next, place the inner edge of the 1st arm against the body and crochet 5 sc through both the arm layer and body layer simultaneously. Work 7 sc across the front of the body. Place the 2nd arm against the body and work 5 sc through both the arm layer and body layer [24].
Stuff the main body firmly with fiberfill. If you wish to make the arms poseable, cut an 8-inch length of craft wire, loop and tape both ends, and thread it horizontally through the chest opening into both arm sleeves before continuing.
- Rnd 41: Work 7 sc across the body, 5 sc around the outer unworked stitches of the 1st arm, 7 sc across the body, and 5 sc around the outer unworked stitches of the 2nd arm [24].
- Rnd 42: (2 sc, dec) repeat 6 times [18]
- Rnd 43: Sc in each st around, sl st in the last st [18]
Top off the body stuffing firmly. Fasten off, leaving a long tail (approx. 12 to 15 inches) for attaching the body to the head later.
Ghost Head
The head starts at the top point of the ghost’s hood, widening out before rounding out toward the neck.
- Rnd 1: Work 6 sc into a MR [6]
- Rnds 2–4: Sc in each st around (3 rounds total) [6]
- Rnd 5: (1 sc, inc) repeat 3 times [9]
- Rnd 6: Sc in each st around [9]
- Rnd 7: (2 sc, inc) repeat 3 times [12]
- Rnd 8: Sc in each st around [12]
- Rnd 9: (3 sc, inc) repeat 3 times [15]
- Rnds 10–11: Sc in each st around (2 rounds total) [15]
- Rnd 12: (4 sc, inc) repeat 3 times [18]
- Rnds 13–14: Sc in each st around (2 rounds total) [18]
- Rnd 15: (2 sc, inc) repeat 6 times [24]
- Rnd 16: (3 sc, inc) repeat 6 times [30]
- Rnds 17–22: Sc in each st around (6 rounds total) [30]
- Rnd 23: (4 sc, inc) repeat 6 times [36]
- Rnd 24: (5 sc, inc) repeat 6 times [42]
- Rnd 25: (6 sc, inc) repeat 6 times [48]
- Rnds 26–28: Sc in each st around (3 rounds total) [48]
Placing Safety Eyes: Insert your 8 mm safety eyes between Rounds 21 and 22, placing them approximately 3 to 5 single crochet stitches apart. Secure the safety backings on the inside of the fabric.
- Rnd 29: (6 sc, dec) repeat 6 times [42]
- Rnd 30: (5 sc, dec) repeat 6 times [36]
- Rnd 31: (4 sc, dec) repeat 6 times [30]
- Rnd 32: (3 sc, dec) repeat 6 times [24]
- Rnd 33: (2 sc, dec) repeat 6 times [18]
Stuff the head firmly with fiberfill stuffing, shaping the pointed top hood neatly.
- Rnd 34: (1 sc, dec) repeat 6 times [12]
- Rnd 35: Dec repeat 6 times [6]
Fasten off. Thread your yarn end through the front loops of the remaining 6 stitches using a tapestry needle, pull tight to close the bottom opening, and weave in the end.
Finishing
Facial Features & Decorative Stitching
Give your ghost personality using black embroidery floss or black yarn:
- Eyelashes & Brows: Embroider short, slanted lashes or subtle expressive eyebrows right alongside the outer corners of each eye.
- Mouth: Embroider a squiggly line or simple straight line across the face below the eyes to give your ghost a cute, spooky expression.
- Spooky Body Stitching: To create the signature patch or stitch scar on the lower belly, embroider a thick diagonal line across the right hip (about 1 inch long). Add 4 or 5 small perpendicular hatch marks across it to resemble cross-stitches.
Assembly
- Guide the protruding body wire up into the base of the head as you position the head over the neck opening (Rnd 43 of the body).
- Using the long yarn tail left on the body and a tapestry needle, whipstitch the open neck of the body securely to the underside of the head.
- Weave in all remaining yarn ends securely into the inside of the body.
- Gently bend the tail and arms into your desired floating pose!
Tips for Amigurumi Success
- Tension Control: Amigurumi requires tight, even tension so that the fiberfill stuffing does not show through your stitches. If your stitches look loose, try sizing down your crochet hook by 0.25 mm or 0.5 mm.
- Wire Safety: Wrapping the bent ends of your craft wire with electrical tape is essential! This ensures sharp metal tips won’t poke through your stitches or scratch anyone handling the finished plush.
- Stuffing Technique: Add small clumps of fiberfill gradually rather than large chunks. This prevents lumps and helps create a smooth, rounded shape for both the head and body.
- Optional Poseability: If you are making this toy for a young child, feel free to skip the internal wire frame completely and rely solely on polyester fiberfill for a softer, squishier plushie.