How to Crochet a Classic Jointed Teddy Bear: Free Amigurumi Pattern
Introduction
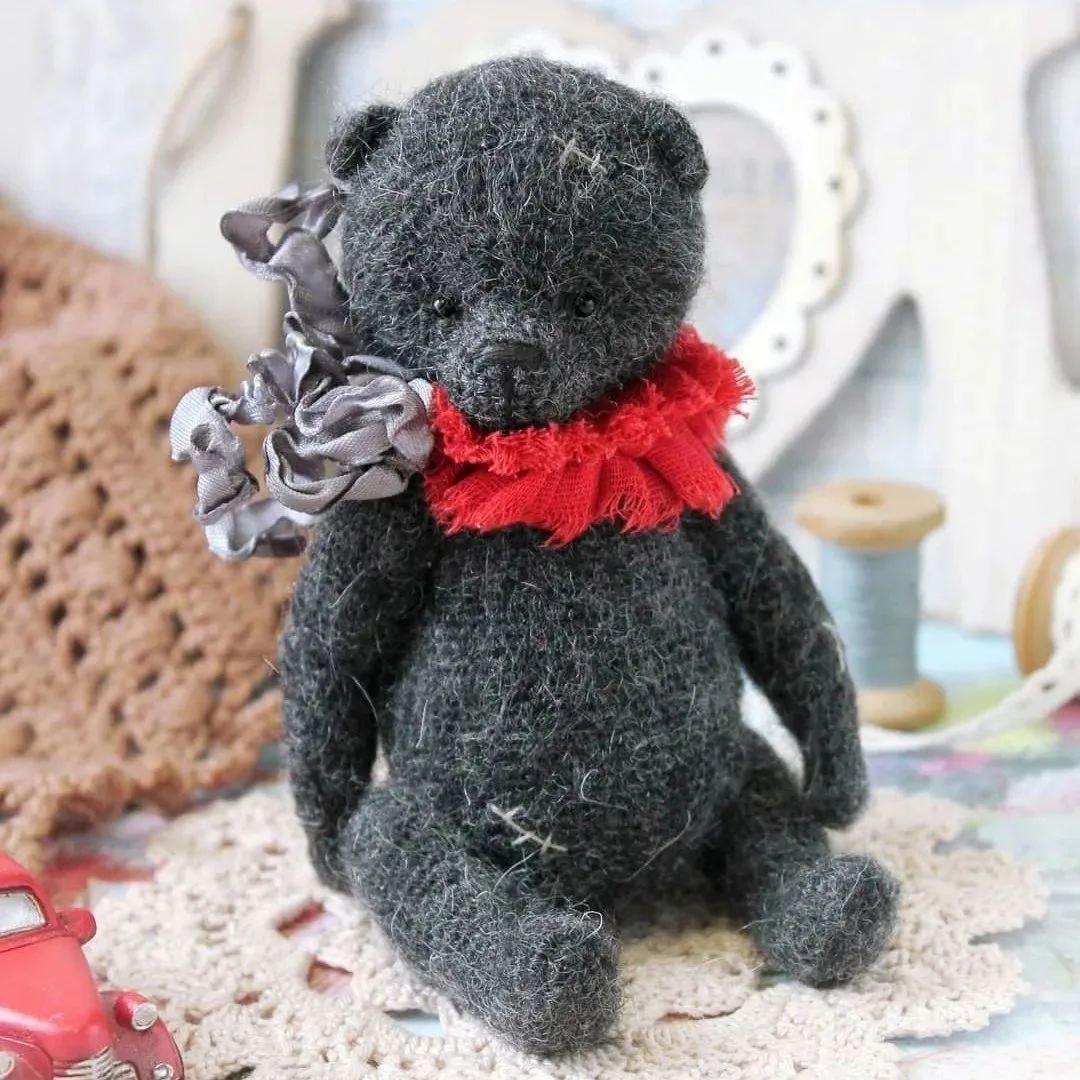
If you love the timeless charm of heirloom toys, this classic jointed teddy bear crochet pattern is for you! Featuring fully movable arms and legs, a beautifully sculpted muzzle, and an aged vintage look, this adorable amigurumi bear makes a heartwarming gift or keepsake. When completed using standard sport-weight yarn and a small hook, your finished bear will stand approximately 6.3 inches (16 cm) tall.
This project is suitable for intermediate crocheters or confident beginners who are ready to explore wire frames, disc joints, and needle sculpting. Grab your favorite textured yarn and hook, and let’s bring this sweet vintage teddy bear to life!
Materials & Abbreviations
Supplies Needed
- Yarn: Approx. 120–150 yards of Fine/Sport weight yarn (fuzzy wool blend or brushed acrylic works wonderfully for a vintage look)
- Crochet Hook: Size B-1 / 2.25 mm or C-2 / 2.75 mm
- Stuffing: Polyester fiberfill
- Joints: 4 wooden or plastic discs (0.7 inch / 18 mm) with 2 cotter pins or T-pins (alternatively, 0.7-inch plastic safety joints or buttons)
- Armature Wire: Craft wire or chenille wire (approx. 16 gauge) for posable limbs
- Tape: Electrical or medical tape to wrap wire ends safely
- Eyes: 4 mm or 5 mm glass eyes on wires or safety eyes
- Embroidery Floss: Dark brown or black for nose, mouth, and eyebrows
- Scarf / Collar: Strip of cotton fabric approx. 2 inches x 18 inches
- Tools: Tapestry needle, small pliers, stitch marker, embroidery needle, scissors
US Crochet Abbreviations
- ch: chain
- sc: single crochet
- inc: increase (2 single crochet in the same stitch)
- dec: decrease (single crochet 2 together)
- hdc: half double crochet
- sl st: slip stitch
- st(s): stitch(es)
- MR: magic ring
- rnd(s): round(s)
Step-by-Step Instructions
Lower Legs (Make 2)
Work in continuous rounds. Use a stitch marker to mark the beginning of each round.
- Rnd 1: Ch 7. Starting in 2nd ch from hook: 5 sc, 3 sc in last ch. Working down opposite side of chain: 4 sc, inc in last ch (14 sts).
- Rnd 2: Inc, 4 sc, 3 inc, 4 sc, 2 inc (20 sts).
- Rnd 3: 1 sc, inc, 4 sc, (1 sc, inc) 3 times, 4 sc, (1 sc, inc) 2 times (26 sts).
- Rnd 4: 26 sc around (26 sts).
- Rnd 5: 8 sc, 3 dec, 12 sc (23 sts).
- Rnd 6: 7 sc, 3 dec, 10 sc (20 sts).
- Rnd 7: 6 sc, 2 dec, 10 sc (18 sts).
- Rnd 8: 5 sc, 2 dec, 9 sc (16 sts).
- Rnds 9–12: 16 sc around (16 sts, 4 rounds).
- Rnd 13: 6 sc, inc, 9 sc (17 sts).
- Rnd 14: 7 sc, inc, 9 sc (18 sts).
- Rnd 15: 7 sc, inc, 10 sc (19 sts).
- Rnd 16: 19 sc around (19 sts).
- Rnd 17: 9 sc, inc, 9 sc (20 sts).
- Rnd 18: 20 sc around (20 sts).
- Rnd 19: 9 sc, inc, 10 sc (21 sts).
- Rnd 20: 10 sc, inc, 10 sc (22 sts).
- Rnd 21: 22 sc around (22 sts).
- Rnd 22: 11 sc, inc, 10 sc (23 sts).
- Rnd 23: 23 sc around (23 sts).
- Rnd 24: 12 sc, inc, 10 sc (24 sts).
- Rnds 25–28: 24 sc around (24 sts, 4 rounds).
Wire Frame & Joint Installation: Cut a piece of craft wire slightly longer than the leg. Bend the lower end into a small foot loop, wrap with tape, and insert into the leg. Stuff foot firmly. Insert a joint disc with a cotter pin placed about 2 to 3 rounds down from the top edge on the inside side of the hip.
- Rnd 29: (2 sc, dec) 6 times (18 sts).
- Rnd 30: 9 dec (9 sts).
- Rnd 31: Dec until closed. Fasten off and weave in end.
Arms (Make 2)
- Rnd 1: 6 sc in MR (6 sts).
- Rnd 2: Inc in each st around (12 sts).
- Rnds 3–5: 12 sc around (12 sts, 3 rounds).
- Rnd 6: 1 sc, 3 dec, 1 sc, 3 inc, 1 sc (12 sts).
- Rnd 7: 12 sc around (12 sts).
- Rnd 8: 1 sc, dec, 4 sc, 2 inc, 3 sc (13 sts).
- Rnd 9: 9 sc, inc, 3 sc (14 sts).
- Rnd 10: 14 sc around (14 sts).
- Rnd 11: 9 sc, inc, 4 sc (15 sts).
- Rnd 12: 10 sc, inc, 4 sc (16 sts).
- Rnd 13: 12 sc, inc, 3 sc (17 sts).
- Rnds 14–16: 17 sc around (17 sts, 3 rounds).
- Rnd 17: 12 sc, inc, 4 sc (18 sts).
- Rnd 18: 18 sc around (18 sts).
- Rnd 19: 9 sc, 9 hdc (18 sts).
- Rnd 20: 9 sl st, 9 sc (18 sts).
- Rnds 21–27: 18 sc around (18 sts, 7 rounds).
- Rnd 28: 6 sc, inc, 8 sc, inc, 2 sc (20 sts).
- Rnds 29–37: 20 sc around (20 sts, 9 rounds).
Arm Frame & Joint: Insert folded taped wire into the hand and forearm. Stuff paw firmly and upper arm lightly. Place a joint disc/pin approx. 2 rounds below top edge facing the inner arm.
- Rnd 38: (1 sc, dec) 6 times, 1 dec (13 sts).
- Rnd 39: 4 dec (9 sts). Fasten off, weave stem shut.
Head
- Rnd 1: 6 sc in MR (6 sts).
- Rnd 2: Inc in each st around (12 sts).
- Rnd 3: (1 sc, inc) 6 times (18 sts).
- Rnd 4: (2 sc, inc) 6 times (24 sts).
- Rnds 5–8: 24 sc around (24 sts, 4 rounds).
- Rnd 9: 12 inc, 12 sc (36 sts).
- Rnd 10: (2 sc, inc) 8 times, 12 sc (44 sts).
- Rnd 11: 44 sc around (44 sts).
- Rnd 12: 3 sc, 2 inc, 2 sc, dec, 6 sc, dec, 2 sc, 2 inc, 15 sc (48 sts).
- Rnd 13: 48 sc around (48 sts).
- Rnd 14: (7 sc, inc) 6 times (54 sts).
- Rnd 15: (8 sc, inc) 6 times (60 sts).
- Rnd 16: (9 sc, inc) 6 times (66 sts).
- Rnds 17–24: 66 sc around (66 sts, 8 rounds).
- Rnd 25: (9 sc, dec) 6 times (60 sts).
- Rnd 26: 3 sc, dec, (8 sc, dec) 5 times, 5 sc (54 sts).
- Rnd 27: (7 sc, dec) 6 times (48 sts).
- Rnd 28: 3 sc, dec, (6 sc, dec) 5 times, 3 sc (42 sts).
- Rnd 29: (5 sc, dec) 6 times (36 sts).
- Rnd 30: 2 sc, dec, (4 sc, dec) 5 times, 2 sc (30 sts).
Joint Note: Insert head joint disc at bottom center between rounds 16 and 17. Stuff head very firmly, shaping muzzle.
- Rnd 31: (3 sc, dec) 6 times (24 sts).
- Rnd 32: (2 sc, dec) 6 times (18 sts).
- Rnd 33: (1 sc, dec) 6 times (12 sts).
- Rnd 34: 6 dec (6 sts). Fasten off and cinch shut.
Ears (Make 2)
- Row 1: 6 sc in MR, ch 1, turn. Do not join into a circle.
- Row 2: (1 sc, inc) 3 times, ch 1, turn (9 sts).
- Row 3: 9 sc across.
Fasten off, leaving a long tail for sewing. Curve slightly and attach to head around Rnd 23.
Body
- Rnd 1: 6 sc in MR (6 sts).
- Rnd 2: Inc in each st around (12 sts).
- Rnd 3: (1 sc, inc) 6 times (18 sts).
- Rnd 4: (2 sc, inc) 6 times (24 sts).
- Rnd 5: (3 sc, inc) 6 times (30 sts).
- Rnd 6: (4 sc, inc) 6 times (36 sts).
- Rnds 7–9: 36 sc around (36 sts, 3 rounds).
Attach head cotter pin to top center of body round 1 and secure washer/pin inside.
- Rnd 10: (11 sc, inc) 3 times (39 sts).
- Rnd 11: 5 sc, inc, (13 sc, inc) 2 times, 5 sc (42 sts).
- Rnds 12–13: 42 sc around (42 sts).
- Rnd 14: (6 sc, inc) 6 times (48 sts).
- Rnds 15–20: 48 sc around (48 sts, 6 rounds).
Attach arms between rounds 13 and 14 on sides.
- Rnd 21: 9 sc, inc, 14 sc, inc, 13 sc, inc, 9 sc (51 sts).
- Rnd 22: 51 sc around (51 sts).
- Rnd 23: 10 sc, inc, 14 sc, inc, 15 sc, inc, 9 sc (54 sts).
- Rnd 24: 54 sc around (54 sts).
- Rnd 25: (8 sc, inc) 6 times (60 sts).
- Rnd 26: (9 sc, inc) 6 times (66 sts).
- Rnds 27–37: 66 sc around (66 sts, 11 rounds).
- Rnd 38: (9 sc, dec) 6 times (60 sts).
- Rnd 39: 60 sc around (60 sts).
- Rnd 40: (8 sc, dec) 6 times (54 sts).
Attach legs to sides near round 40.
- Rnd 41: 54 sc around (54 sts).
- Rnd 42: (7 sc, dec) 6 times (48 sts).
- Rnd 43: 48 sc around (48 sts).
- Rnd 44: (6 sc, dec) 6 times (42 sts).
- Rnd 45: 42 sc around (42 sts).
- Rnd 46: (5 sc, dec) 6 times (36 sts).
- Rnd 47: 2 sc, dec, (4 sc, dec) 5 times, 2 sc (30 sts).
- Rnd 48: (3 sc, dec) 6 times (24 sts).
- Rnd 49: (2 sc, dec) 6 times (18 sts).
Stuff body firmly, shaping a cute round tummy and lower back.
- Rnd 50: (1 sc, dec) 6 times (12 sts).
- Rnd 51: 6 dec (6 sts). Fasten off and pull opening tight.
Tail
- Rnd 1: Ch 4, starting in 2nd ch from hook: 2 sc, inc, working opposite side: 2 sc (6 sts).
- Rnds 2–5: 6 sc around (6 sts).
Flatten tail piece and sew onto lower back of body.
Finishing
Facial Sculpting & Expressions
- Needle Sculpting: Thread a long needle with matching yarn. Insert at neck base, bring up to inner eye corner, across to second eye corner, and back down to neck. Pull tightly to create indented eye sockets; knot securely.
- Eyes: Secure glass or safety eyes deep into eye sockets using glue or wiring through back of head.
- Nose & Mouth Embroidery: Embroider a triangular nose and vertical mouth line using dark embroidery floss. Add thin eyebrow lines above eyes.
- Shading (Optional): Apply a tiny touch of dry pastel or blush below eyes and inside ears for an aged vintage feel.
Vintage Scarf Collar
Tear a strip of 100% natural cotton fabric approximately 2 inches wide by 18 inches long, leaving raw frayed edges. For a vintage look, steep the fabric in warm brewed coffee for 10 minutes, rinse lightly, and let dry complete. Tie loosely around bear’s neck.
Tips for Success
- Stuffing Density: Stuff head and body very firmly so needle sculpting stays intact over time. Keep upper thigh/shoulder areas slightly lighter so joints turn smoothly.
- Wire Safety: Always fold wire tips into tight loops and tape thoroughly to prevent wire ends from poking through crochet stitches.
- Joint Placement: Test arm and leg positioning with pins before splitting cotter pin legs open inside body. Ensure bear sits evenly!