Cute Crochet Ghost & Halloween Decor Trio – Free Pattern
Introduction
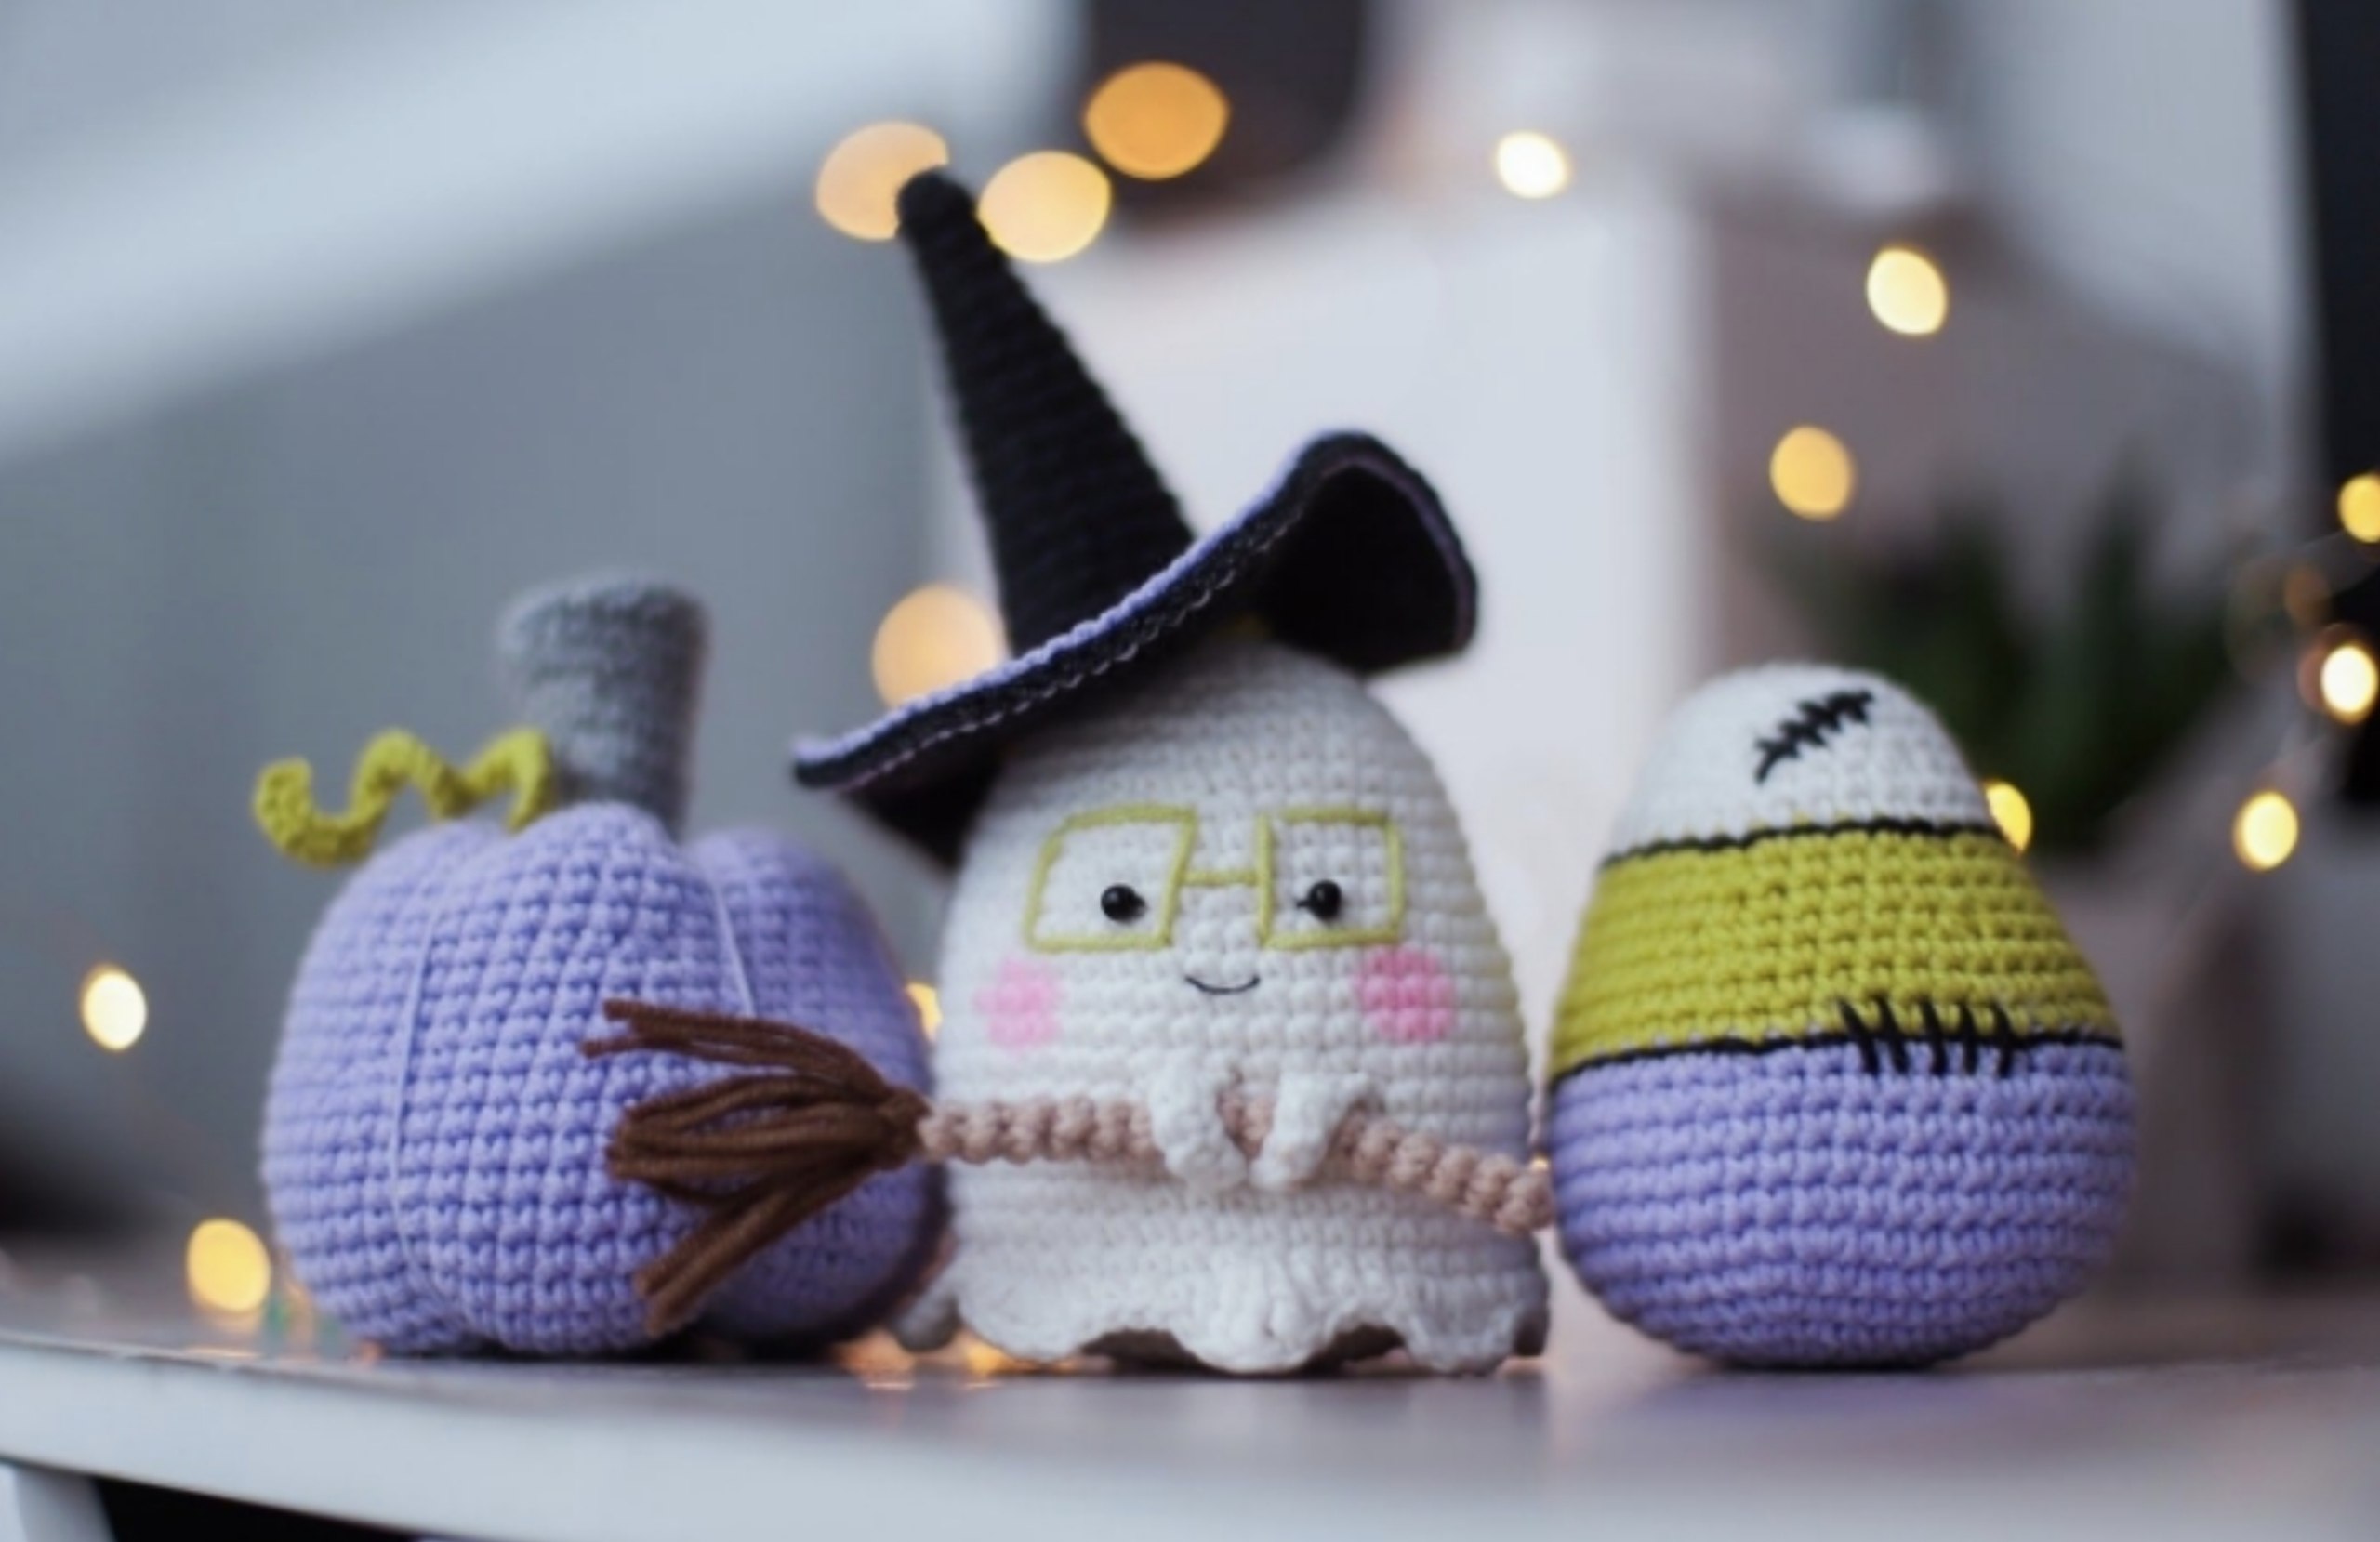
Get ready to add a charmingly spooky touch to your spooky season celebrations! This free Halloween crochet pattern set features three adorable amigurumi creations: a clever little ghost wearing specs and a witch hat, a plush purple pumpkin, and a festive striped Halloween candy corn treat. Whether you are crafting for your mantel, making a trick-or-treat gift, or stocking up for your autumn craft fair booth, this beginner-friendly tutorial provides step-by-step instructions for creating the ultimate spooktacular display.
This project is designed using simple stitches, basic shaping techniques, and colorful yarn accents. With a finished height of approximately 3.5 to 4 inches for each piece, these miniature items work up quickly and make fantastic stash-buster projects. Grab your hook, pick your favorite autumn yarn colors, and let’s get crafting!
Materials & Abbreviations
Supplies Needed
- Yarn: Sport weight (#2 Fine) or Light Worsted (#3) cotton-acrylic blend yarn in the following colors:
- White (Ghost main body, Candy top)
- Black (Hat body, mouth embroidery, stitch details)
- Purple / Violet (Pumpkin, Candy base, Hat rim)
- Lime / Bright Green (Hat band, Candy middle, Vine stem)
- Tan / Beige (Broomstick stem)
- Brown / Grey (Pumpkin stem)
- Bright Yellow or Light Green Embroidery Thread (Ghost glasses)
- Crochet Hook: Size B-1 (2.0 mm) or size needed to obtain tight stitches
- Safety Eyes or Beads: Two 2 mm to 3 mm black beads or safety eyes
- Stuffing: Polyester fiberfill stuffing
- Notions: Tapestry needle, sharp yarn needle, scissors, stitch markers
Crochet Terms & Abbreviations (US Terms)
- MR: Magic Ring
- ch: Chain
- sc: Single Crochet
- dc: Double Crochet
- tr: Treble (Triple) Crochet
- inc: Increase (2 single crochet in the same stitch)
- dec: Decrease (Single crochet 2 stitches together)
- sl st: Slip Stitch
- BLO: Back Loop Only
- st(s): Stitch(es)
- rnd(s): Round(s)
Step-by-Step Instructions
Part 1: The Wise Little Ghost
Ghost Base Plate (White Yarn)
We begin by creating an oval flat base to help the ghost stand upright.
- Rnd 1: Ch 6. Starting in the 2nd ch from hook, work 3 sc in the first ch, sc in the next 3 ch. Rotate to work down the opposite side of the chain: work 3 sc in the last ch, sc in the next 3 ch [12 sts].
- Rnd 2: (3 inc, 3 sc) repeat 2 times [18 sts].
- Rnd 3: (inc, 1 sc) 3 times, 3 sc, (inc, 1 sc) 3 times, 3 sc [24 sts].
- Rnd 4: 1 sc, (inc, 2 sc) 3 times, 3 sc, (inc, 2 sc) 3 times, 2 sc [30 sts].
- Rnd 5: 1 sc, (inc, 3 sc) 3 times, 3 sc, (inc, 3 sc) 3 times, 2 sc [36 sts].
- Rnd 6: 2 sc, (inc, 4 sc) 3 times, 3 sc, (inc, 4 sc) 3 times, 1 sc [42 sts].
- Rnd 7: 1 sc, (inc, 5 sc) 3 times, 3 sc, (inc, 5 sc) 3 times, 2 sc [48 sts]. Work 10 additional shift stitches to align the round start along the side. Fasten off.
Ghost Main Body (White Yarn)
- Rnd 1: 6 sc into a MR [6 sts].
- Rnd 2: (inc) repeat 6 times [12 sts].
- Rnd 3: (inc, 1 sc) repeat 6 times [18 sts].
- Rnd 4: 1 sc, inc, (2 sc, inc) repeat 5 times, 1 sc [24 sts].
- Rnd 5: (3 sc, inc) repeat 6 times [30 sts].
- Rnd 6: Sc around [30 sts].
- Rnd 7: (4 sc, inc) repeat 6 times [36 sts].
- Rnd 8–9: Sc around [36 sts for 2 rnds].
- Rnd 10: (5 sc, inc) repeat 6 times [42 sts].
- Rnd 11–12: Sc around [42 sts for 2 rnds].
- Rnd 13: (6 sc, inc) repeat 6 times [48 sts].
- Rnd 14–23: Sc around [48 sts for 10 rnds]. Do not cut the yarn!
Joining Body to Base & Edging
Place the base plate against the bottom opening of the body. Insert your hook through both the body stitch and the back loop only (BLO) of the base plate stitch, working single crochets through both layers all the way around [48 sts]. Stuff the ghost firmly with fiberfill before closing the last few stitches.
Ruffle Skirt: Along the outer edge, work the following pattern around: (3 sc, 1 dc, 3 tr in the next st, 1 dc) repeat 8 times to form 8 shell ruffles. Sl st to close, fasten off, and hide the thread end.
Ghost Arms (Make 2)
Using White yarn, ch 7. Starting in the 2nd ch from hook, work 6 sc back along the chain. Fasten off, leaving a long tail for sewing.
Witch Hat
- Rnd 1: In Black yarn, 6 sc in MR [6 sts].
- Rnd 2: Sc around [6 sts].
- Rnd 3: 5 sc, inc [7 sts].
- Rnd 4: 6 sc, inc [8 sts].
- Rnd 5: 7 sc, inc [9 sts].
- Rnd 6: 8 sc, inc [10 sts].
- Rnd 7: 9 sc, inc [11 sts].
- Rnd 8: 10 sc, inc [12 sts].
- Rnd 9: 11 sc, inc [13 sts].
- Rnd 10: 12 sc, inc [14 sts].
- Rnd 11: 13 sc, inc [15 sts].
- Rnd 12: 14 sc, inc [16 sts].
- Rnd 13: 15 sc, inc [17 sts].
- Rnd 14: 16 sc, inc [18 sts].
- Rnd 15: 17 sc, inc [19 sts].
- Rnd 16: Switch to Green yarn: 18 sc, inc [20 sts].
- Rnd 17: Switch back to Black yarn: 19 sc, inc [21 sts].
- Rnd 18 (Brim): (inc) in each stitch around [42 sts].
- Rnd 19: (inc, 1 sc) repeat 21 times [63 sts].
- Rnd 20–21: Sc around [63 sts for 2 rnds].
- Rnd 22: (inc, 2 sc) repeat 21 times [84 sts].
- Rnd 23: Switch to Purple yarn: sl st in each of the 84 sts around. Fasten off and weave in ends.
Witch’s Broom
Handle: Using Tan/Beige yarn, work 4 sc into a MR [4 sts]. Work 4 sc in each rnd from Rnd 2 through Rnd 18 (17 total rounds of 4 sc). Fasten off.
Bristles: Cut several 2-inch strands of tan yarn. Loop them through the bottom of the handle, fold downward, bind around the top with a thread wrap to form a broom bundle, and trim evenly.
Part 2: Purple Halloween Pumpkin
Pumpkin Body
- Rnd 1: In Purple yarn, 6 sc in MR [6 sts].
- Rnd 2: (inc) repeat 6 times [12 sts].
- Rnd 3: (inc, 1 sc) repeat 6 times [18 sts].
- Rnd 4: 1 sc, inc, (2 sc, inc) repeat 5 times, 1 sc [24 sts].
- Rnd 5: (3 sc, inc) repeat 6 times [30 sts].
- Rnd 6: 2 sc, inc, (4 sc, inc) repeat 5 times, 2 sc [36 sts].
- Rnd 7: (5 sc, inc) repeat 6 times [42 sts].
- Rnd 8: 3 sc, inc, (6 sc, inc) repeat 5 times, 3 sc [48 sts].
- Rnd 9: (7 sc, inc) repeat 6 times [54 sts].
- Rnd 10–16: Sc around [54 sts for 7 rnds].
- Rnd 17: (7 sc, dec) repeat 6 times [48 sts].
- Rnd 18–20: Sc around [48 sts for 3 rnds].
- Rnd 21: (6 sc, dec) repeat 6 times [42 sts].
- Rnd 22–24: Sc around [42 sts for 3 rnds].
- Rnd 25: (5 sc, dec) repeat 6 times [36 sts].
- Rnd 26: (4 sc, dec) repeat 6 times [30 sts].
- Rnd 27: (3 sc, dec) repeat 6 times [24 sts]. Stuff firmly.
- Rnd 28: (2 sc, dec) repeat 6 times [18 sts].
- Rnd 29: (1 sc, dec) repeat 6 times [12 sts].
- Rnd 30: (dec) repeat 6 times [6 sts]. Fasten off, leaving a very long tail (approx. 20 inches) for creating pumpkin segments.
Pumpkin Stem
- Rnd 1: In Brown yarn, 6 sc in MR [6 sts].
- Rnd 2: (inc) repeat 6 times [12 sts].
- Rnd 3: (inc, 1 sc) repeat 6 times [18 sts].
- Rnd 4: Working in BLO, 18 sc [18 sts].
- Rnd 5–6: Sc around [18 sts for 2 rnds].
- Rnd 7: dec, 16 sc [17 sts].
- Rnd 8: dec, 15 sc [16 sts].
- Rnd 9: dec, 14 sc [15 sts].
- Rnd 10: dec, 13 sc [14 sts].
- Rnd 11: dec, 12 sc [13 sts].
- Rnd 12: dec, 11 sc [12 sts].
- Rnd 13: dec, 10 sc [11 sts].
- Rnd 14: dec, 9 sc [10 sts]. Fasten off, leaving yarn for sewing.
Green Tendril / Vine
Using Green yarn, ch 25. Starting in the 2nd ch from hook, work 2 sl st in each ch stitch across [48 sts]. The strand will naturally curl into a spiraled vine. Fasten off with a sewing tail.
Part 3: Halloween Striped Candy
- Rnd 1: In Purple yarn, ch 6. Starting in 2nd ch from hook, 3 sc in 1st ch, 3 sc, rotate to opposite side: 3 sc in last ch, 3 sc [12 sts].
- Rnd 2: (3 inc, 3 sc) repeat 2 times [18 sts].
- Rnd 3: (inc, 1 sc) 3 times, 3 sc, (inc, 1 sc) 3 times, 3 sc [24 sts].
- Rnd 4: 1 sc, (inc, 2 sc) 3 times, 3 sc, (inc, 2 sc) 3 times, 2 sc [30 sts].
- Rnd 5: 1 sc, (inc, 3 sc) 3 times, 3 sc, (inc, 3 sc) 3 times, 2 sc [36 sts].
- Rnd 6: 2 sc, (inc, 4 sc) 3 times, 3 sc, (inc, 4 sc) 3 times, 1 sc [42 sts].
- Rnd 7: 1 sc, (inc, 5 sc) 3 times, 3 sc, (inc, 5 sc) 3 times, 2 sc [48 sts]. Work 12 additional shift stitches so the round start shifts cleanly to the side edge.
- Rnd 8–11: Sc around [48 sts for 4 rnds].
- Rnd 12: (6 sc, dec) repeat 6 times [42 sts].
- Rnd 13: Switch to Green yarn: 42 sc around [42 sts].
- Rnd 14–15: Sc around [42 sts for 2 rnds].
- Rnd 16: (5 sc, dec) repeat 6 times [36 sts].
- Rnd 17–18: Sc around [36 sts for 2 rnds].
- Rnd 19: (4 sc, dec) repeat 6 times [30 sts].
- Rnd 20: Switch to White yarn: 30 sc around [30 sts].
- Rnd 21: (3 sc, dec) repeat 6 times [24 sts].
- Rnd 22–23: Sc around [24 sts for 2 rnds]. Stuff body firmly with fiberfill.
- Rnd 24: (2 sc, dec) repeat 6 times [18 sts].
- Rnd 25: (1 sc, dec) repeat 6 times [12 sts].
- Rnd 26: (dec) repeat 6 times [6 sts]. Fasten off and weave closed.
Finishing & Assembly
Ghost Assembly & Facial Details
- Glasses Embroidery: Using bright yellow or lime green thread, embroider square glasses onto the ghost’s face between Rnds 12 and 13. The bridge across the nose spans 2 to 3 stitches wide, while each square frame extends 4 stitches wide by 4 rounds tall.
- Eyes & Mouth: Stitch 2 mm black beads in the center of each lens frame (or stitch tiny black knots). Embroider a small black line for a sweet smile just below the bridge.
- Hat & Arms: Attach the arms on either side of Rnd 14. Sew the witch hat onto the top of the ghost’s head at a slight jaunty angle. Attach the broom handle securely under one of the arms.
Pumpkin Assembly
- Shaping Segments: Thread the long purple yarn end onto a tapestry needle. Bring the yarn up through the bottom center to the top center, pulling firmly to compress the pumpkin slightly. Wrap the yarn around the outer body wall and insert the needle back through the bottom to top. Repeat this process 6 times around the pumpkin at equal intervals to create six distinct, plump pumpkin ridges. Knot securely at the bottom.
- Stem & Tendril: Sew the stem to the top center over the center knot. Attach the curly green vine alongside the base of the stem.
Candy Finishing
Using black embroidery thread, make short vertical accent stitches across the color-change borders between the purple, green, and white stripes to give the candy a handmade “stitched” patch style.
Tips for Success
- Maintain Uniform Tension: Amigurumi requires tight single crochet stitches to prevent polyester fiberfill stuffing from peeking through. If your stitches look loose, drop down a hook size (e.g., to a 1.75 mm hook).
- Seamless Color Changes: When changing colors on the witch hat or striped candy, pull the new color through on the final yarn-over of the stitch preceding the join.
- Customize Your Set: Feel free to experiment with classic orange, soft pastel creams, or dark charcoal gray yarns to match your home decor aesthetic!