DIY Mini Knitted Penguin Pattern: A Cute Beginner-Friendly Tutorial
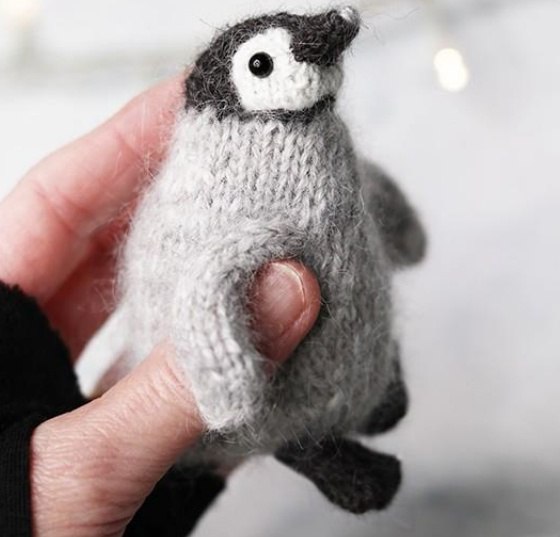
Looking for a quick and adorable project to brighten up your day? This mini knitted penguin is the perfect companion for your desk or a thoughtful handmade gift for a loved one. Measuring approximately 4 inches tall, this little bird is designed to be cozy, fluffy, and incredibly cute. Whether you are looking to practice your short-row shaping or just want a charming new addition to your amigurumi collection, this step-by-step guide will walk you through everything you need to know.
Materials & Abbreviations
To get that signature fluffy penguin look, we recommend using a blend of alpaca or wool. Using a combination of a standard yarn and a mohair creates a soft, realistic texture.
Yarn Requirements
- Yarn A (Black): 4-ply alpaca or wool yarn.
- Yarn B (Light Gray): 4-ply alpaca or wool yarn (Fine DK weight).
- Yarn C (Light Gray): Kid-mohair yarn. Tip: You can combine Yarn B and C together, or replace them with a single strand of Aran weight fluffy light gray yarn.
- Yarn D (White): 4-ply alpaca or wool yarn.
Tools & Notions
- Needles: 2.5 mm (US 0) needles for the beak and feet; 3.25 mm (US 3) needles for the head and body.
- Eyes: A pair of 6 mm or 7 mm black safety eyes (or black embroidery thread for a child-safe alternative).
- Stuffing: High-quality polyester fiberfill or yarn scraps.
- Extras: Yarn needle, scissors, and 12 colorful stitch markers to keep track of different body sections.
- Optional: A 6-inch piece of floral wire for the body and wings to make your penguin posable.
Abbreviations (US Terms)
- K: Knit
- P: Purl
- Inc: Increase
- Dec: Decrease
- K2tog: Knit 2 together (right-leaning decrease)
- P2tog: Purl 2 together
- KFB: Knit front and back (increase)
- PFB: Purl front and back (increase)
- M1: Make 1 (increase)
- SKP: Slip 1, knit 1, pass slipped stitch over (left-leaning decrease)
- W+TK (Wrap and Turn Knit): Bring the yarn to the back, slip the next stitch as if to knit, move the yarn to the front, return the slipped stitch to the left needle, and turn the work.
- W+TP (Wrap and Turn Purl): Leave the yarn in front, slip the next stitch as if to purl, move the yarn to the back, return the slipped stitch to the left needle, and turn the work.
Step-by-Step Instructions
The Beak
Using Yarn A and 2.5 mm needles, cast on 6 stitches.
- Row 1: Purl all stitches.
- Row 2: KFB, K4, KFB (8 sts).
- Row 3: P3, PFB twice, P3 (10 sts).
- Row 4: KFB, K to last st, KFB (12 sts).
- Row 5: Purl all stitches. Place stitch markers at the beginning and end of the row to mark the neck.
Switch to 3.25 mm needles for the following section.
The Head
- Row 6: K3, KFB, K4, KFB, K3 (14 sts).
- Row 7: Purl all stitches.
- Row 8: K2tog, K2, KFB, K4, KFB, K2, K2tog.
- Row 9: P2tog, P10, P2tog (12 sts).
- Row 10: K2tog, K1, KFB, K4, KFB, K1, K2tog.
- Row 11: P2tog, P to last 2 sts, P2tog (10 sts).
- Row 12: K2tog, K to last 2 sts, K2tog (8 sts).
- Row 13: P2tog, P to last 2 sts, P2tog (6 sts).
- Row 14: K2tog three times (3 sts).
Bind off the remaining 3 stitches using purl stitches. Place markers at the beginning and end of the bind-off edge to mark the back of the head.
The Body
Starting from the left neck marker using Yarn A and 3.25 mm needles, pick up and knit 7 stitches along the edge; pick up 3 stitches along the closed cast-off edge; and pick up 7 stitches from the right neck marker to the back of the head (17 sts total).
Cut Yarn A and join Yarn BC (the gray blend).
- Row 1: Cast on 4 chain stitches for the throat, Purl all 21 sts.
- Row 2: Cast on 4 chain stitches for the throat, Knit all 25 sts.
- Row 3: Purl all stitches.
- Row 4: K10, KFB, K3, KFB, K10 (27 sts).
- Row 5: Purl all stitches.
- Row 6: K10, KFB, K5, KFB, K10 (29 sts).
- Row 7: PFB, P to last st, PFB (31 sts).
- Row 8: K12, KFB, K5, KFB, K12 (33 sts).
- Row 9: PFB, P to last st, PFB (35 sts).
- Row 10: K5, place marker for left wing, K9, KFB, K5, KFB, K10, place marker for right wing, K4 (37 sts).
- Row 11: PFB, P to last st, PFB (39 sts).
Shaping the Back and Belly
To give the penguin its rounded shape, we use short rows. Work the following sequence:
- Short Row 1: K34, W+TK.
- Short Row 2: P29, W+TP.
- Short Row 3: K28, W+TK.
- Short Row 4: P27, W+TP.
- Short Row 5: K26, W+TK.
- Short Row 6: P25, W+TP.
- Short Row 7: K24, W+TK.
- Short Row 8: P23, W+TP.
- Short Row 9: K31 to the end of the row.
Work rows 12 and 14 in purl. For rows 13, 15, and 17, perform decreases (SKP and K2tog) as specified in the pattern to taper the body toward the tail. Finally, work the tail using short rows (W+TK/W+TP) to create a pointed shape before binding off the remaining stitches for the feet.
The White Face Patch
Using Yarn D and 2.5 mm needles, cast on 15 stitches. Work short rows on both sides to create an oval shape:
- Side 1: K5, W+TK; P5 to end; K4, W+TK; P4; K3, W+TK; P3.
- Row 2: Knit all 15 sts.
- Side 2: P5, W+TP; K5; P4, W+TP; K4; P3, W+TP; K3.
Bind off all 15 stitches in purl.
The Wings
Using Yarn BC and 3.25 mm needles, pick up 4 stitches from the side of the body at the wing marker. Work the wings by increasing to 10 stitches and then shaping the point using short rows (similar to the back shaping). Repeat for the second wing.
The Feet
Using Yarn A and 2.5 mm needles, cast on 10 stitches. Work a series of short rows, decreasing the number of active stitches by one every two rows until you reach 1 stitch. Bind off.
Finishing
Assembly
- Body: Fold the body in half with wrong sides together. Sew from the neck markers down to the bottom.
- Beak: Fold the beak in half and sew it to the head.
- Face: Stuff the head and body with fiberfill. Place the white patch on the face, centered under the beak, and sew it in place with small, invisible stitches.
- Eyes: Insert safety eyes into the white patch or embroider French knots with black thread.
- Wings: Fold the wings to align the cast-on edge with the body marker and sew along the back edge.
- Feet: Fold the feet in half, sew the edges, and attach them to the bottom of the body.
Tips for Success
- Taming the Fluff: If you are using mohair, it can be tricky to see your stitches. Use a bright-colored marker to clearly identify your short-row turns.
- Firm Stuffing: Ensure you stuff the head firmly, especially around the beak, to prevent the penguin from sagging.
- Wire Placement: If using wire for posability, make sure the ends are bent into small loops or capped so they don’t poke through the knit fabric.
- Seamless Sewing: Use a mattress stitch for the body and wings to ensure the seams are completely hidden.