How to Crochet a Fluffy Chicken Family: Free Amigurumi Rooster, Hen, and Chick Pattern
Looking for a delightful project to brighten up your home or create a unique gift? There is nothing quite as charming as a little farmyard family! In this tutorial, we will walk you through creating a complete fluffy flock, including a proud rooster, a sweet hen, and a tiny, adorable chick. Whether you are an experienced amigurumi artist or a beginner looking for a challenging but rewarding project, this guide is designed to help you every step of the way.
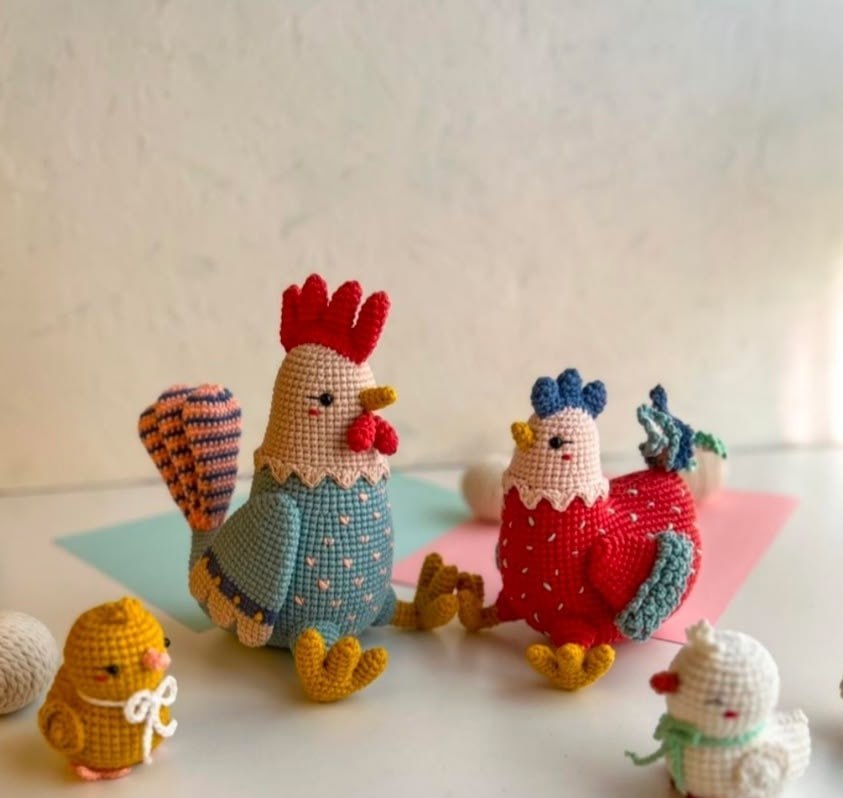
This set consists of three distinct characters: Theo the Rooster, Gilda the Hen, and Lio the Chick. Each has its own personality and color palette, making this a great way to use up your cotton yarn scraps. Let’s get hooking!
Materials & Abbreviations
To achieve the best results, we recommend using a DK weight cotton yarn. Cotton provides the necessary stitch definition and keeps the amigurumi from becoming too “fuzzy,” ensuring your chickens look polished and professional.
Supplies Needed
- Yarn: DK Cotton Yarn in the following colors: Beige, Blue, Light Blue, Salmon, Red, Yellow, Pink, Green, and White.
- Crochet Hook: 2.20 mm (or a size that prevents stuffing from showing through).
- Safety Eyes: 6 mm (2 pairs) and 4 mm (1 pair).
- Other Tools: Black cotton embroidery thread, yarn needle, polyester fiberfill stuffing, and scissors.
Abbreviations (US Terms)
- rnd: round
- mr: magic ring
- sc: single crochet
- ch: chain
- inc: increase (2 single crochet in the same stitch)
- dec: decrease (single crochet decrease)
- hdc: half double crochet
- dc: double crochet
- slst: slip stitch
- blo: back loops only
- flo: front loops only
- *: repeat instructions indicated by the number of times specified
Important Note: Do not join your rounds. Work in a continuous spiral unless the pattern specifically tells you otherwise. This prevents visible seams on your finished birds.
Step-by-Step Instructions
Theo the Rooster
Theo is the largest member of the flock, measuring approximately 7.5 to 8.3 inches tall. We will start with his body and head using light blue yarn.
Body and Head
Round 1: Ch 14. Insert hook in 2nd ch from hook; 12 sc. In the next stitch, work 3 sc. Do not turn your work; instead, crochet along the opposite side of the chain: 12 sc. (Total: 27 sc)
Round 2: 1 inc, 11 sc, 3 inc, 11 sc, 1 inc. (Total: 32 sc)
Round 3: 2 inc, 5 sc, 1 inc, 6 sc, 4 inc, 6 sc, 1 inc, 5 sc, 2 inc. (Total: 42 sc)
Round 4: 3 sc, 1 inc, (6 sc, 1 inc)*5, 3 sc. (Total: 48 sc)
Round 5: (7 sc, 1 inc)*6. (Total: 54 sc)
Round 6: 4 sc, 1 inc, (8 sc, 1 inc)*5, 4 sc. (Total: 60 sc)
Round 7: (9 sc, 1 inc)*6. (Total: 66 sc)
Round 8: 5 sc, 1 inc, (10 sc, 1 inc)*5, 5 sc. (Total: 72 sc)
Round 9: (11 sc, 1 inc)*6. (Total: 78 sc)
Round 10: 6 sc, 1 inc, (12 sc, 1 inc)*5, 6 sc. (Total: 84 sc)
Round 11: (13 sc, 1 inc)*6. (Total: 90 sc)
Rounds 12-22: 90 sc for 11 rounds.
Round 23: 32 sc, skip 22 sc, 36 sc. (Total: 68 sc)
Round 24: 68 sc.
Round 25: 31 sc, 1 dec, 35 sc. (Total: 67 sc)
Round 26: 30 sc, 1 dec, 35 sc. (Total: 66 sc)
Round 27: 10 sc, 1 dec, (20 sc, 1 dec)*2, 10 sc. (Total: 63 sc)
Round 28: 63 sc.
Round 29: (19 sc, 1 dec)*3. (Total: 60 sc)
Round 30: 60 sc.
Round 31: 9 sc, 1 dec, (18 sc, 1 dec)*2, 9 sc. (Total: 57 sc)
Round 32: 57 sc.
Round 33: (17 sc, 1 dec)*3. (Total: 54 sc)
Round 34: 54 sc. Begin stuffing the body firmly.
Round 35: 8 sc, 1 dec, (16 sc, 1 dec)*2, 8 sc. (Total: 51 sc)
Round 36: 51 sc. Change color to beige.
Round 37: (15 sc, 1 dec)*3. (Total: 48 sc)
Round 38: Work in BLO (back loops only): 48 sc.
Round 39: 48 sc.
Round 40: 11 sc, 1 dec, 22 sc, 1 dec, 11 sc. (Total: 46 sc)
Round 41: 46 sc.
Round 42: (21 sc, 1 dec)*2. (Total: 44 sc)
Round 43: 44 sc.
Round 44: 10 sc, 1 dec, 20 sc, 1 dec, 10 sc. (Total: 42 sc)
Rounds 45-49: 42 sc for 5 rounds.
Safety Eyes: Attach eyes between Rounds 48 and 49, with 12 stitches between them.
Round 50: 6 sc, 1 dec, (12 sc, 1 dec)*2, 6 sc. (Total: 39 sc)
Round 51: (11 sc, 1 dec)*3. (Total: 36 sc)
Round 52: 5 sc, 1 dec, (10 sc, 1 dec)*2, 5 sc. (Total: 33 sc)
Round 53: (9 sc, 1 dec)*3. (Total: 30 sc)
Round 54: (3 sc, 1 dec)*6. (Total: 24 sc)
Round 55: (2 sc, 1 dec)*6. (Total: 18 sc)
Round 56: (1 sc, 1 dec)*6. (Total: 12 sc)
Round 57: 6 dec. Fasten off and sew the hole closed.
Theo’s Legs (Make 2)
Use yellow yarn and stuff as you go.
Toe Piece: Rnd 1: 6 sc in mr. Rnd 2: (1 sc, 1 inc)*3. Rnd 3-5: 9 sc. Finish off. Make 3 of these toes per leg.
Joining Toes: Rnd 6: Join toes with sc. Work 4 sc on the second piece, 8 sc on the third piece, 4 sc on the second again, and 9 sc on the first. (Total: 27 sc). Continue following the leg shape and finishing with a red base as seen in the photos.
Theo’s Other Features
- Wings (Make 2): Use beige yarn. Start with 6 sc in mr, increase to 12, work 2 rounds of 12 sc. Join 3 of these pieces to create a wider wing.
- Beak: Use yellow yarn. 4 sc in mr, increase to 6, then 8. Work 2 rounds of 8 sc.
- Comb: Use red yarn. 6 sc in mr, increase to 9, work 4 rounds of 9 sc. Join 4 of these pieces together to create the crest.
- Tail (Make 3): Alternate salmon and blue yarn. Start with 8 sc in mr, increase to 16, then 24. Follow the decrease pattern to create a tapered feather shape.
Gilda the Hen
Gilda is slightly smaller than Theo, measuring approximately 5.5 to 6.3 inches. Her construction is very similar to the rooster but with different color placements.
Body and Head
Use red yarn. Follow the same oval start as Theo, but modify the rounds for a slightly smaller body. Change color to pink for the neck area. Use the BLO (back loops only) technique on the neck to create a base for the “fluffy” neck feathers.
Neck Feathers: Attach pink yarn to the BLO stitches of the neck. Work: [1 slst, 1 sc, (1 hdc, 2 dc, 1 hdc), 1 sc] * 12. Fasten off and sew these ruffles down.
Gilda’s Features
- Comb: Use blue yarn instead of red.
- Tail: Alternate pink and blue yarn for a feminine touch.
- Wings: Use red yarn.
Lio the Chick
Lio is the baby of the group, measuring about 2.8 to 3.5 inches. He is much simpler to create!
Body and Head
Use yellow yarn. Rnd 1: 8 sc in mr. Rnd 2: 16 sc. Rnd 3: (1 sc, 1 inc)*8. Rnd 4: (3 sc, 1 inc)*6. Rnd 5: 2 sc, 1 inc, (4 sc, 1 inc)*5, 2 sc. Rnd 6: (5 sc, 1 inc)*6. Rnd 7-12: 42 sc. Continue with decreases to shape the head and body, stuffing as you go.
Lio’s Details
- Legs: Use salmon yarn. Create a small base with three tiny toes using the chain-and-sc method.
- Hair: Ch 20 with yellow yarn. Attach it to the top of the head and weave it through the stitches to create a little tuft of hair.
- Ribbon: Ch 65 with white yarn to tie a cute bow around Lio’s neck.
Finishing & Assembly
Now that all your pieces are crocheted, it is time to bring your fluffy flock to life!
Assembly Order
- Beak: Sew the beak centrally between the eye rounds.
- Eyes: Ensure eyes are symmetrical before sewing any other features.
- Comb and Wattles: Sew the comb to the top of the head and the wattles just below the beak.
- Wings: Position the wings on the sides of the body. Sew only the top half of the wing to the body to allow the bottom to hang naturally.
- Legs: Sew the legs to the bottom of the body. For Theo and Gilda, ensure they are spaced wide enough for the bird to sit upright.
- Tail: Attach the tail feathers to the back of the body, fanning them out slightly.
Pro Tips for Amigurumi
- Tension is Key: Keep your stitches tight. If you see stuffing peeking through, try a smaller hook.
- Perfecting the Magic Ring: If you struggle with the magic ring, you can chain 2 and work your first round of stitches into the first chain.
- Invisible Decreases: For a smoother look, use the “invisible decrease” method (front loops only) instead of a standard sc decrease.
- Symmetry: Use sewing pins to mark exactly where the eyes, wings, and legs will go before you start sewing. This prevents your chickens from looking lopsided!