Spring Elf Crochet Pattern: Adorable Amigurumi Gnome Tutorial
Introduction
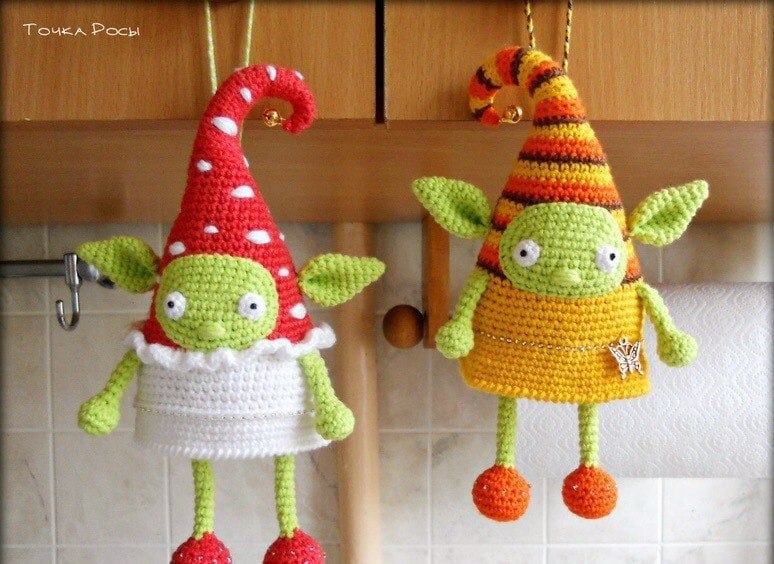
Bring a touch of whimsical magic into your handmade collection with this charming Spring Elf crochet pattern! This adorable little amigurumi gnome features a tall, curly striped pointy hat, oversized floppy elf ears, sweet beaded eyes, and a soft pillow-like body. Standing at approximately 7 to 8 inches tall, this project makes a delightful spring decoration, desk companion, or festive ornament for loved ones.
Whether you are looking to stash-bust colorful yarns or create a magical gift, this beginner-friendly tutorial guides you step-by-step through every round. We will cover how to construct the striped hat, shape the body, stitch tiny limbs, and assemble all the playful details. Grab your favorite hook and vibrant pastel yarns, and let us get crafting!
Materials & Abbreviations
Materials Needed
- Yarn: Sport weight or Fine (Category 2) cotton yarn. You will need Lime Green (for face, ears, arms, and legs) plus 3 contrasting colors for the striped hat and body (such as Light Purple, Bright Yellow, and Orange). Approx. 100–120 yards total.
- Crochet Hook: Size B-1 / C-2 (2.0 mm) steel hook.
- Stuffing: Polyester fiberfill stuffing.
- Beads & Embellishments: 2 small black seed beads (for eyes), 2 large heavy beads or glass marbles (optional, to weight the feet/hands), colorful accent seed beads, and a tiny jingle bell or decorative charm for the hat tip.
- Notions: Yarn needle, sewing needle, color-matched sewing thread, glass-head sewing pins, and scissors.
- Stuffing Tool: Wooden chopstick or narrow tool for stuffing tiny parts.
Crochet Abbreviations (US Terms)
- st / sts: stitch / stitches
- ch: chain
- sc: single crochet
- inc: increase (2 single crochet in the same stitch)
- dec: decrease (single crochet 2 stitches together)
- BLO: back loop only
- FLO: front loop only
- reverse sc: reverse single crochet (crab stitch)
- MR: magic ring
Step-by-Step Instructions
1. Hat and Upper Body
The hat and upper body are worked in one continuous piece from top to bottom. Leave a long 8 to 10-inch yarn tail when forming the initial magic ring. You will pull this tail outside of the hole; it will be used later to pull and curl the tip of the hat.
Striping Sequence: Alternate colors every 2 rounds if following the sample (Rnd 1: Orange, Rnds 2–3: Lavender, Rnds 4–5: Yellow, repeating every 6 rounds). Switch to your solid body color starting at Round 42.
Rnds 1–22 are worked in Back Loops Only (BLO):
- Rnd 1: 4 sc in MR (4 sts). (Pull initial yarn tail through the center hole to the outside.)
- Rnd 2: 4 sc in BLO (4 sts)
- Rnd 3: [1 sc, inc] 2 times in BLO (6 sts)
- Rnds 4–5: 6 sc in BLO (6 sts)
- Rnd 6: [2 sc, inc] 2 times in BLO (8 sts)
- Rnds 7–10: 8 sc in BLO (8 sts)
- Rnd 11: [3 sc, inc] 2 times in BLO (10 sts)
- Rnds 12–15: 10 sc in BLO (10 sts)
- Rnd 16: [4 sc, inc] 2 times in BLO (12 sts)
- Rnds 17–18: 12 sc in BLO (12 sts)
- Rnd 19: [5 sc, inc] 2 times in BLO (14 sts)
- Rnd 20: 14 sc in BLO (14 sts)
- Rnd 21: [6 sc, inc] 2 times in BLO (16 sts)
- Rnd 22: 16 sc in BLO (16 sts)
Rnds 23–55 are worked through BOTH loops as normal:
- Rnd 23: [7 sc, inc] 2 times (18 sts)
- Rnd 24: [8 sc, inc] 2 times (20 sts)
- Rnd 25: [9 sc, inc] 2 times (22 sts)
- Rnd 26: [10 sc, inc] 2 times (24 sts)
- Rnd 27: [11 sc, inc] 2 times (26 sts)
- Rnd 28: [12 sc, inc] 2 times (28 sts)
- Rnd 29: [13 sc, inc] 2 times (30 sts)
- Rnd 30: [14 sc, inc] 2 times (32 sts)
- Rnd 31: [15 sc, inc] 2 times (34 sts)
- Rnd 32: [16 sc, inc] 2 times (36 sts)
- Rnds 33–35: 36 sc (36 sts)
- Rnd 36: [5 sc, inc] 6 times (42 sts)
- Rnds 37–39: 42 sc (42 sts)
- Rnd 40: [6 sc, inc] 6 times (48 sts)
- Rnd 41: 48 sc (48 sts)
- (Hat section complete. Switch to solid body color.)
- Rnds 42–43: 48 sc (48 sts)
- Rnd 44: [7 sc, inc] 6 times (54 sts)
- Rnds 45–47: 54 sc (54 sts)
- Rnd 48: [8 sc, inc] 6 times (60 sts)
- Rnd 49: 60 sc in FRONT LOOPS ONLY (FLO). This creates a ridge for the belt. (60 sts)
- Rnds 50–52: Working through both loops as normal, 60 sc (60 sts)
- Rnd 53: [9 sc, inc] 6 times (66 sts)
- Rnd 54: 66 sc (66 sts)
- Rnd 55: Reverse sc (crab stitch) in all 66 sts to create a decorative ruffle trim along the lower skirt edge. Fasten off and weave in end.
2. Bottom of Body
Attach the body-colored yarn to the first unworked back loop of Round 48 inside the lower body skirt edge.
- Rnd 1: 60 sc in BLO of Rnd 48 (60 sts)
- Rnd 2: [8 sc, dec] 6 times (54 sts)
- Rnd 3: [7 sc, dec] 6 times (48 sts)
- Rnd 4: [6 sc, dec] 6 times (42 sts)
- Rnd 5: [5 sc, dec] 6 times (36 sts)
- Rnd 6: [4 sc, dec] 6 times (30 sts)
Stuff the main body and hat firmly with fiberfill. Press the body slightly flat so it takes on a soft, plump cushion shape rather than a perfectly round sphere.
- Rnd 7: [3 sc, dec] 6 times (24 sts)
- Rnd 8: [2 sc, dec] 6 times (18 sts)
- Rnd 9: [1 sc, dec] 6 times (12 sts)
Fasten off, leaving a long yarn tail. Thread the tail onto your yarn needle and sew the remaining opening closed flat in a straight line. Weave in the tail securely.
3. Feet and Legs (Make 2)
Start with your chosen foot color (e.g., Yellow):
- Rnd 1: 6 sc in MR (6 sts)
- Rnd 2: 6 inc (12 sts)
- Rnd 3: [1 sc, inc] 6 times (18 sts)
- Rnds 4–7: 18 sc (18 sts)
- Rnd 8: [1 sc, dec] 6 times (12 sts)
- Rnd 9: 6 dec (6 sts)
Insert fiberfill and an optional heavy glass bead/marble inside the rounded foot to give the leg weight so it hangs nicely. Switch to Lime Green yarn:
- Rnds 10–20 (11 rounds total): 6 sc (6 sts)
Do not stuff the leg tube. Press the top edge flat and single crochet across the top opening to seal it. Fasten off, leaving a tail for sewing.
4. Arms (Make 2)
Using Lime Green yarn:
- Rnd 1: 6 sc in MR (6 sts)
- Rnd 2: 6 inc (12 sts)
- Rnds 3–4: 12 sc (12 sts)
- Rnd 5: 6 dec (6 sts)
- Rnds 6–10: 6 sc (6 sts)
Stuff only the round bottom hand (or insert a small bead). Leave the narrow arm unstuffed. Pinch the top flat and sc across the opening. Fasten off, leaving a long sewing tail.
5. Elf Ears (Make 2)
Using Lime Green yarn (do not stuff):
- Rnd 1: 4 sc in MR (4 sts)
- Rnd 2: [1 sc, inc] 2 times (6 sts)
- Rnd 3: [2 sc, inc] 2 times (8 sts)
- Rnd 4: [3 sc, inc] 2 times (10 sts)
- Rnd 5: [4 sc, inc] 2 times (12 sts)
- Rnd 6: [5 sc, inc] 2 times (14 sts)
- Rnd 7: [6 sc, inc] 2 times (16 sts)
- Rnds 8–9: 16 sc (16 sts)
- Rnd 10: [6 sc, dec] 2 times (14 sts)
Fold flat and sc across the opening. Fold the piece in half lengthwise to create a realistic curved ear shape. Leave a very long tail—this yarn end will be used later to attach the ear and form a hanging braided cord!
6. Face Patch & Eyes
Face Patch
Using Lime Green yarn, work in an oval spiral around a central foundation chain:
- Rnd 1: Ch 8. Starting in 2nd ch from hook: inc in 1st ch, 5 sc, 3 sc in last ch. Turn to work along bottom loops of chain: 6 sc (16 sts total).
- Rnd 2: 1 sc, inc, 5 sc, inc, 1 sc, inc, 5 sc, inc (20 sts)
- Rnd 3: 2 sc, inc, 6 sc, inc, 2 sc, inc, 6 sc, inc (24 sts)
- Rnd 4: 3 sc, inc, 7 sc, inc, 3 sc, inc, 7 sc, inc (28 sts)
- Rnd 5: 4 sc, inc, 8 sc, inc, 4 sc, inc, 8 sc, inc (32 sts)
Fasten off, weaving in the working end.
White Eye Discs (Make 2)
Using White yarn: 6 sc in MR (6 sts). Fasten off. Stitch a black seed bead into the center of each white disc using black thread.
Nose Embroidery
Position the nose about 2 rows up from the bottom edge of the green face patch. Using Lime Green yarn, make repeated horizontal embroidery stitches over a width of 2 stitches until a cute, puffy nose bulb is formed.
Finishing
1. Curling the Hat Tip
Take the long yarn tail left at the very top of the hat (from Round 1). Thread it onto a yarn needle. Weave the needle downward through the ridge of front loops along one side of the hat down to approximately Round 20. Pull the tail firmly—the hat tip will naturally curl downward into a crook! Tie a firm knot at the base of the curl to secure the shape, then push the remaining tail inside the body.
2. Assembling the Face and Body
- Face: Place a very thin pad of fiberfill behind the oval face patch so it pops out slightly. Pin the face patch onto the front of the body so its lower edge rests 1 round below the hat brim color line. Sew into place securely using matching sewing thread.
- Eyes: Stitch the assembled eyes onto the face patch using sewing thread.
- Arms: Sew the arms directly underneath the hat brim line on the front sides of the body.
- Ears: Pin the folded ears to the sides of the head slightly above eye level and sew tightly into place.
- Legs: Sew the top flat edges of the legs to the center seam on the bottom of the elf’s body, spaced to line up vertically with the eyes.
3. Adding Embellishments
- Sew a shiny bell or accent bead to the pointed tip of the hat.
- Embroider accent seed beads along the front loop ridge (Round 49) to create a glowing belt. You can also sew tiny charms or colorful ribbon accents along the waistband.
- Stitch colorful beads onto the feet for extra detail.
4. Braided Hanging Loop (Optional)
Bring the long green yarn tails left over from both ears up through the center top of the hat, roughly 1 stitch apart. Add two accent-colored threads to each green strand to create two 3-strand bundles. Braid each bundle into a neat cord, knot the ends together, and trim the fringe to form a colorful hanging loop.
Tips for Success
- Gauge & Tension: Keep your single crochet stitches tight to prevent polyester fiberfill from showing through the gaps between stitches. Using a hook slightly smaller than recommended for your yarn weight works best for amigurumi.
- Flattened Silhouette: Unlike spherical amigurumi, this elf has a charming cushion-like shape. When stuffing the lower body, gently squeeze it into an oval pillow profile before sewing the base closed.
- Yarn Customization: Experiment with pastel greens, pinks, and yellow-gold shades for a spring theme, or switch to red, emerald green, and white yarns to create a festive Christmas gnome variant!