How to Crochet a Funny Patrick Star Plush: Free Amigurumi Pattern
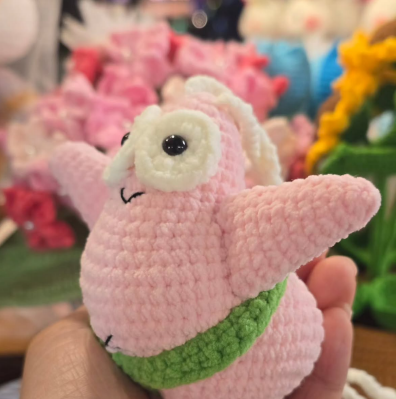
Looking for a project that brings a bit of humor and a lot of cuteness to your crochet hook? This “Sexy Patrick Star” amigurumi pattern is the perfect blend of silly and sweet. Using a plush velvet yarn, you can create a soft, squishy version of everyone’s favorite starfish, complete with his iconic green bikini. Whether you are making this as a gag gift or a fun addition to your plushie collection, this tutorial will guide you through every stitch.
This pattern is designed for those who love amigurumi and want a project that is relatively quick but results in a high-impact, funny piece of art. Let’s dive into the materials and get started!
Materials & Abbreviations
To get that signature “squishy” look seen in the photos, I highly recommend using a chunky velvet or chenille yarn. This makes the finished plushie incredibly soft and hides the stitches for a smoother finish.
Materials Needed:
- Yarn: Super bulky velvet yarn in Pink (main body), Green (bikini), and White (eyes).
- Hook: A crochet hook size suitable for your yarn (typically 4.0mm to 5.0mm for velvet yarn).
- Eyes: Two black safety eyes (approx. 10mm-12mm).
- Stuffing: High-quality polyester fiberfill.
- Tools: Tapestry needle, stitch markers, and scissors.
- Embroidery Thread: Black thread for the mouth and small details.
Abbreviations (US Terms):
- sc: Single crochet
- inc: Increase (2 sc in one stitch)
- dec: Decrease (sc 2 together)
- hdc: Half double crochet
- dc: Double crochet
- tr: Triple crochet
- 3sc: 3 single crochets in the same stitch
- dec3: Decrease 3 stitches into 1
- ch: Chain
- st: Stitch
Step-by-Step Instructions
The Body (Pink Yarn)
The body is worked in continuous rounds. Do not join the rounds unless specified. Use a stitch marker to keep track of the first stitch of each round.
- R1: 6 sc in a magic ring (6)
- R2: 6 inc (12)
- R3: 3 sc, 3(sc, inc), 3 sc (18)
- R4: 3 sc, 3(sc, inc, sc), 3 sc (15)
- R5: 18 sc (18)
- R6: 3 sc, 3(3 sc, inc), 3 sc (18)
- R7: 3 sc, 3(2 sc, inc, 2 sc), 3 sc (21)
- R8: 24 sc (24)
- R9: 3 sc, 3(5 sc, inc), 3 sc (24)
- R10: 27 sc (27)
- R11: 3 sc, 3(3 sc, inc, 3 sc), 3 sc (27)
- R12: 2(sc, inc, sc), 18 sc, 2(sc, inc, sc) (30)
- R13: 2(3 sc, inc), 18 sc, 2(3 sc, inc) (34)
- R14: 2(sc, inc, sc), 9 sc, 4(sc, inc), 9 sc, 2(sc, inc, sc) (38)
- R15: 3sc, inc, 3(sc, inc), 12 sc, 2(sc, inc, sc), 12 sc, 3(inc, sc), inc, 3sc (52)
- R16: 4 sc, 6 inc, 40 sc, 6 inc, 4 sc (72)
- R17: 6 sc, 2(2 sc, inc, 2 sc), 40 sc, 2(2 sc, inc, 2 sc), 6 sc (72)
- R18: 37 sc, (2 sc, hdc) in same st, (hdc, 2 sc) in same st, 37 sc
- R19: 24 sc, dec, sc, dec, 8 sc, dec3, dec3, 8 sc, dec, sc, dec, 24 sc
- R20: 3(2 sc, dec, 2 sc), 36 sc, 3(2 sc, dec, 2 sc)
- R21: 29 sc, dec, 4 sc, dec, 29 sc
- R22: 5 sc, 7 dec, 5 sc, 4(2 sc, dec), 5 sc, 7 dec, 5 sc
- R23: 15 sc, 4(2 sc, dec), 15 sc
- R24: 2 sc, 4(sc, dec), 14 sc, 4(dec, sc), 2 sc
The Legs (Worked into Body)
Unlike traditional amigurumi, the legs are worked directly into the body. Chain 3, count 17 stitches across the body, insert hook, chain 1, turn, and work as follows:
Left Leg:
- R25-26: 20 sc
- R27: sc, 4(dec, sc), 7 sc
- R28: 4(dec, sc), 4 sc
- R29: 6 dec
- Fill with fiberfill.
Right Leg:
- R25-26: 20 sc
- R27: 7 sc, 4(sc, dec), sc
- R28: 5 sc, 3(dec, sc), dec
- R29: 6 dec
The Arms (Make 2 – Pink Yarn)
- R1: 4 sc in magic ring (4)
- R2: 4 inc (8)
- R3: 2(3 sc, inc) (12)
- R4: 10 sc (10)
- R5: 2(4 sc, inc) (12)
- R6: 12 sc (12)
- R7: 2(5 sc, inc) (14)
- R8: 14 sc (14)
- R9: 2(6 sc, inc) (16)
- R10: 16 sc (16)
The Eyes (Make 2 – White Yarn)
- R1: 6 sc in magic ring (6)
- R2: inc, (dc, inc), 2 inc, (dc, inc), inc (12)
The Bikini (Green Yarn)
- R1: Chain 35, 35 sc (35)
- R2: 5 sc, 3 hdc, 7 sc, 2 hdc, (dc, tr, dc), 2 hdc, 7 sc, 3 hdc, 5 sc
- Finishing: Chain 20 and sew it to the triple crochet (tr) stitch to create the bikini tie.
Finishing & Assembly
Now that all your pieces are complete, it is time to bring Patrick to life!
- Eyes: Insert the safety eyes into the white eye circles. Sew the white circles onto the top of the body, positioned slightly wide apart for that classic Patrick look.
- Arms: Sew the arms to the sides of the body, slightly angled upward to give him a “posing” look.
- Bikini: Wrap the green bikini strip around the mid-section of the body. Sew it securely in place and tie the 20-chain string into a small bow or knot at the back.
- Face: Using black embroidery thread, sew a small “V” shape for the mouth. Add a tiny stitch for the navel just above the bikini line.
- Stuffing: Ensure the body is stuffed firmly, especially in the rear section to maintain the shape created in Round 18.
Tips for Success
- Working with Velvet Yarn: Velvet yarn can be slippery and the stitches are harder to see. Using a stitch marker is non-negotiable for this pattern!
- Tension: Keep your tension slightly tight. If the stuffing is peeking through, try a smaller hook.
- The “Sexy” Shape: In Round 18, the specific placement of the hdc (half double crochet) in the same stitch is what creates the rounded protrusion of the backside. Pay close attention to this round to get the anatomy right.
- Customizing: Feel free to change the bikini color! A bright red or blue bikini can give Patrick a completely different vibe.