Adorable Sleeping Duckling Crochet Pattern: A Step-by-Step Tutorial
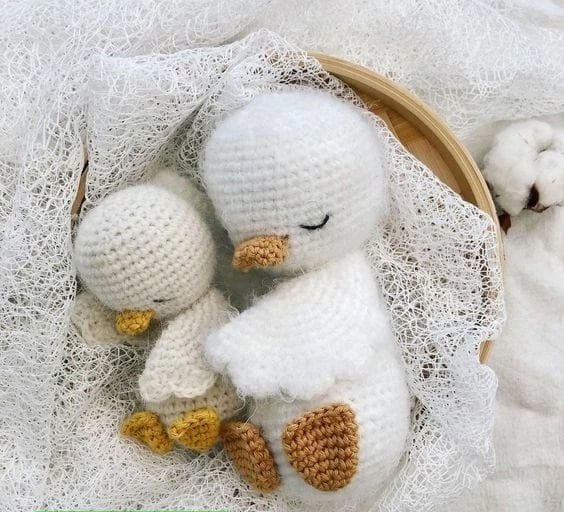
If you are looking for a project that is equal parts cute and cozy, this Sleeping Duckling is the perfect addition to your crochet queue. This little amigurumi friend is designed to look like he is drifting off to sleep, making him a wonderful gift for a nursery, a sweet companion for a child, or a charming addition to a collection of handmade animals.
The magic of this pattern lies in its texture and its unique posture. By using a fuzzy yarn and a clever stitch technique at the neck, we create a duckling that looks naturally sleepy. Whether you are an experienced crocheter or a beginner looking for a manageable project, this detailed guide will walk you through every stitch.
Materials & Abbreviations
To get the best results, I recommend using a yarn with a slight halo or fuzziness to give the duckling that soft, downy look. While the original design suggests angora, you can use any soft mohair blend or a high-quality baby acrylic that has a similar fluffy texture.
Supplies You Will Need:
- Main Yarn: One skein of white or cream fuzzy yarn (such as a mohair blend or soft angora).
- Accent Yarn: A small amount of yellow cotton yarn for the beak and feet.
- Embroidery Thread: A small length of black thread for the sleeping eyes.
- Crochet Hook: 2.5 mm (or a size that works well with your chosen yarn to ensure the stuffing doesn’t show).
- Stuffing: Polyester fiberfill or a similar stuffing material.
- Tools: Yarn needle, scissors, and stitch markers.
- Optional: A clean pet slicker brush (for adding extra fluff).
Abbreviations (US Terms):
- MR: Magic Ring
- ch: Chain
- sc: Single Crochet
- inc: Increase (two single crochets in one stitch)
- dec: Decrease (invisible decrease is recommended)
- sl st: Slip Stitch
- dc: Double Crochet
- BLO: Back Loop Only
- FLO: Front Loop Only
Pattern Note: This project is worked in continuous spiral rounds. Do not join your rounds with a slip stitch unless specifically instructed. I highly recommend using a stitch marker in the first stitch of every round to keep track of your progress.
Step-by-Step Instructions
The Body and Neck
We will begin by crocheting the body and neck as one continuous piece. This ensures a seamless look and makes the assembly much easier.
- Round 1: 6 sc in MR (6)
- Round 2: 6 inc (12)
- Round 3: (1 sc, 1 inc) repeat 6 times (18)
- Round 4: 1 sc, 1 inc, (2 sc, 1 inc) repeat 5 times, 1 sc (24)
- Round 5: (3 sc, 1 inc) repeat 6 times (30)
- Rounds 6-10: 30 sc (30) — Work 5 rounds total.
- Round 11: 6 sc, (1 dec, 1 sc) repeat 6 times, 6 sc (24)
- Rounds 12-13: 24 sc (24) — Work 2 rounds total.
- Round 14: 3 sc, (1 dec, 1 sc) repeat 6 times, 3 sc (18). Stuff the body firmly here.
- Rounds 15-16: 18 sc (18) — Work 2 rounds total.
- Round 17: (1 sc, 1 dec) repeat 6 times (12)
- Round 18: 3 sc, 6 sc in BLO, 3 sc (12)
- Round 19: 12 sc (12)
Creating the Head Tilt
This is the most important part of the pattern! To give the duckling its signature “sleeping” look, we need to create a fold in the neck.
Round 20: Work one slip stitch (sl st) into every stitch of Round 19. Additionally, work one slip stitch into each of the 6 front loops (FLO) left over from Round 18. Keep your tension loose during this round so the head can move easily in the next step.
The Head
Now we will expand the work back out to create the rounded head of the duckling.
- Round 21: 12 inc (24)
- Round 22: (3 sc, 1 inc) repeat 6 times (30)
- Round 23: 2 sc, (1 inc, 4 sc) repeat 5 times, 1 inc, 2 sc (36)
- Rounds 24-31: 36 sc (36) — Work 8 rounds total.
- Round 32: (4 sc, 1 dec) repeat 6 times (30)
- Round 33: 30 sc (30)
- Round 34: (3 sc, 1 dec) repeat 6 times (24)
- Round 35: (2 sc, 1 dec) repeat 6 times (18). Stuff the head firmly.
- Round 36: (1 sc, 1 dec) repeat 6 times (12)
- Round 37: 6 dec (6). Fasten off and weave in the end, closing the hole tightly.
The Wings (Make 2)
The wings are worked as a flat circle that is then folded to create a semi-circle shape.
- Round 1: 6 sc in MR (6)
- Round 2: 6 inc (12)
- Round 3: (1 sc, 1 inc) repeat 6 times (18)
- Round 4: 1 sc, 1 inc, (2 sc, 1 inc) repeat 5 times, 1 sc (24)
- Round 5: (3 sc, 1 inc) repeat 6 times (30)
Folding: Fold the circle exactly in half. Single crochet through both layers together for 15 stitches to close the side.
The Decorative Edge: Chain 2. Work 2 dc in the first stitch, skip 1 stitch, sl st in the next, skip 1 stitch. Then, (work 5 dc in one stitch, skip 1, sl st, skip 1) repeat 3 times. Finish with a sl st in the final stitch. Fasten off, leaving a long tail for sewing.
The Feet (Make 2)
Using yellow cotton yarn, create two small feet. Do not stuff these pieces.
- Round 1: 4 sc in MR (4)
- Round 2: (1 sc, 1 inc) repeat 2 times (6)
- Round 3: (1 sc, 1 inc) repeat 3 times (9)
- Rounds 4-5: 9 sc (9) — Work 2 rounds total.
Fold the foot in half and sc across the opening (4 stitches) to close it. Fasten off, leaving a long tail.
The Beak
Using yellow cotton yarn:
- Chain 4. Starting in the 2nd chain from the hook: 2 sc, 1 inc. Working along the other side of the foundation chain: 2 sc, 1 inc (8)
- (3 sc, 1 inc) repeat 2 times (10)
Fasten off, leaving a long tail for sewing.
Finishing & Assembly
Now it is time to bring your little duckling to life! Assembly is where the character of the toy really comes through.
1. The Face
Using your black embroidery thread, sew two small closed curves (like little rainbows) to represent sleeping eyes. Position these between rounds 24 and 25 of the head, approximately 6 stitches apart.
2. The Beak
Sew the yellow beak to the center of the face, positioning it between rounds 23 and 25.
3. The Wings
Sew the wings to the sides of the body, right at the base of the neck. Make sure they are symmetrical.
4. The Feet
Sew the feet to the bottom of the body between rounds 4 and 8. Space them about 3 or 4 stitches apart so the duckling can balance comfortably.
Tips for a Professional Finish
To make your Sleeping Duckling look truly boutique, try these final touches:
- The “Fluff” Factor: If your yarn isn’t fuzzy enough, you can use a clean pet slicker brush to gently brush the surface of the finished duckling. This will tease out the fibers and give it a soft, downy appearance.
- Tension Control: When working with mohair or angora, be mindful of your tension. These yarns can be fragile, so avoid pulling too tightly, especially during the neck transition.
- Invisible Decreases: To keep the stuffing from peeking through, always use the “invisible decrease” method (working into the front loops of the next two stitches).
- Customizing: While this pattern is for a white duckling, you can easily swap the main yarn for a soft yellow or grey to create different breeds of ducklings!
Your Sleeping Duckling is now complete! This little project is only about 4 inches tall, making it a quick and rewarding make. Happy crocheting!