Adorable Amigurumi Baby Koala Crochet Pattern: A Step-by-Step Tutorial
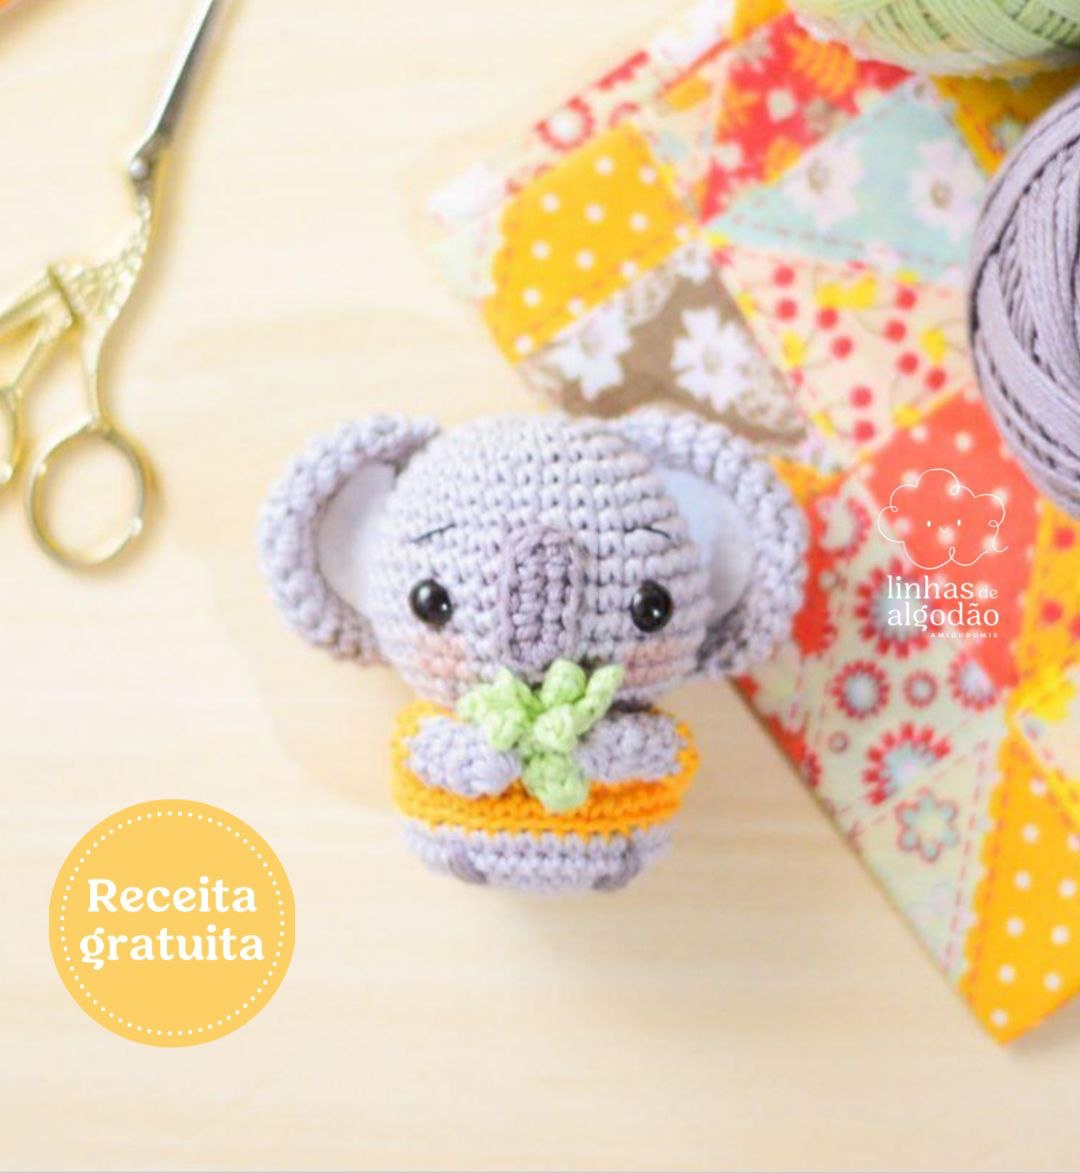
There is nothing quite as sweet as a baby animal, and this little Amigurumi Baby Koala is the perfect project for anyone looking to create a cuddly, handmade companion. Whether you are looking for a unique gift for a newborn or a charming addition to your own plushie collection, this koala is designed to be peaceful, cute, and cozy.
This pattern is beginner-friendly, though it does involve a few different techniques like color changes and joining pieces. If you have a basic understanding of how to crochet in the round, you are ready to dive in! Our finished koala stands approximately 4 inches tall, making it a wonderful “desk buddy” or a small toy for children.
Materials & Abbreviations
Before we start stitching, let’s gather all the supplies. Using the correct hook size is important for amigurumi to ensure the stuffing doesn’t peek through the stitches.
Supplies Needed
- Yarn: Sport weight yarn in the following colors:
- Light Beige (main body and head)
- Mustard Yellow (sweater)
- Gray (ears and scarf)
- Dark Brown (nose and eyes)
- Green (tiny leaf)
- Crochet Hook: 2.0 mm
- Stuffing: Polyester fiberfill
- Notions: Tapestry needle, scissors, stitch markers, and one small decorative button for the scarf.
US Crochet Terms & Abbreviations
- ch: chain
- sc: single crochet
- inc: increase (two single crochet stitches in one stitch)
- dec: decrease (single crochet two stitches together)
- slst: slip stitch
- hdc: half double crochet
- dc: double crochet
- BLO: back loop only
- MR: magic ring
- st(s): stitch(es)
- Rnd: round
Step-by-Step Instructions
The Legs and Body
The legs and body are worked as one continuous piece to minimize sewing later. We will start with the first leg, then the second, and then join them to create the torso.
First Leg (Light Beige)
- Rnd 1: Create a MR and work 7 sc into it (7)
- Rnd 2: Inc in every stitch around (14)
- Rnd 3: Sc in each stitch around (14)
- Rnd 4: 3 sc, 4 dec, 3 sc (10)
- Rnd 5 – 6: Sc in each stitch around (10)
Finish with a slip stitch and fasten off. Leave a small tail.
Second Leg (Light Beige)
Repeat the instructions for the first leg through Round 6. However, do not fasten off this time, as we will use this leg to join the two together.
Joining the Legs and Body
- Rnd 7: While still attached to the second leg, work 6 sc, chain 3, then join to the first leg and work 10 sc. Then, work 3 sc on the opposite side of the chain 3, and finish with 4 sc on the second leg (Total 26 sts).
- Rnd 8: 6 sc, 3 inc, 10 sc, 3 inc, 4 sc (32)
Color Change: Change to Mustard Yellow yarn with the final stitch of Round 8.
- Rnd 9 – 10: Sc in each stitch around (32)
- Rnd 11: (6 sc, 1 dec) repeat 4 times (28)
- Rnd 12: Sc in each stitch around (28)
- Rnd 13: (5 sc, 1 dec) repeat 4 times (24)
- Rnd 14: Sc in each stitch around (24)
- Rnd 15: (4 sc, 1 dec) repeat 4 times (20)
- Rnd 16: Sc in each stitch around (20)
- Rnd 17: (3 sc, 1 dec) repeat 4 times (16)
Color Change: Change back to Light Beige yarn.
- Rnd 18: Working in BLO, (2 sc, 1 dec) repeat 4 times (12)
Slst to join, fasten off, and leave a long tail for sewing to the head.
The Head (Light Beige)
- Rnd 1: 6 sc in MR (6)
- Rnd 2: Inc in every stitch around (12)
- Rnd 3: (1 sc, 1 inc) repeat 6 times (18)
- Rnd 4: (2 sc, 1 inc) repeat 6 times (24)
- Rnd 5: (3 sc, 1 inc) repeat 6 times (30)
- Rnd 6: (4 sc, 1 inc) repeat 6 times (36)
- Rnd 7: (5 sc, 1 inc) repeat 6 times (42)
- Rnd 8 – 13: Sc in each stitch around (42) (6 rounds total)
- Rnd 14: (5 sc, 1 dec) repeat 6 times (36)
- Rnd 15: (4 sc, 1 dec) repeat 6 times (30)
- Rnd 16: (3 sc, 1 dec) repeat 6 times (24)
- Rnd 17: (2 sc, 1 dec) repeat 6 times (18)
- Rnd 18: (1 sc, 1 dec) repeat 6 times (12)
Stuff the head firmly with fiberfill. Fasten off and secure the yarn.
The Arms (Make Two)
Start with Light Beige.
- Rnd 1: 6 sc in MR (6)
- Rnd 2: Inc in every stitch around (12)
- Rnd 3: Sc in each stitch around (12)
Color Change: Change to Mustard Yellow with the final stitch of Round 3.
- Rnd 4: (1 sc, 1 dec) repeat 4 times (8)
- Rnd 5 – 8: Sc in each stitch around (8)
Fasten off, leaving a long tail for sewing.
The Ears (Make Two)
Each ear consists of a front piece and a back piece that are joined together.
Front Piece (Gray): Ch 2, work 5 sc in the first chain. Ch 1, turn. Row 2: 1 sc, 3 inc, 1 sc. Ch 1, slst and fasten off.
Back Piece (Light Beige): Ch 2, work 5 sc in the first chain. Ch 1, turn. Row 2: 1 sc, 3 inc, 1 sc. Ch 1, turn. Now, place the gray front piece on top of this beige piece and crochet through both layers.
Joining Row: Work 1 dc, 6 hdc, 1 dc. Ch 2, slst and fasten off, leaving a long tail for sewing.
The Scarf (Gray)
Chain 25. Starting in the second chain from the hook, work 23 hdc. Ch 1, slst, and fasten off.
Finishing & Assembly
Now comes the fun part—bringing your baby koala to life! Use a tapestry needle and pins to position your pieces before sewing.
- Head to Body: Sew the head to the top of the body by stitching matching sc points together.
- Arms: Sew the arms to the body at Round 3, counting down from the neck.
- Ears: The top of the ear should align with Round 4 of the head. Pin them carefully to ensure they are symmetrical.
- The Nose: Using dark brown yarn, embroider a small nose. The nose should be located at Round 14 of the head (or Round 5 if counting from the body up). Make it approximately 3 stitches wide and 3 stitches high.
- The Eyes: Embroider the eyes at Round 11 of the head. The eyes should be about 4 stitches wide, with a 1-stitch gap between the nose and each eye.
- The Leaf: Attach green yarn to Round 3 of the head. Ch 6, sc in the second ch from hook, 1 sc, slst. Then, ch 4, sc in second ch from hook, 1 sc, and slst into the same chain as the first leaf. Work 2 slst into the next 2 stitches and fasten off.
- The Scarf: Wrap the gray scarf around the koala’s neck and sew a small button on the front to hold it in place.
Tips for Success
- Tension Control: If you see gaps in your work, try a smaller hook or tighten your tension. Amigurumi needs to be tight so the stuffing doesn’t leak out.
- Stitch Markers: Since we are working in continuous spirals, always use a stitch marker at the beginning of each round to avoid losing your count.
- Invisible Decrease: For a cleaner look, use the “invisible decrease” method (sc into the front loops only of the next two stitches, then finish the sc in the second loop).
- Symmetry: When sewing the eyes and ears, use pins! It is much easier to move a pin than it is to rip out several stitches of sewing.